Barcode & QR Code Scanner
A feature for quickly accessing participant records in clinical trials
My Role
The initial discovery workshop for this product was conducted by one of my design colleagues. I was solely responsible for all subsequent research and design for this specific feature.
What is IQVIA?
IQVIA is a leading global provider of advanced analytics, technology solutions, and clinical research services to the life sciences industry.
I was on the MedTech team, a startup-like venture within the organization that focused on advancing how patients and management teams interacted with clinical trials through the use of native mobile apps.
What is Capture?
Capture was a native iOS/iPadOS app that improved how study staff managed clinical trials and onboarded participants.
Product Kickoff
When our team approached a new product, we ran a week-long discovery workshop with end users.
This workshop was facilitated by a designer and attended by three end users, plus a variety of other product team members. It allowed us to better understand:
- who our users were
- how they work
- how they think
- what pain points they typically experience
Our findings during these sessions also helped us:
- assess product-market fit
- create a lean set of UX artifacts that we could reference
- identify specific problems to solve, which informed the feature roadmap
Context & Problem
Individuals interested in participating in a clinical study (also known as a clinical trial) must first complete a screening process to determine eligibility. Eligible candidates can then be enrolled. Screening visits and participation in the study have historically been conducted on site and in person at a clinic. It is worth noting that in recent years, and especially as a result of the COVID-19 pandemic, there has been an increased desire for hybrid and fully-virtual studies. This case study focuses on the in-person and hybrid scenarios.
Study participants are also referred to as “patients,” “volunteers,” and often, “subjects.” I use these terms interchangeably.
While participants may interact with a variety of staff on the study team, the Clinical Research Technician (CRT) is primarily responsible for participant engagement and data collection. The CRT is the core user of the Capture app.
A physical binder is maintained at the study site for every participant. It contains all study-related documents and information for that participant, and is used for the entire duration of the study.
During a study visit, data is captured both by hand (using pen and paper) and electronically (at workstations throughout the facility). Electronic data capture, in particular, is not a user-friendly experience. The online system in use today can be inefficient and difficult to understand and navigate. There is also no good way to consolidate paper-based data with electronically-captured data into a single system.
Target User & Persona
Clinical Research Technician (CRT)
Age & Education
- 24 to 46 years old
- Has a Bachelor's degree
- Completed the CRT training program
Motivations
I want to help run clinical studies so that patients can benefit from new, safe, and effective healthcare options.
I enjoy working with people and helping them feel comfortable.
Skills
- General computer proficiency and data entry
- Written and verbal communication
- Organization and attention to detail
- Teamwork
- Bedside manner
- Able to capture basic health measurements (e.g. height, weight, blood pressure, ECG)
Responsibilities
- Coordinate study visits
- Capture participant data and complete tasks according to the study protocol in a timely manner
- Monitor the safety of participants
- Work seamlessly with the study team
- Share data and updates with the Site Coordinator
- Adhere to regulatory and data privacy requirements
Wants to
- Easily capture all data electronically
- Minimize or eliminate errors
- Avoid stress when processes are inefficient and there are a lot of participants scheduled
- Not have to worry about the technology, and instead focus on participant interactions
Pain Points
The current processes for capturing data are too inefficient, time consuming, and can lead to errors. I often have to convert written notes and results into a digital format after the fact in order to store them in a database. It's all very tedious.
Goals
Product Goals
To deliver a native mobile application that fully digitizes and modernizes the participant management and data capture experience in a clinical study.
- Easy to navigate between studies and participants
- Easy to capture data without error
- Adhere to strict security and data privacy standards
- Fast and reliable
This app would integrate into a larger ecosystem of products that address every major facet of the clinical study experience.
Feature Goals
To provide a quick and easy way to navigate to a study participant's digital file, particularly during in-person study visits.
To set the foundation for an extensible barcode/QR code scanning feature that will have additional applications, including the ability to record barcode values in digital forms.
Project Scope
Basic Feature Requirements
- Barcode and QR code support
- Dark mode appearance ("dark room vibe")
- Immersive feeling (e.g., maybe place content over video feed)
- Manual entry fail-safe so the user can still find the intended subject if there is an issue with scanning
- Only barcodes fully within the bounds of the viewfinder should be scanned
Design Considerations
- Errors:
- What can go wrong?
- How do I communicate error (and success) states?
- Permissions: Camera access/entitlement
- Orientation: Implications of portrait vs. landscape screen orientation?
- Timing: Scanning should feel natural, responsive, and intentional
- Forgiving: Easy way to "reset" if the user scans the wrong barcode
- Verification: How many layers of verification are needed, if any?
- Entry points: How should this feature be accessed?
User Flows
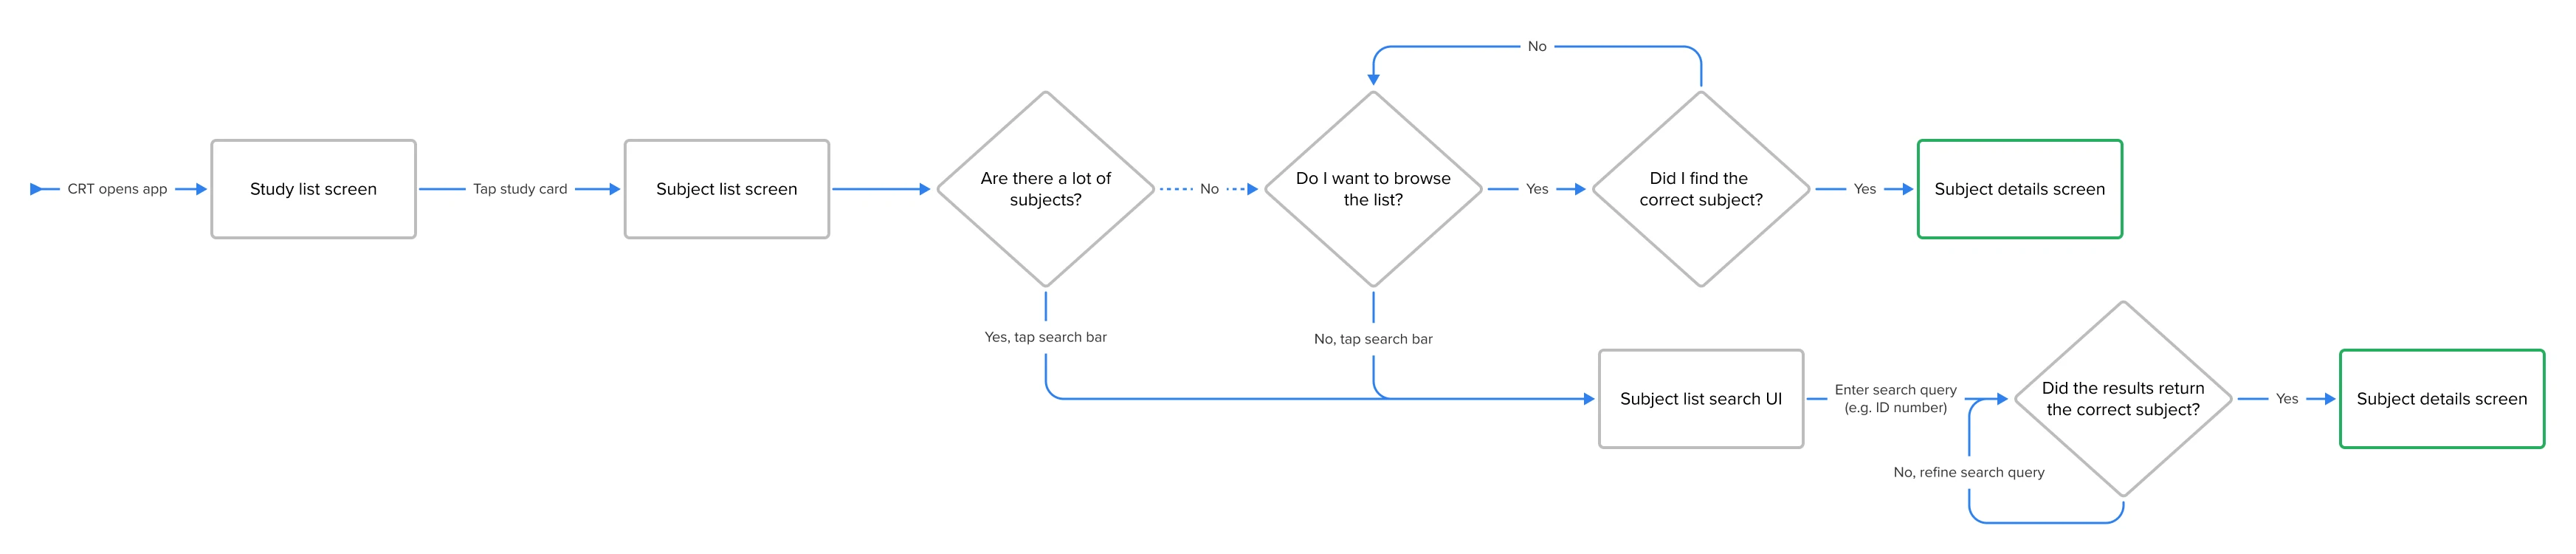
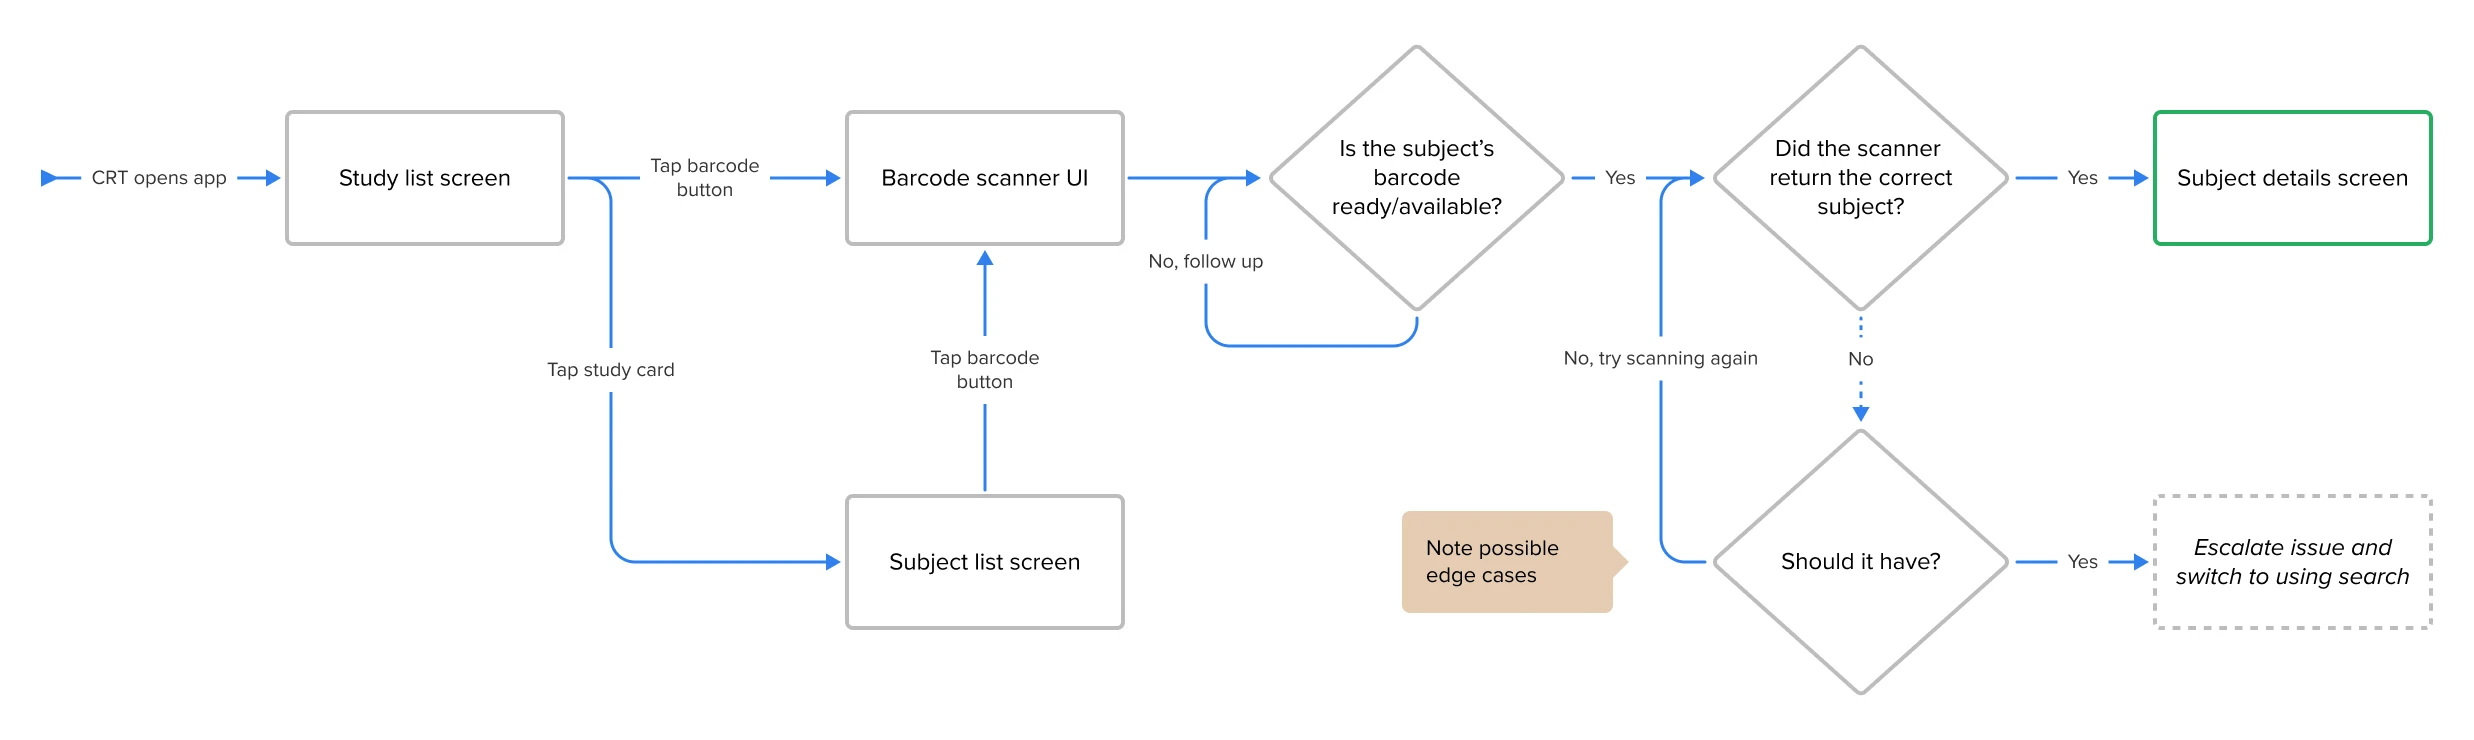
I wanted to better understand how the user would incorporate this feature into their workflow. I chose to create a flow chart of a possible future-state experience to help me think through the necessary steps and possible gaps. I also mapped the existing experience for comparison.
Search or Browse to Access
Scan Barcode/QR code to Access
Ideation
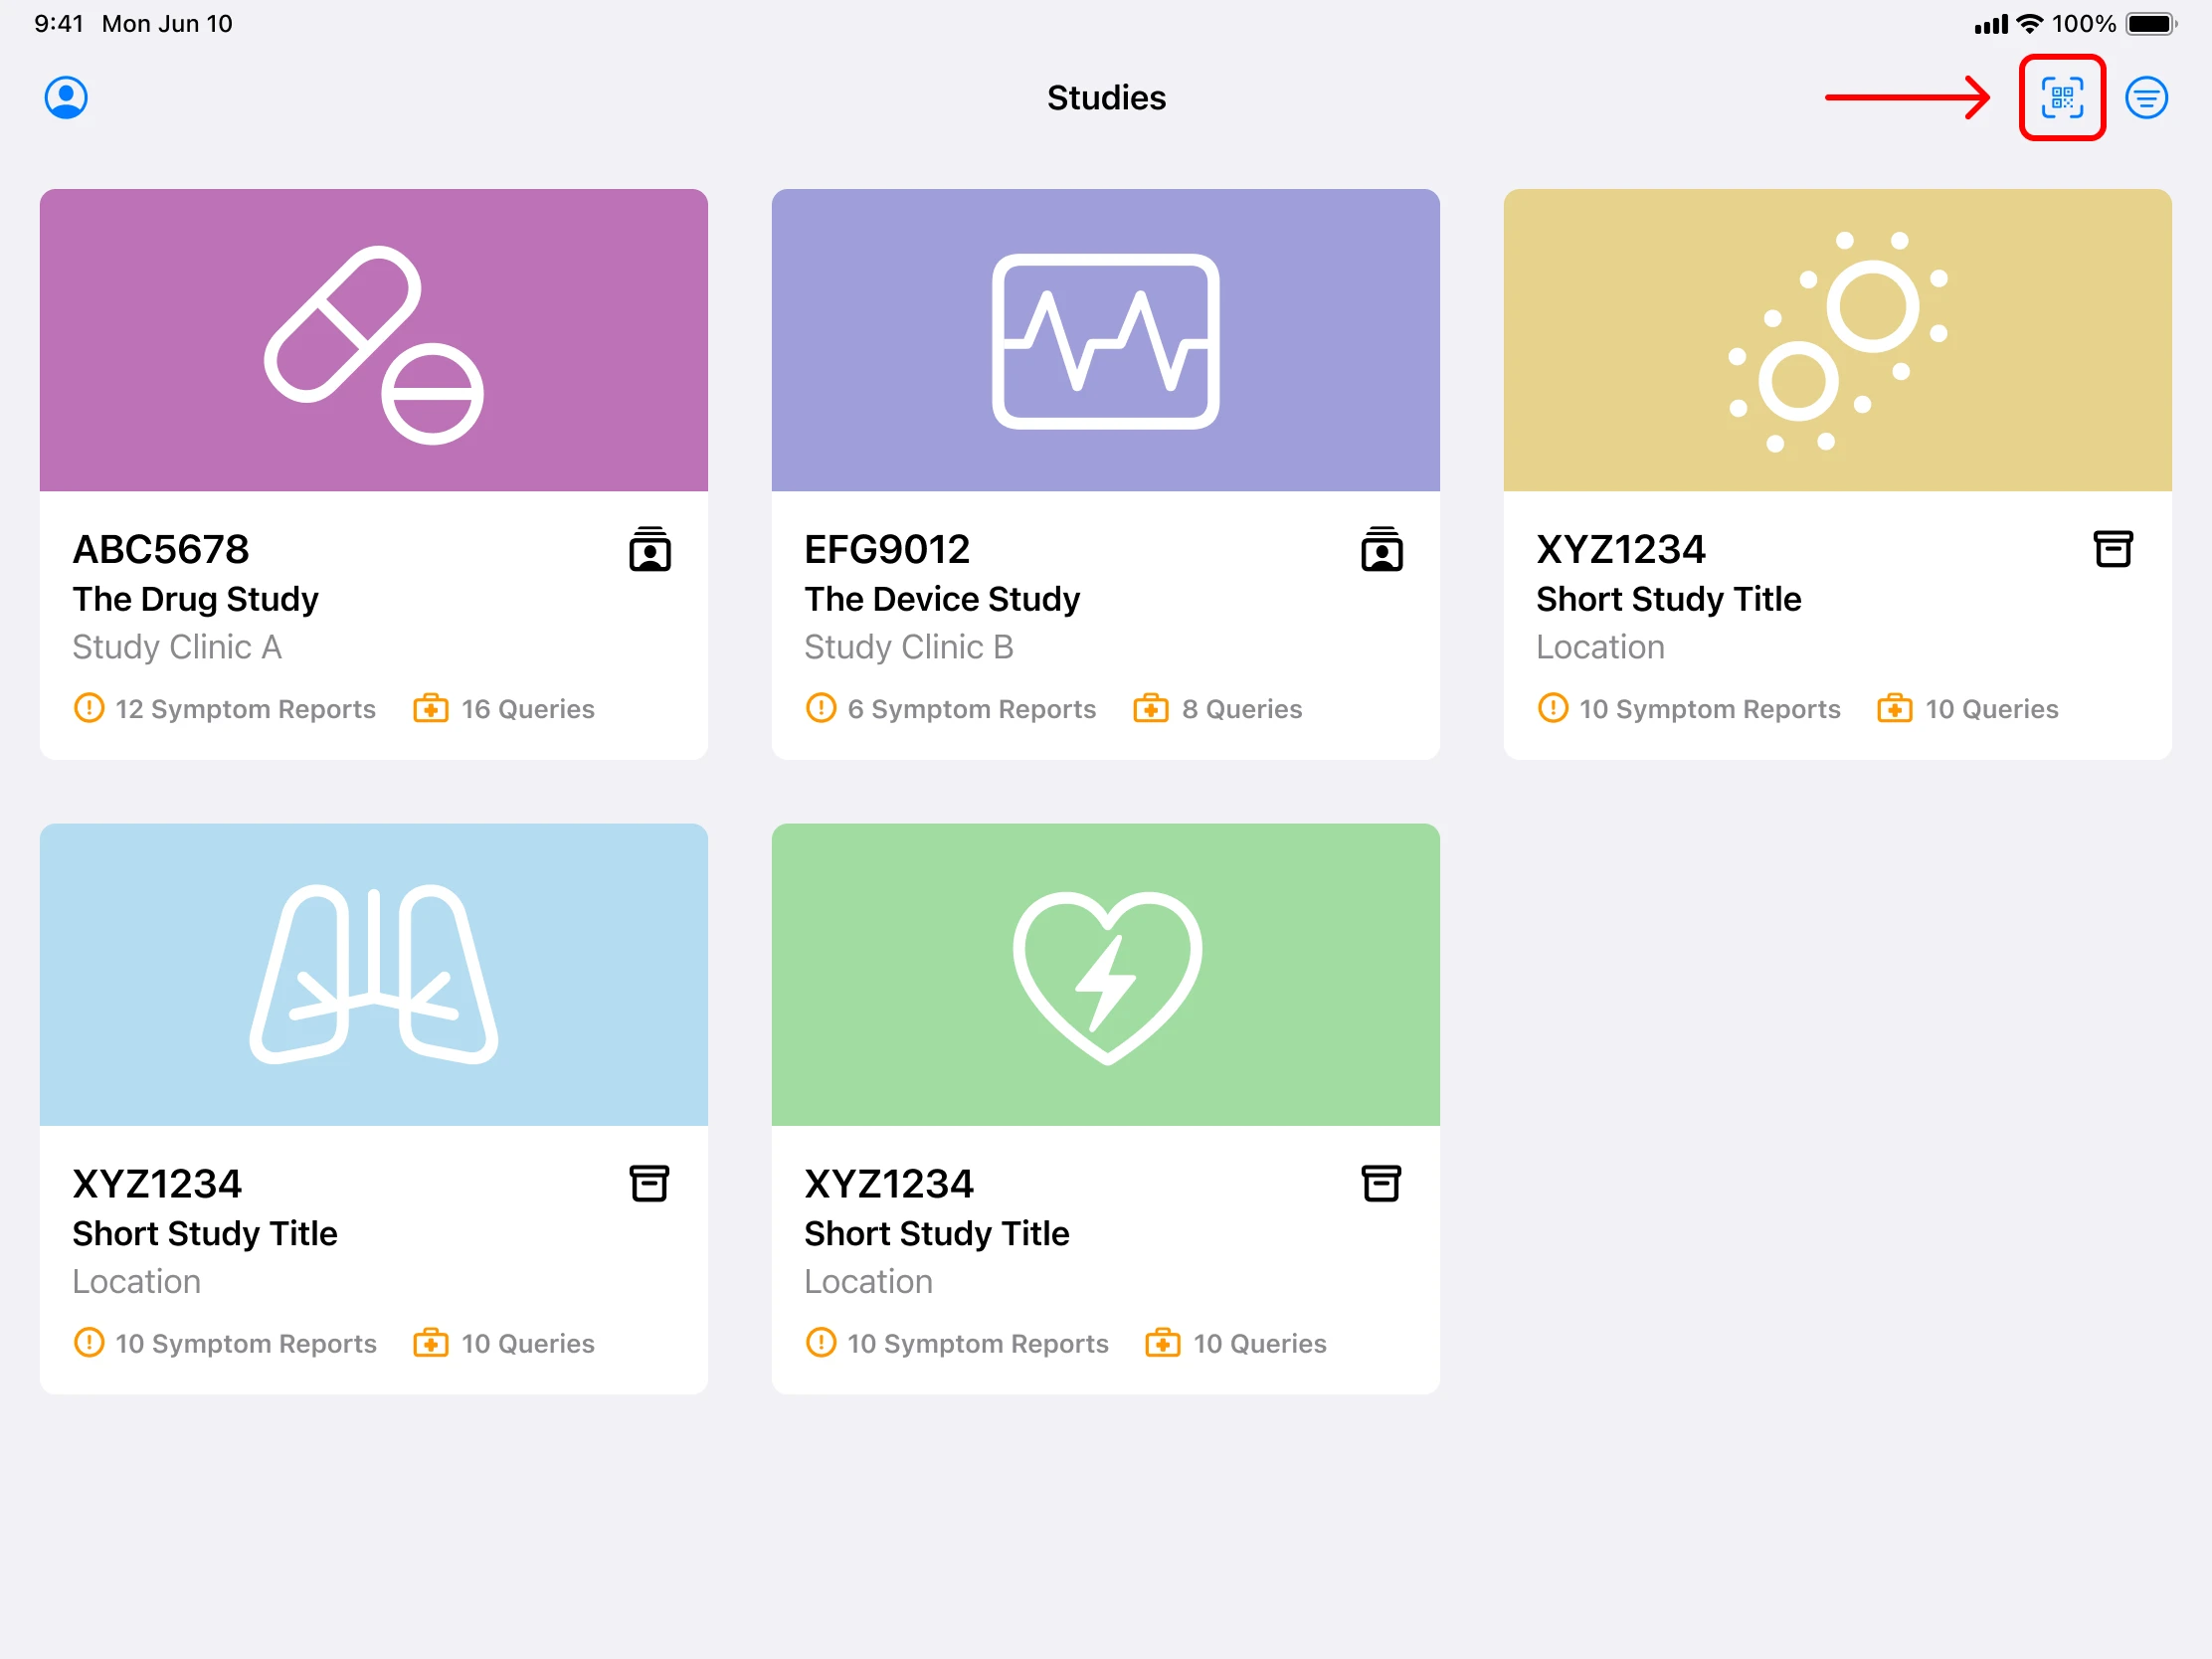
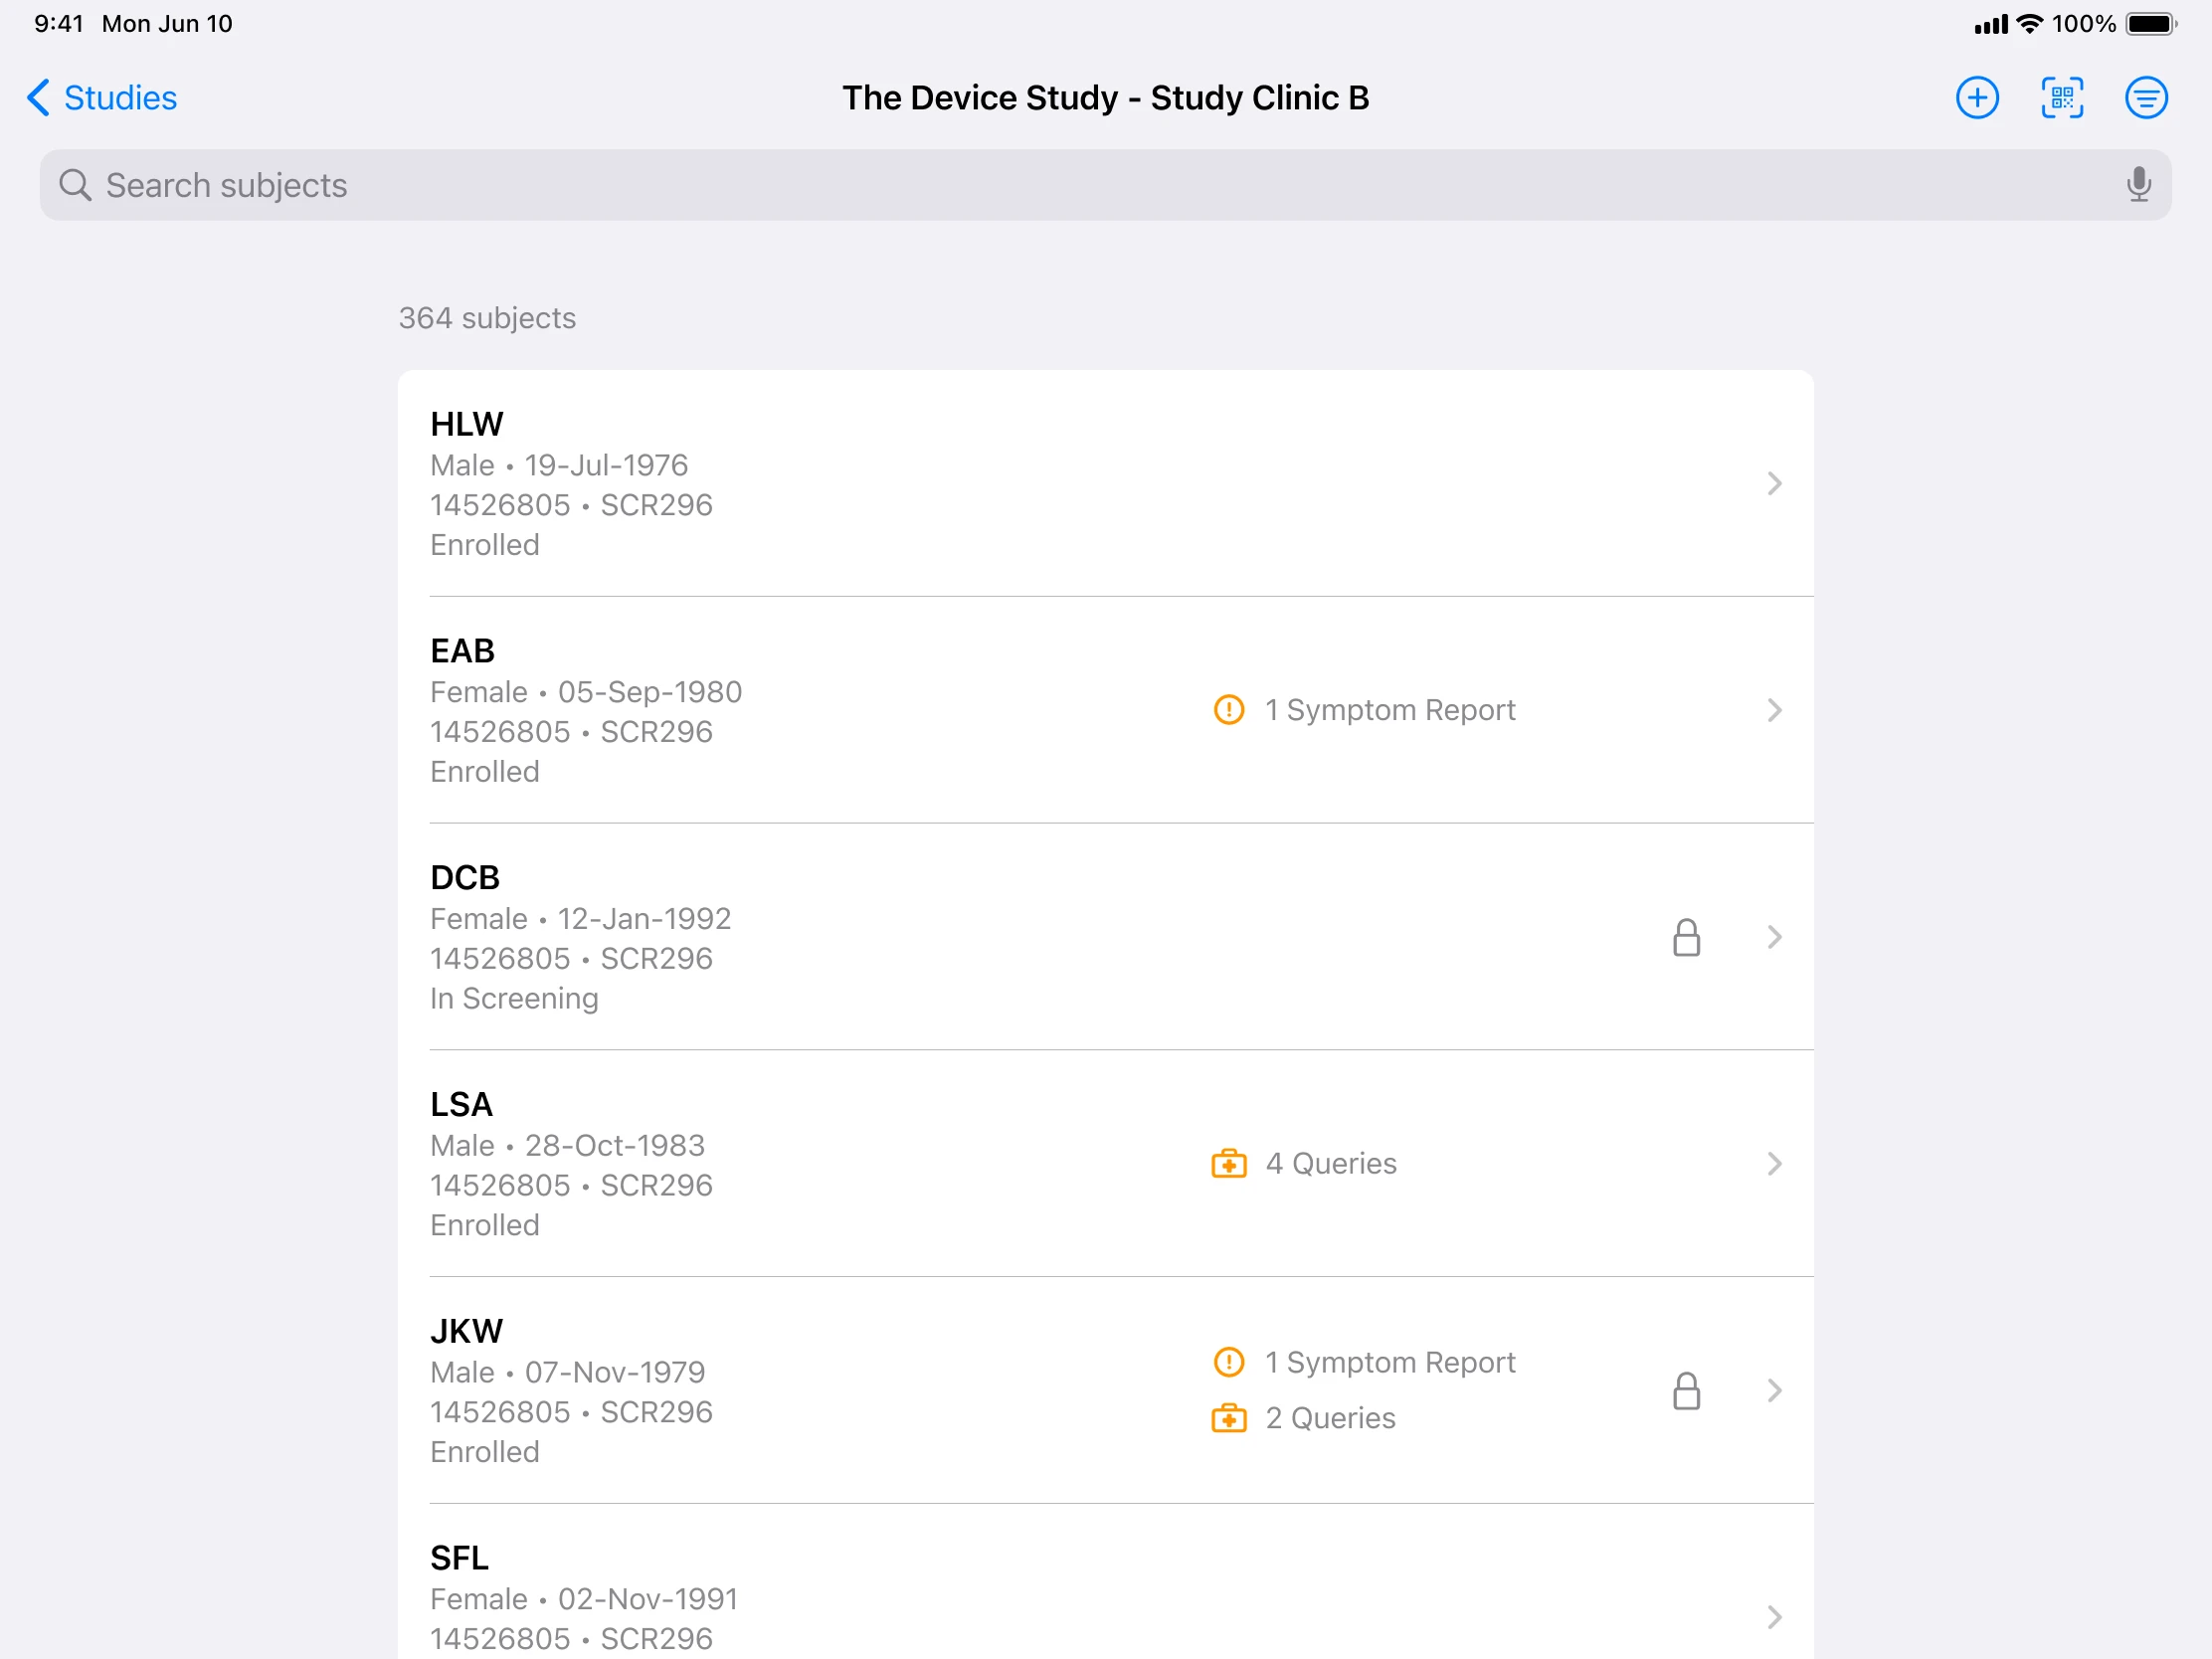
Entry Points
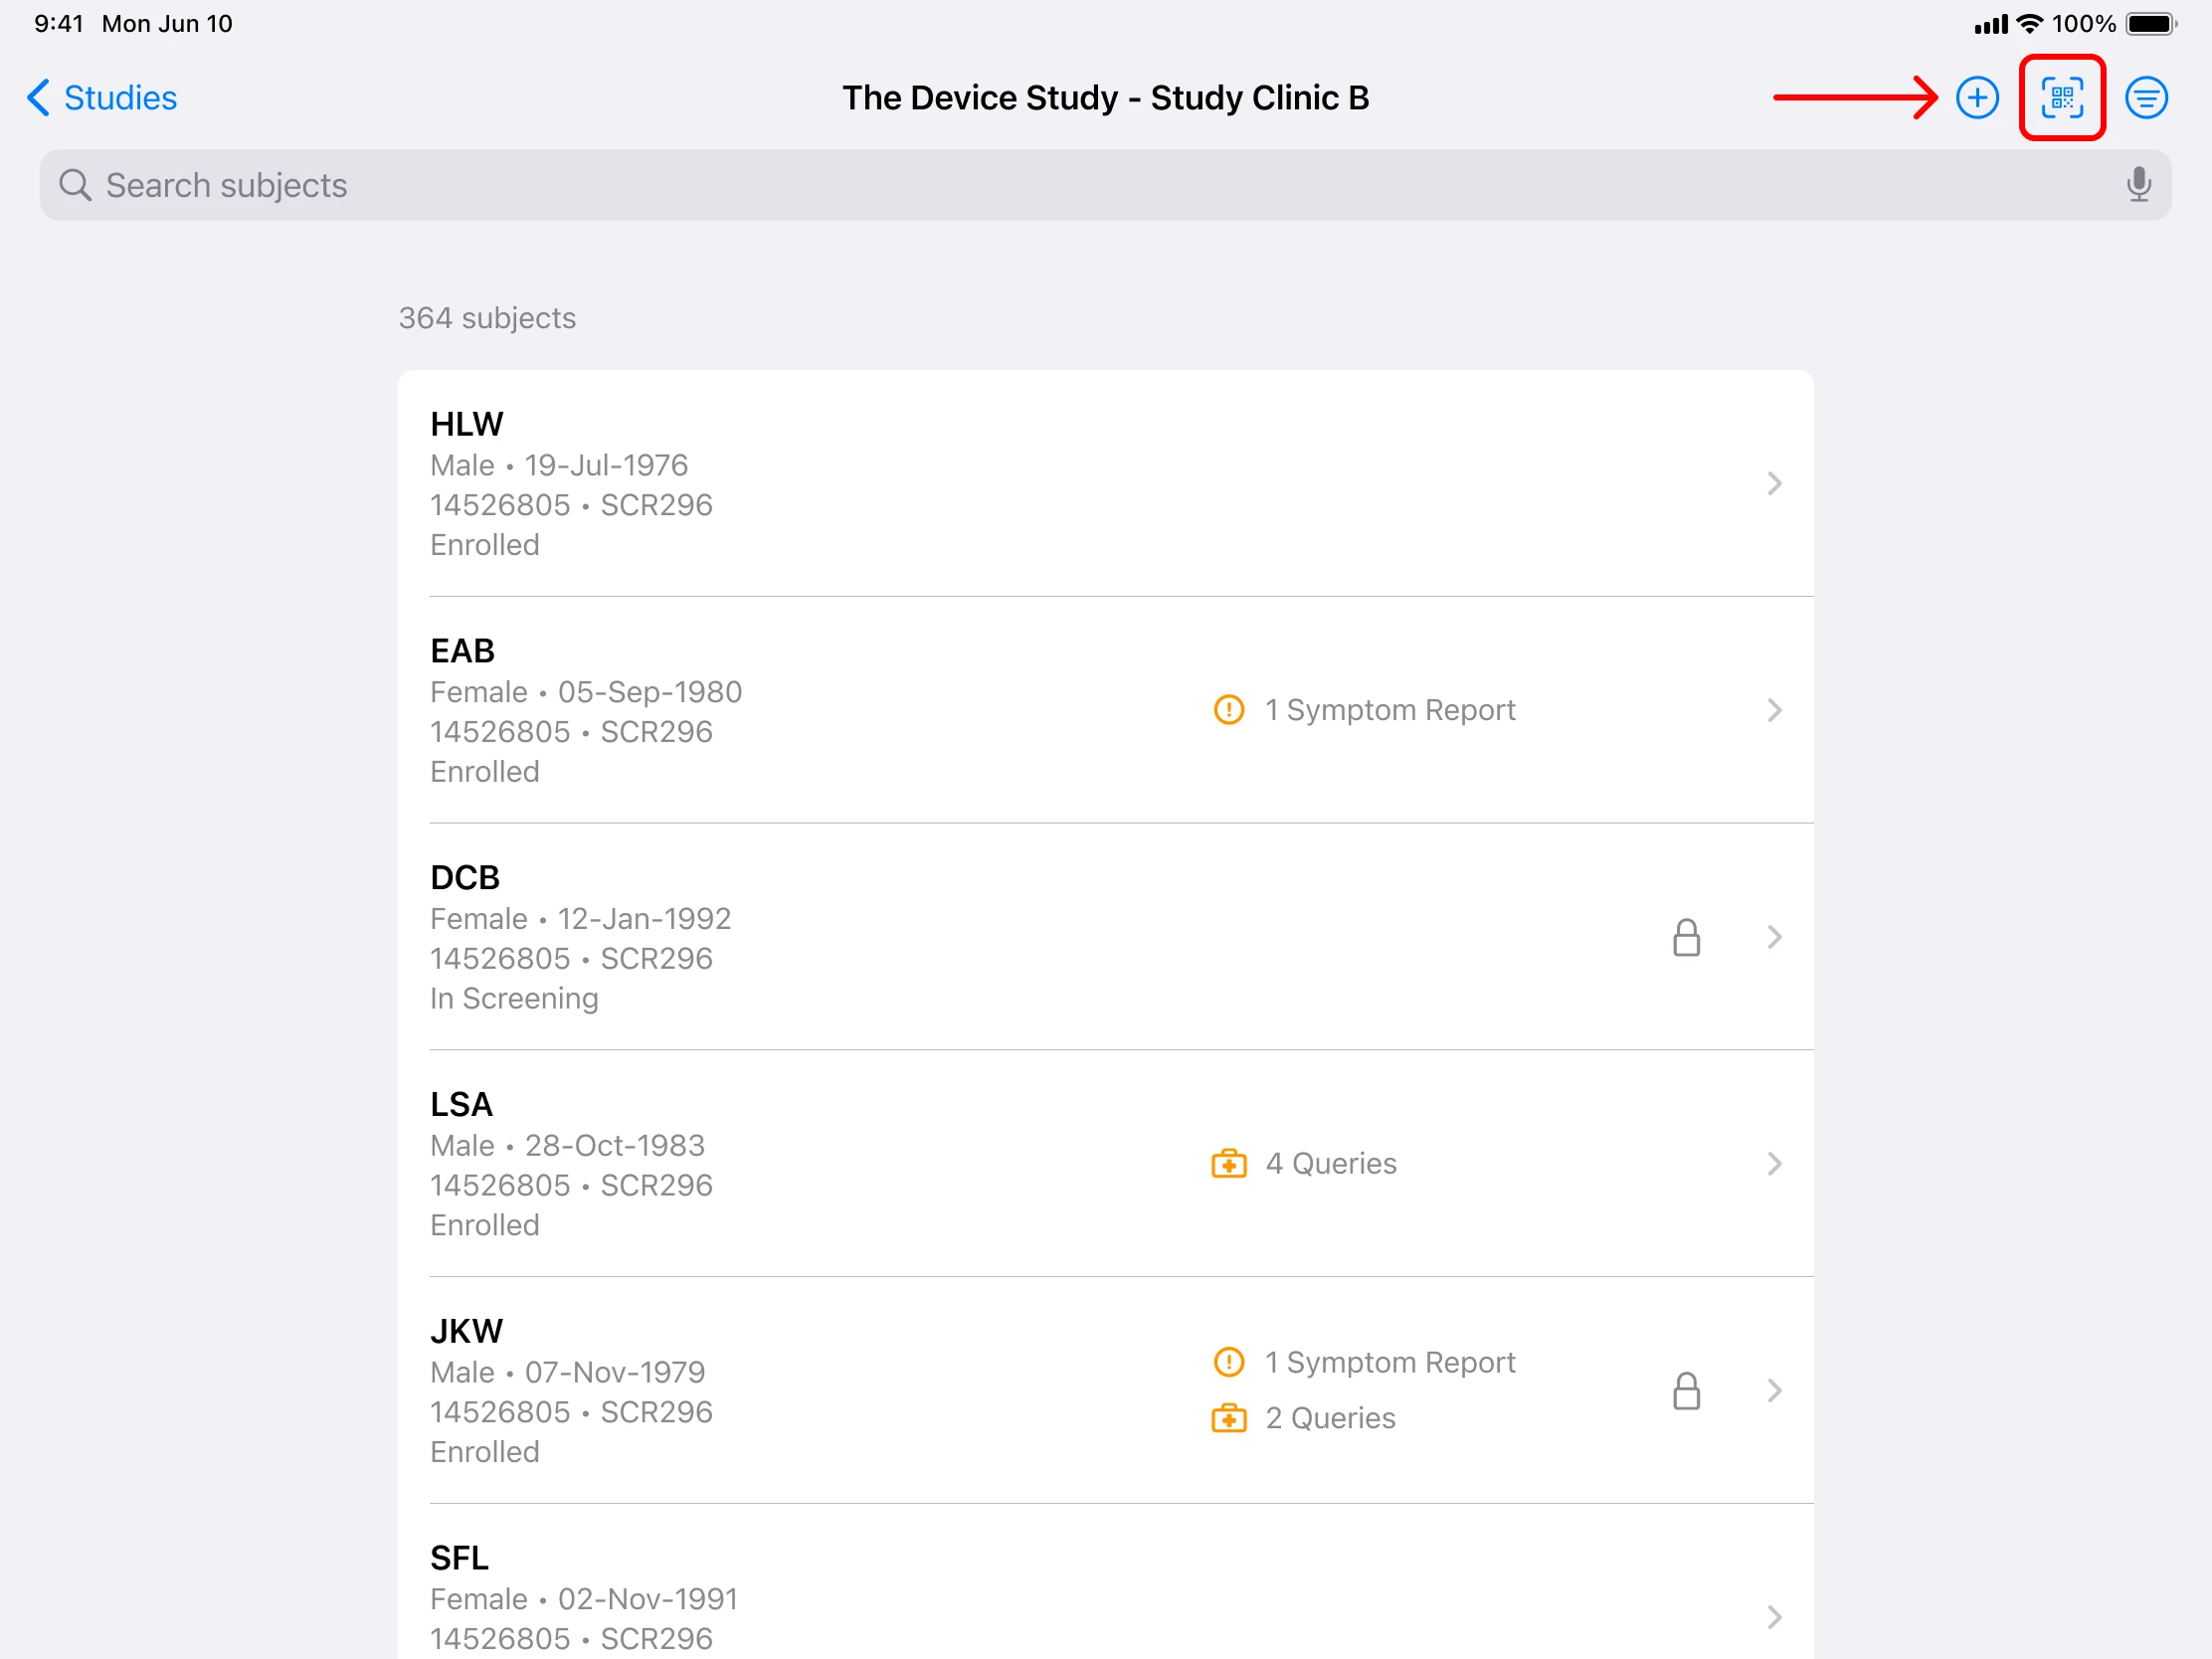
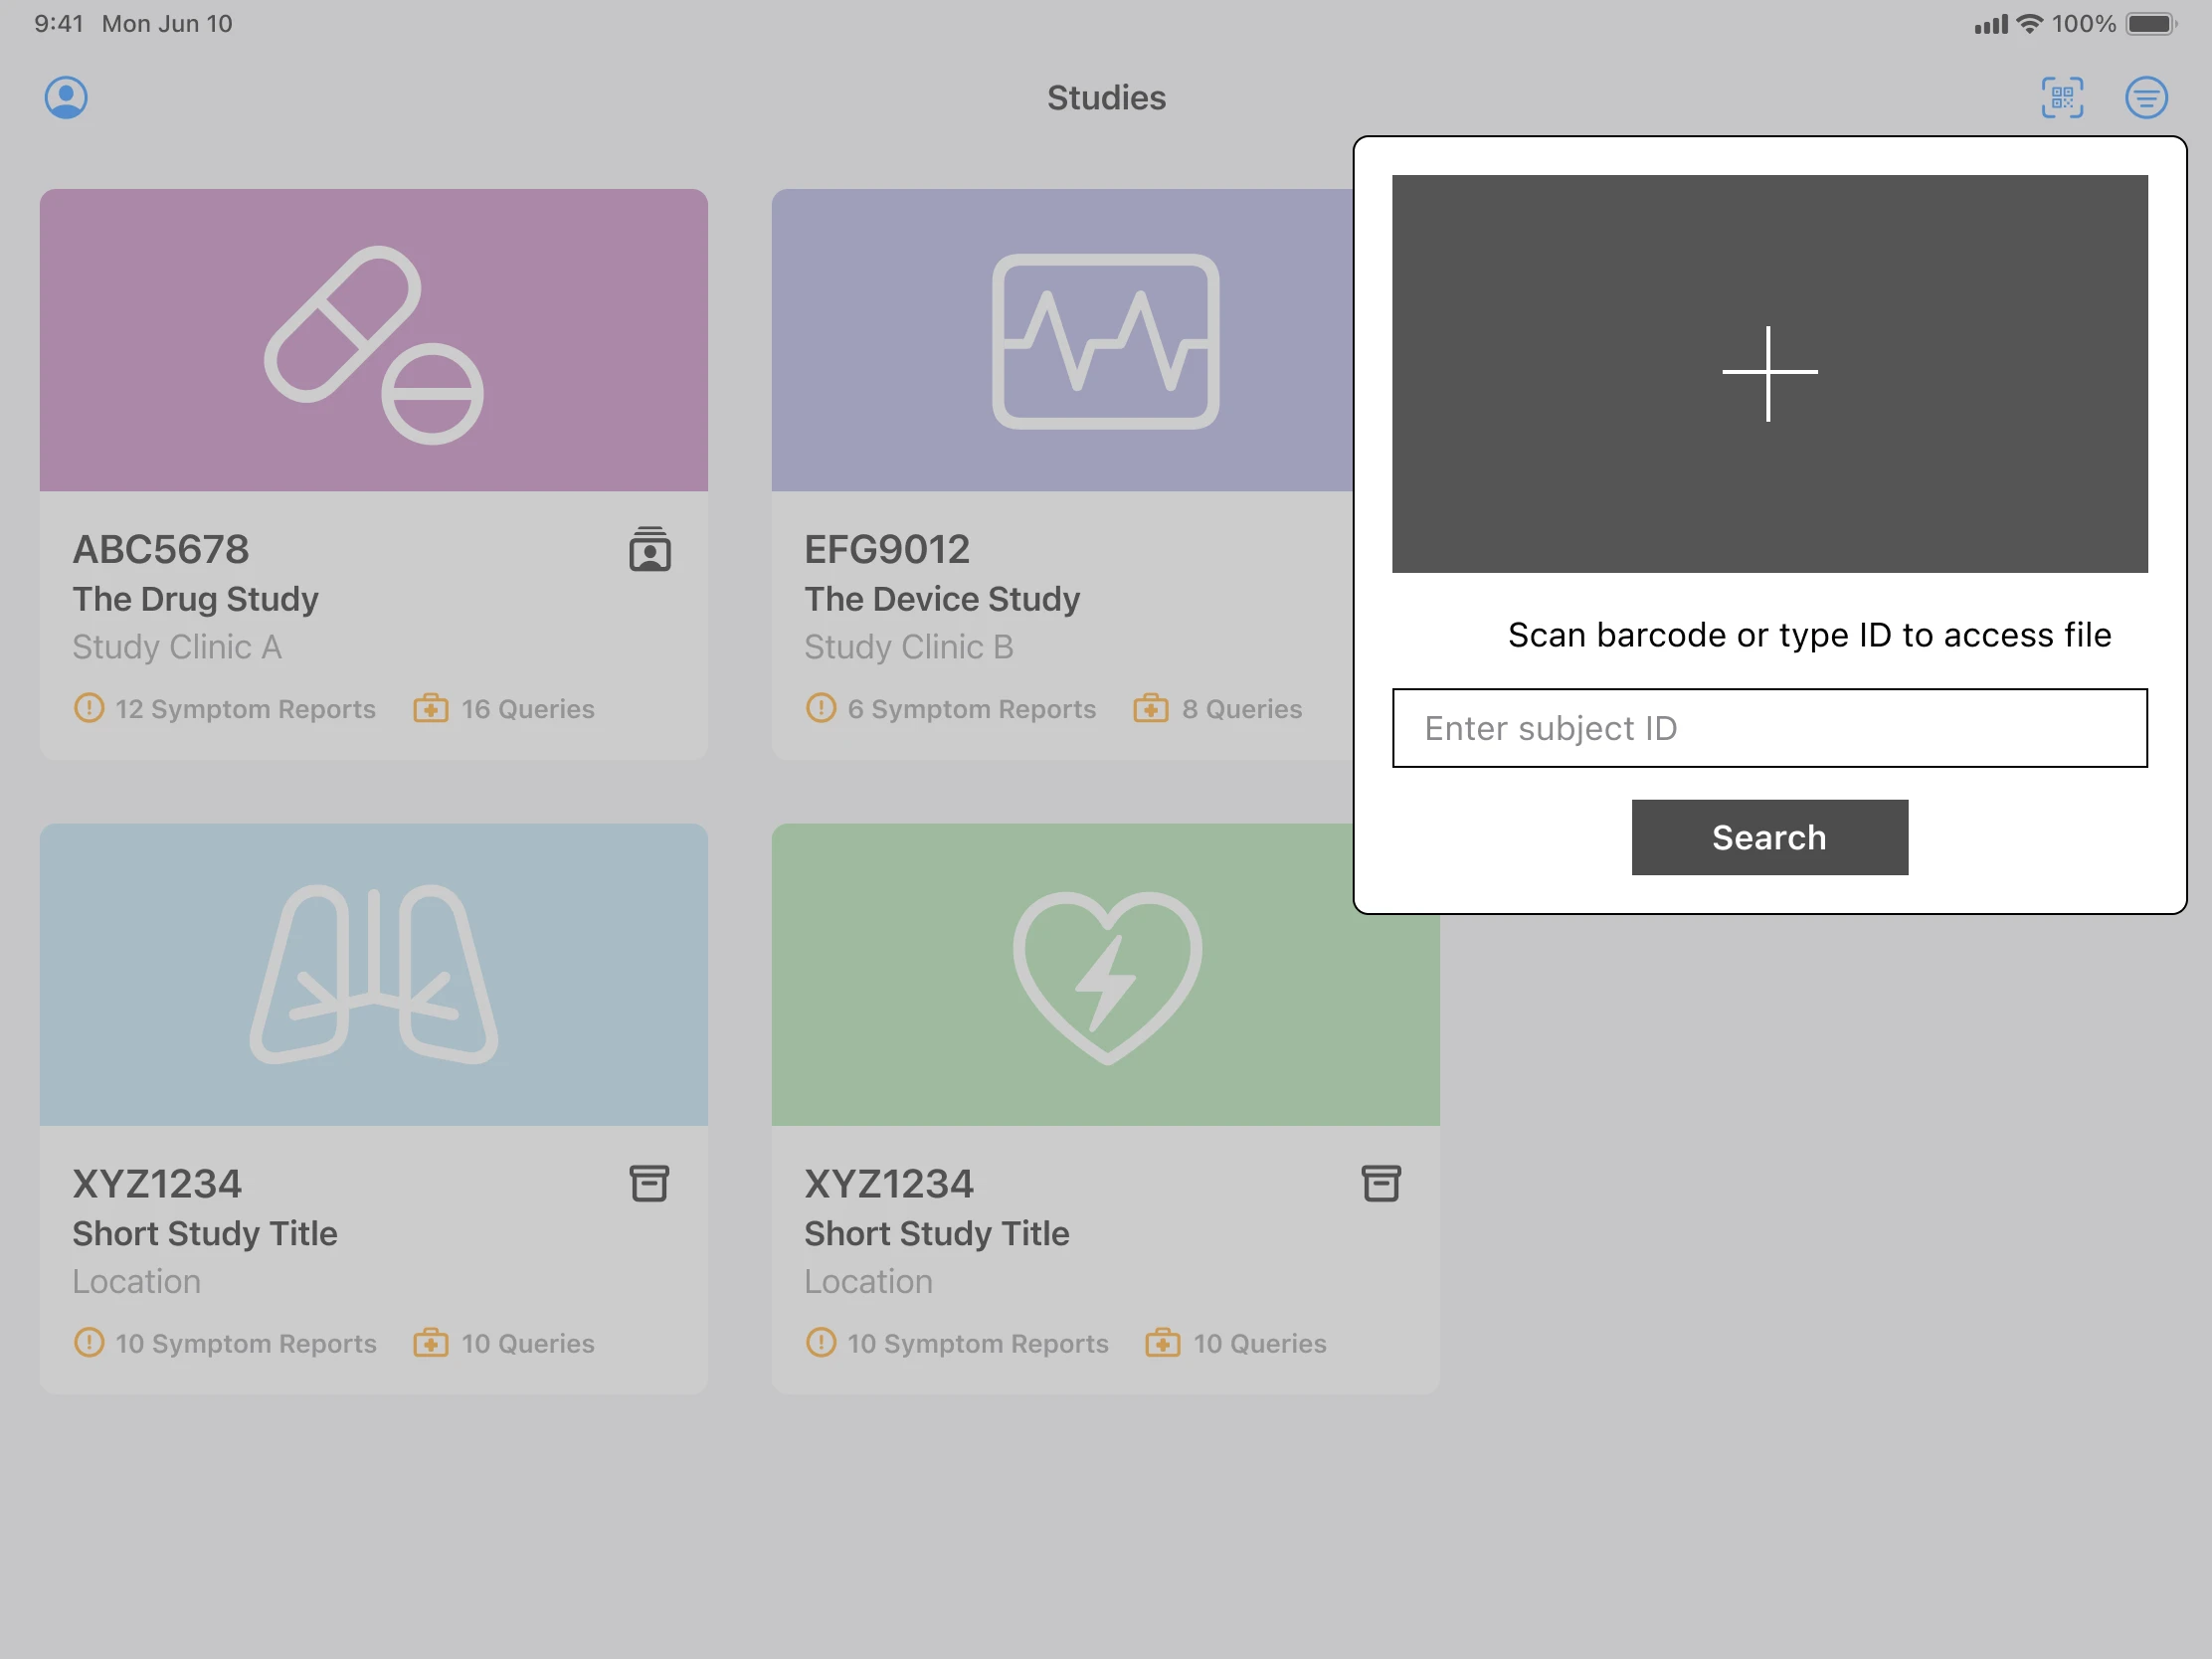
Where in the existing flow does this feature naturally fit? We needed to provide easy access, and we knew that it was possible for CRTs to manage multiple studies out of the same facility. That suggested placement on the top-levels screens: the study list and the subject list for a specific study.
Barcodes were unique to participants and studies, so there would be no issue scanning a barcode before selecting which study the participant was in.
Views
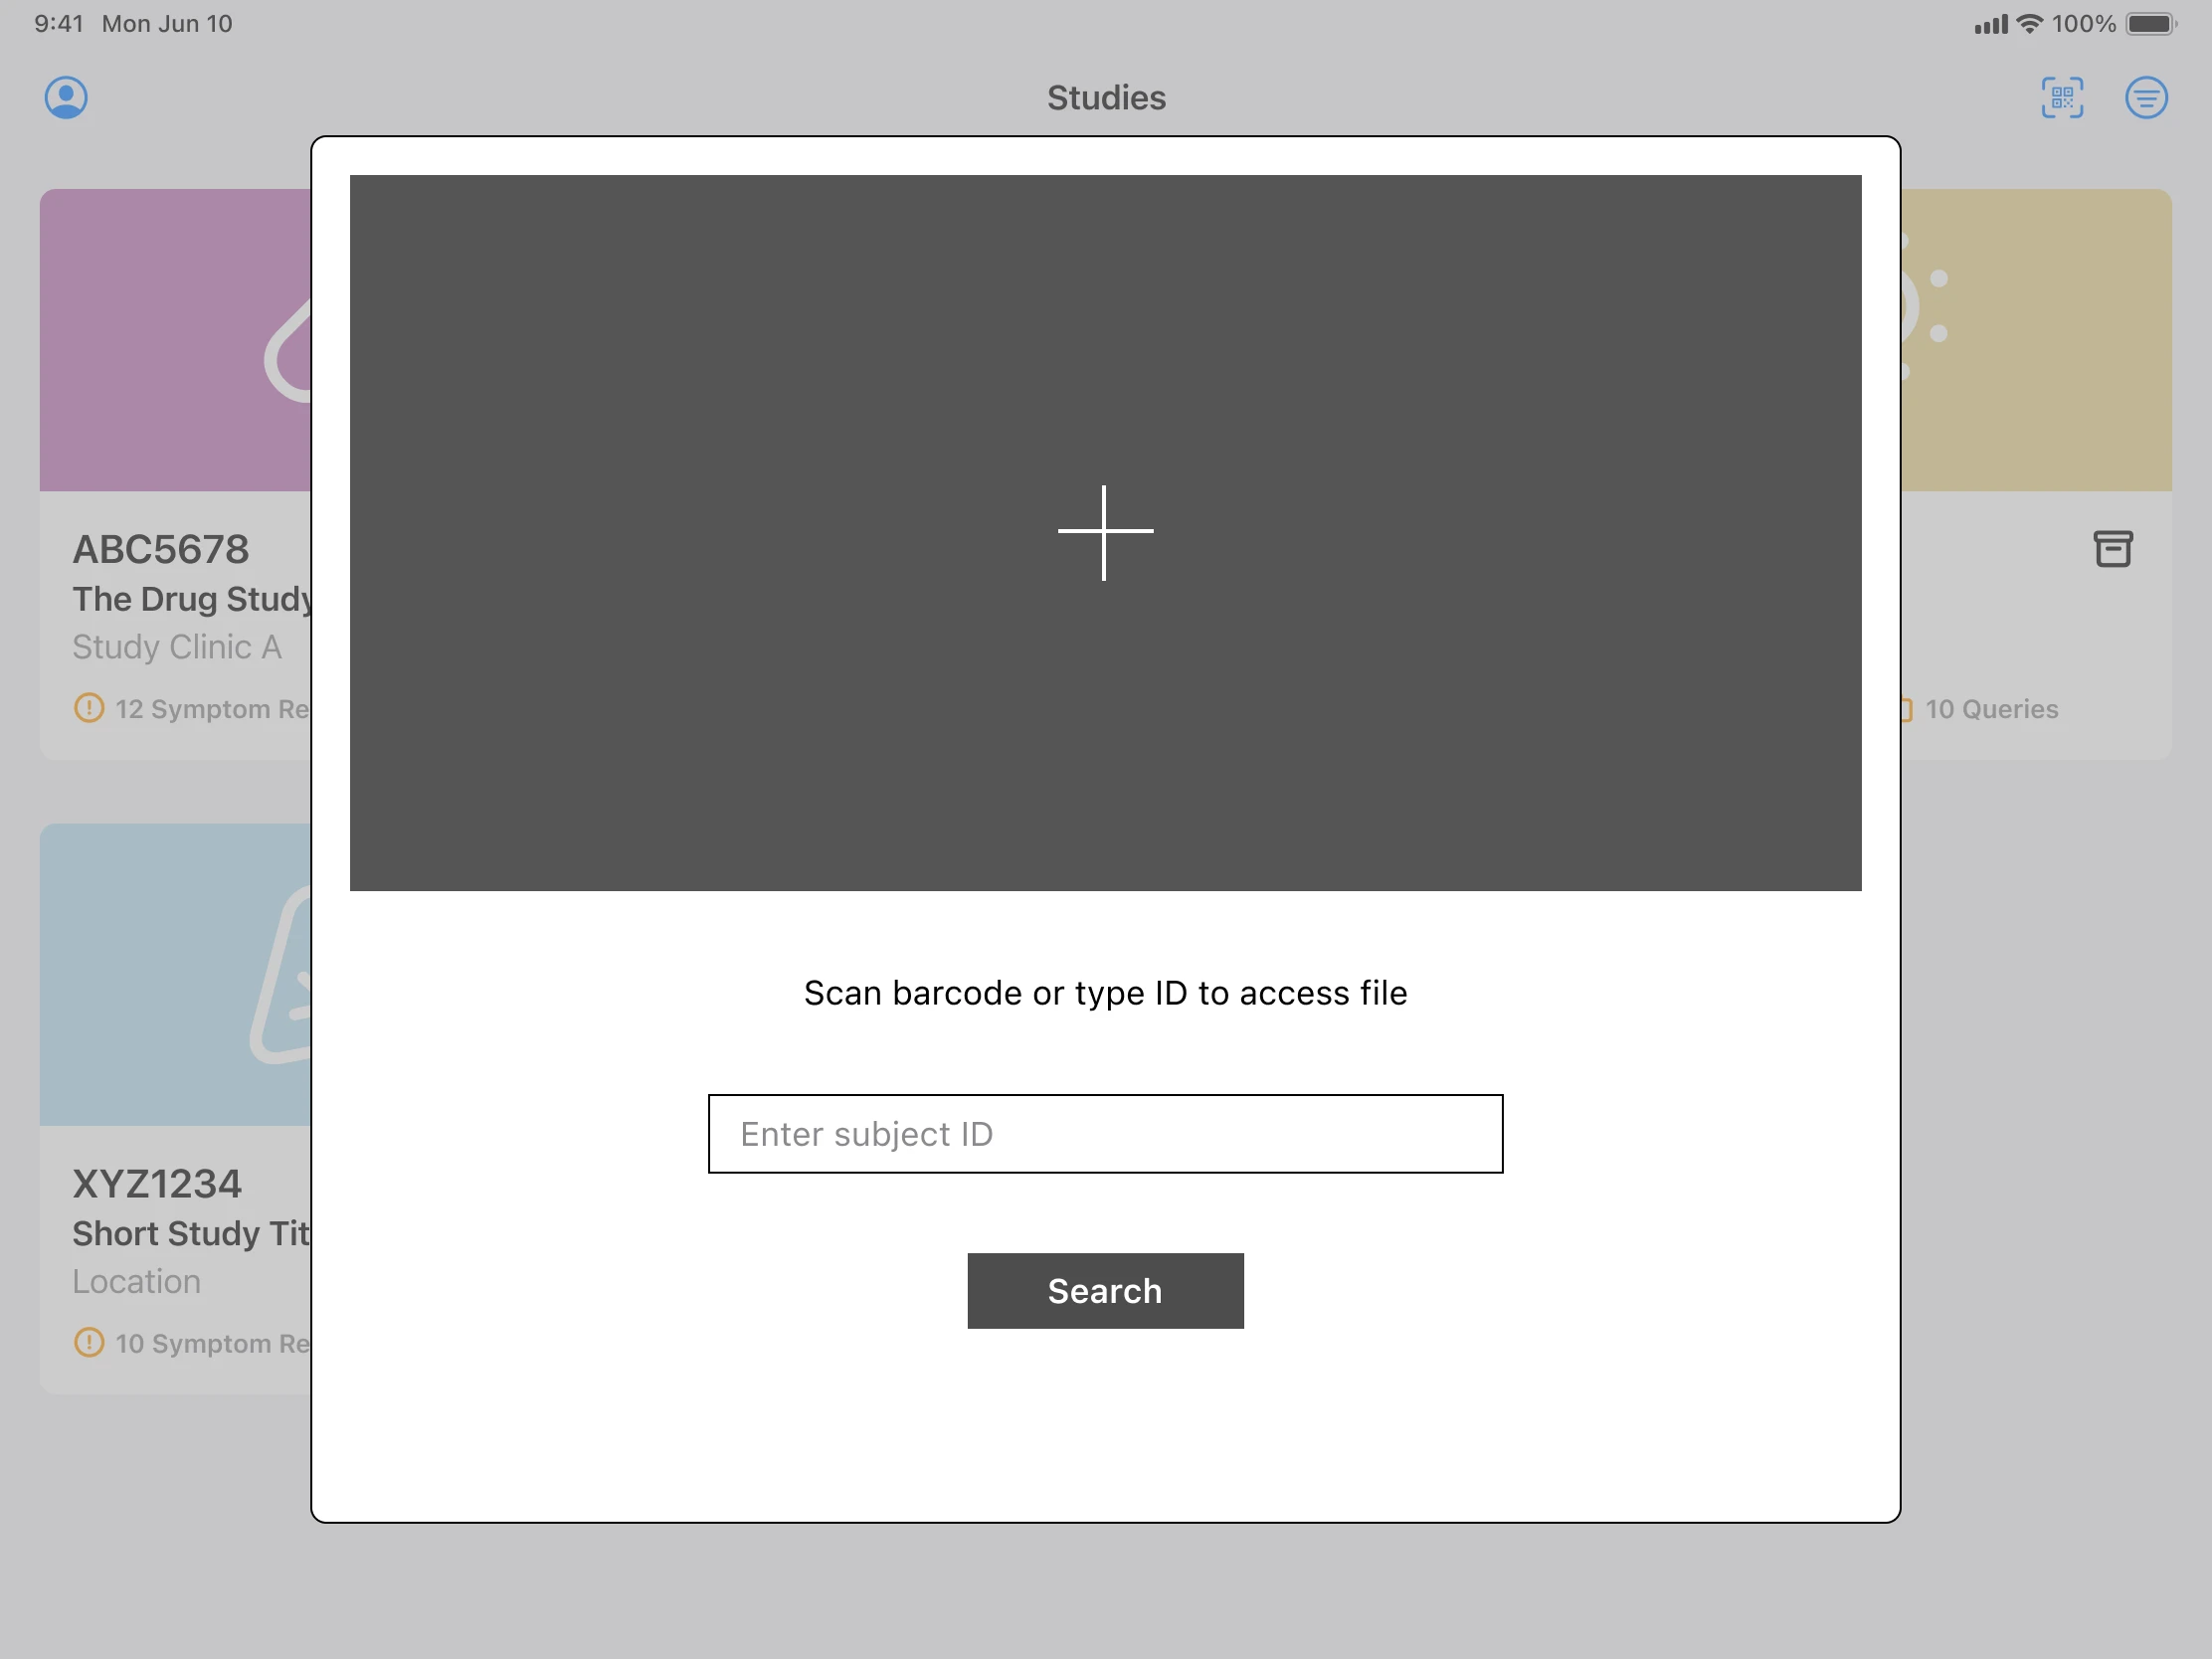
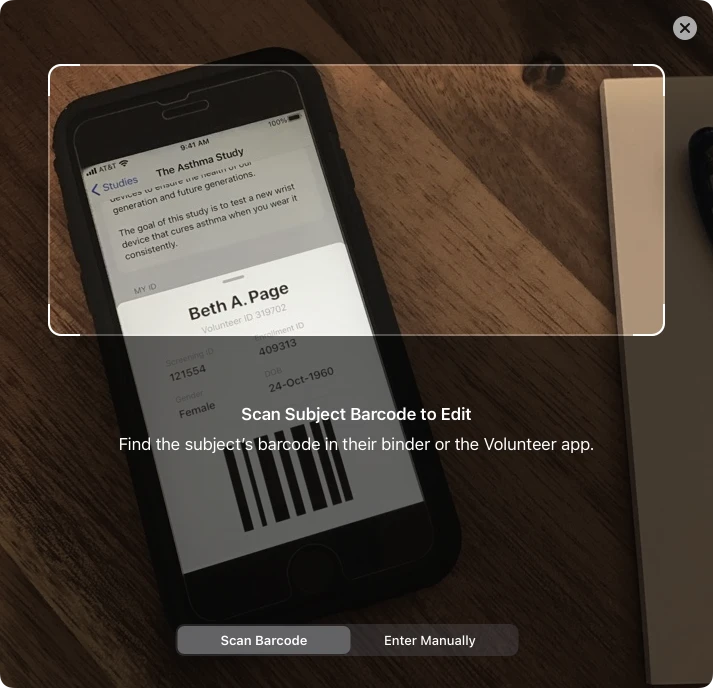
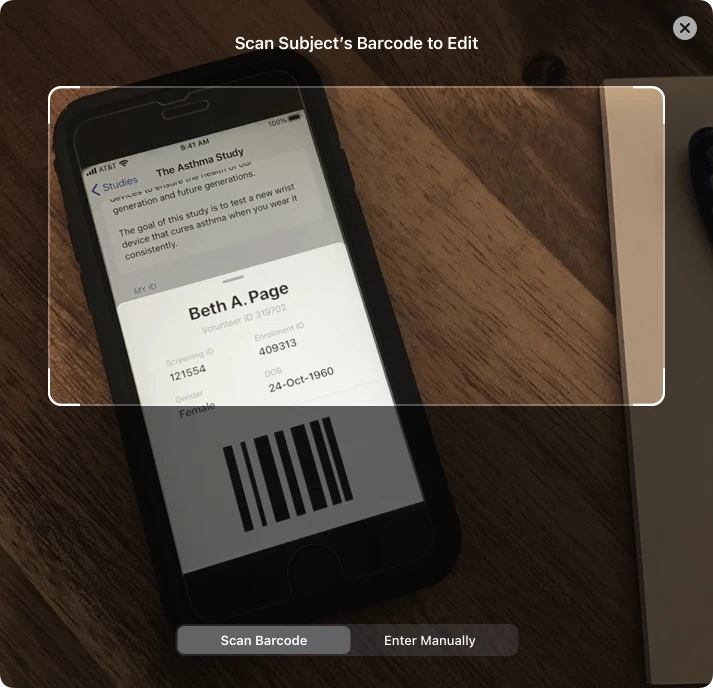
iOS natively supports various presentation views. I explored a few based on placement and prominence on the screen. The small popover off to the side felt odd when I held the iPad in my hands and simulated the experience. A more central viewfinder felt more natural, similar to opening the camera on your device. I liked that the sheet modal allowed for some of the background context to remain visible when using the scanner.
We moved forward with the sheet modal approach.
Scan Mode
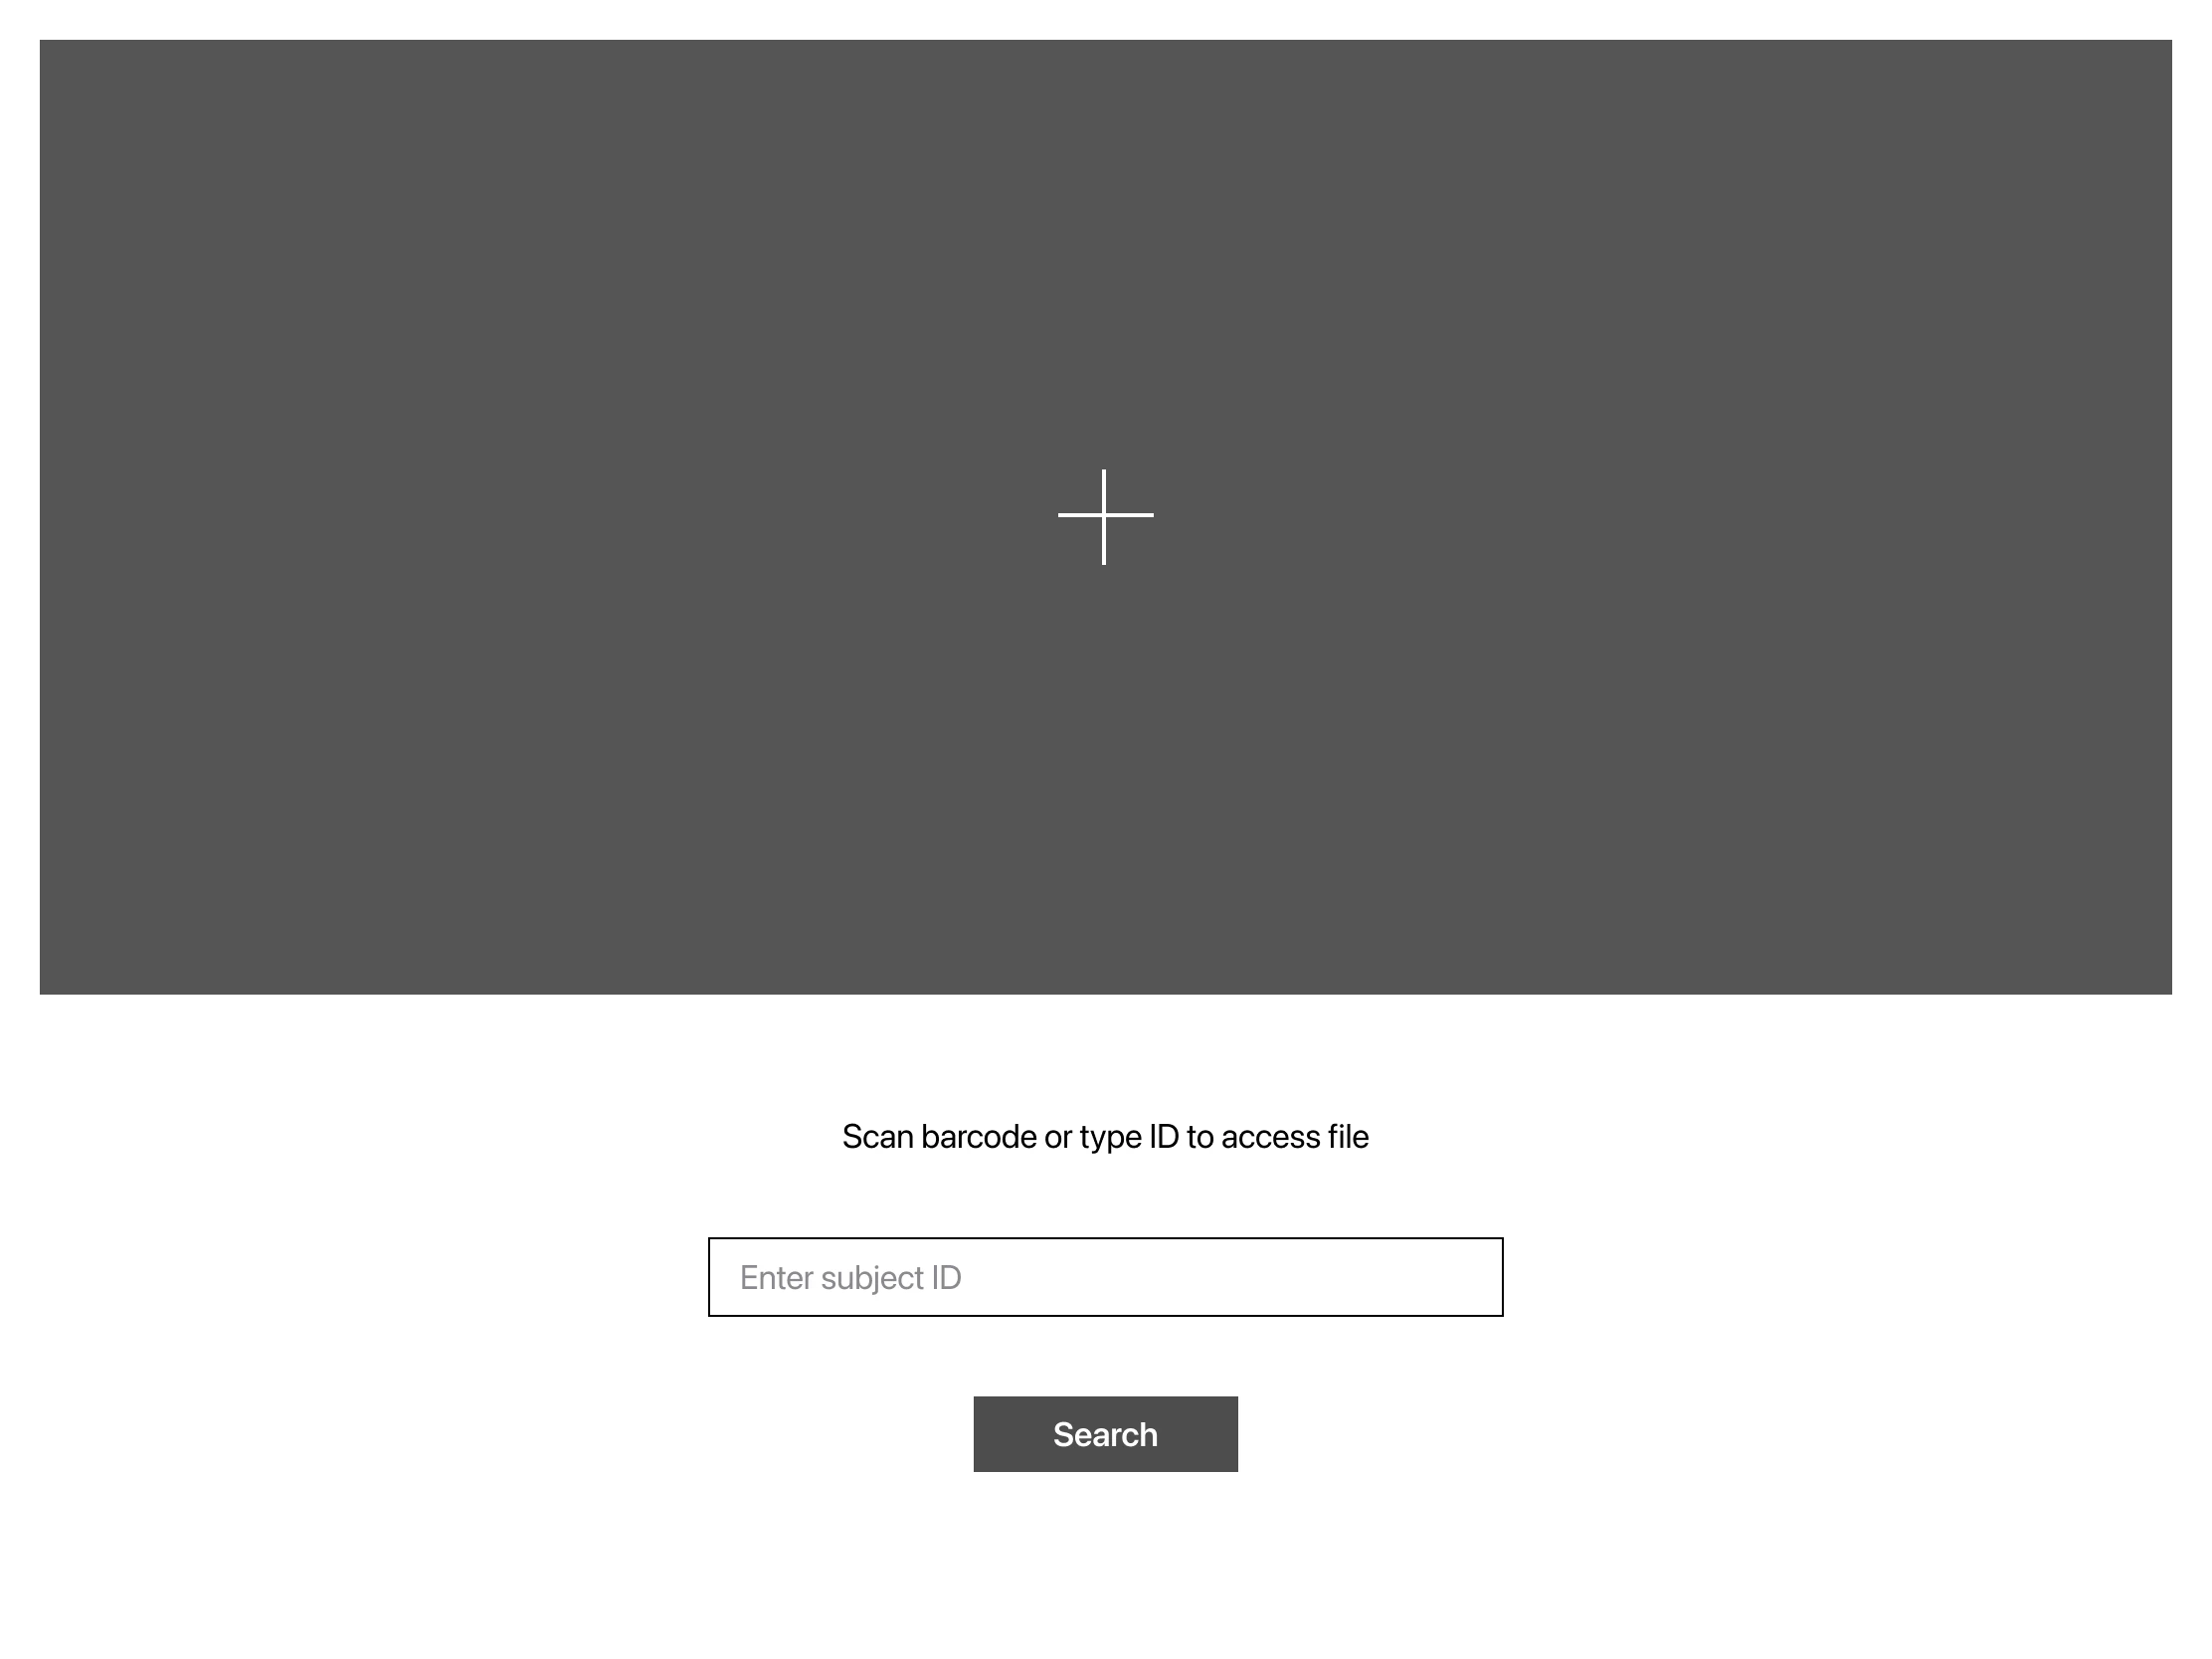
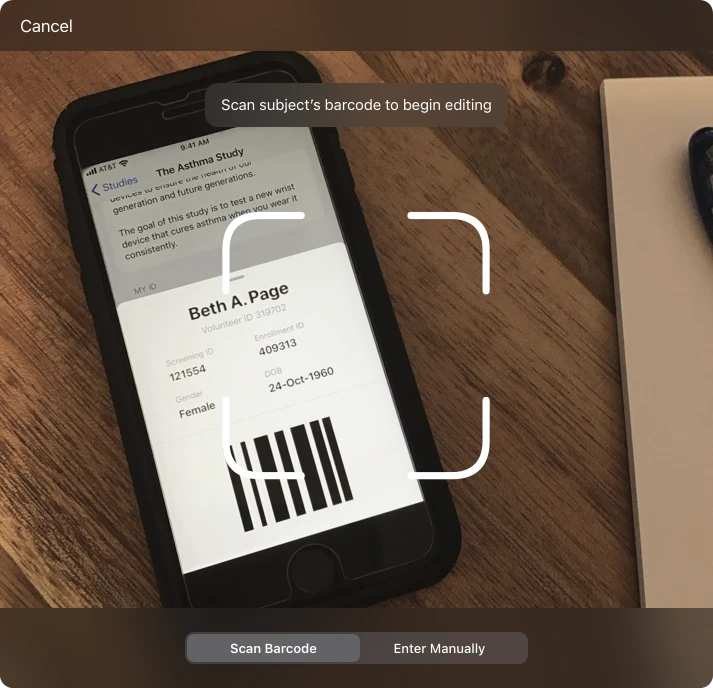
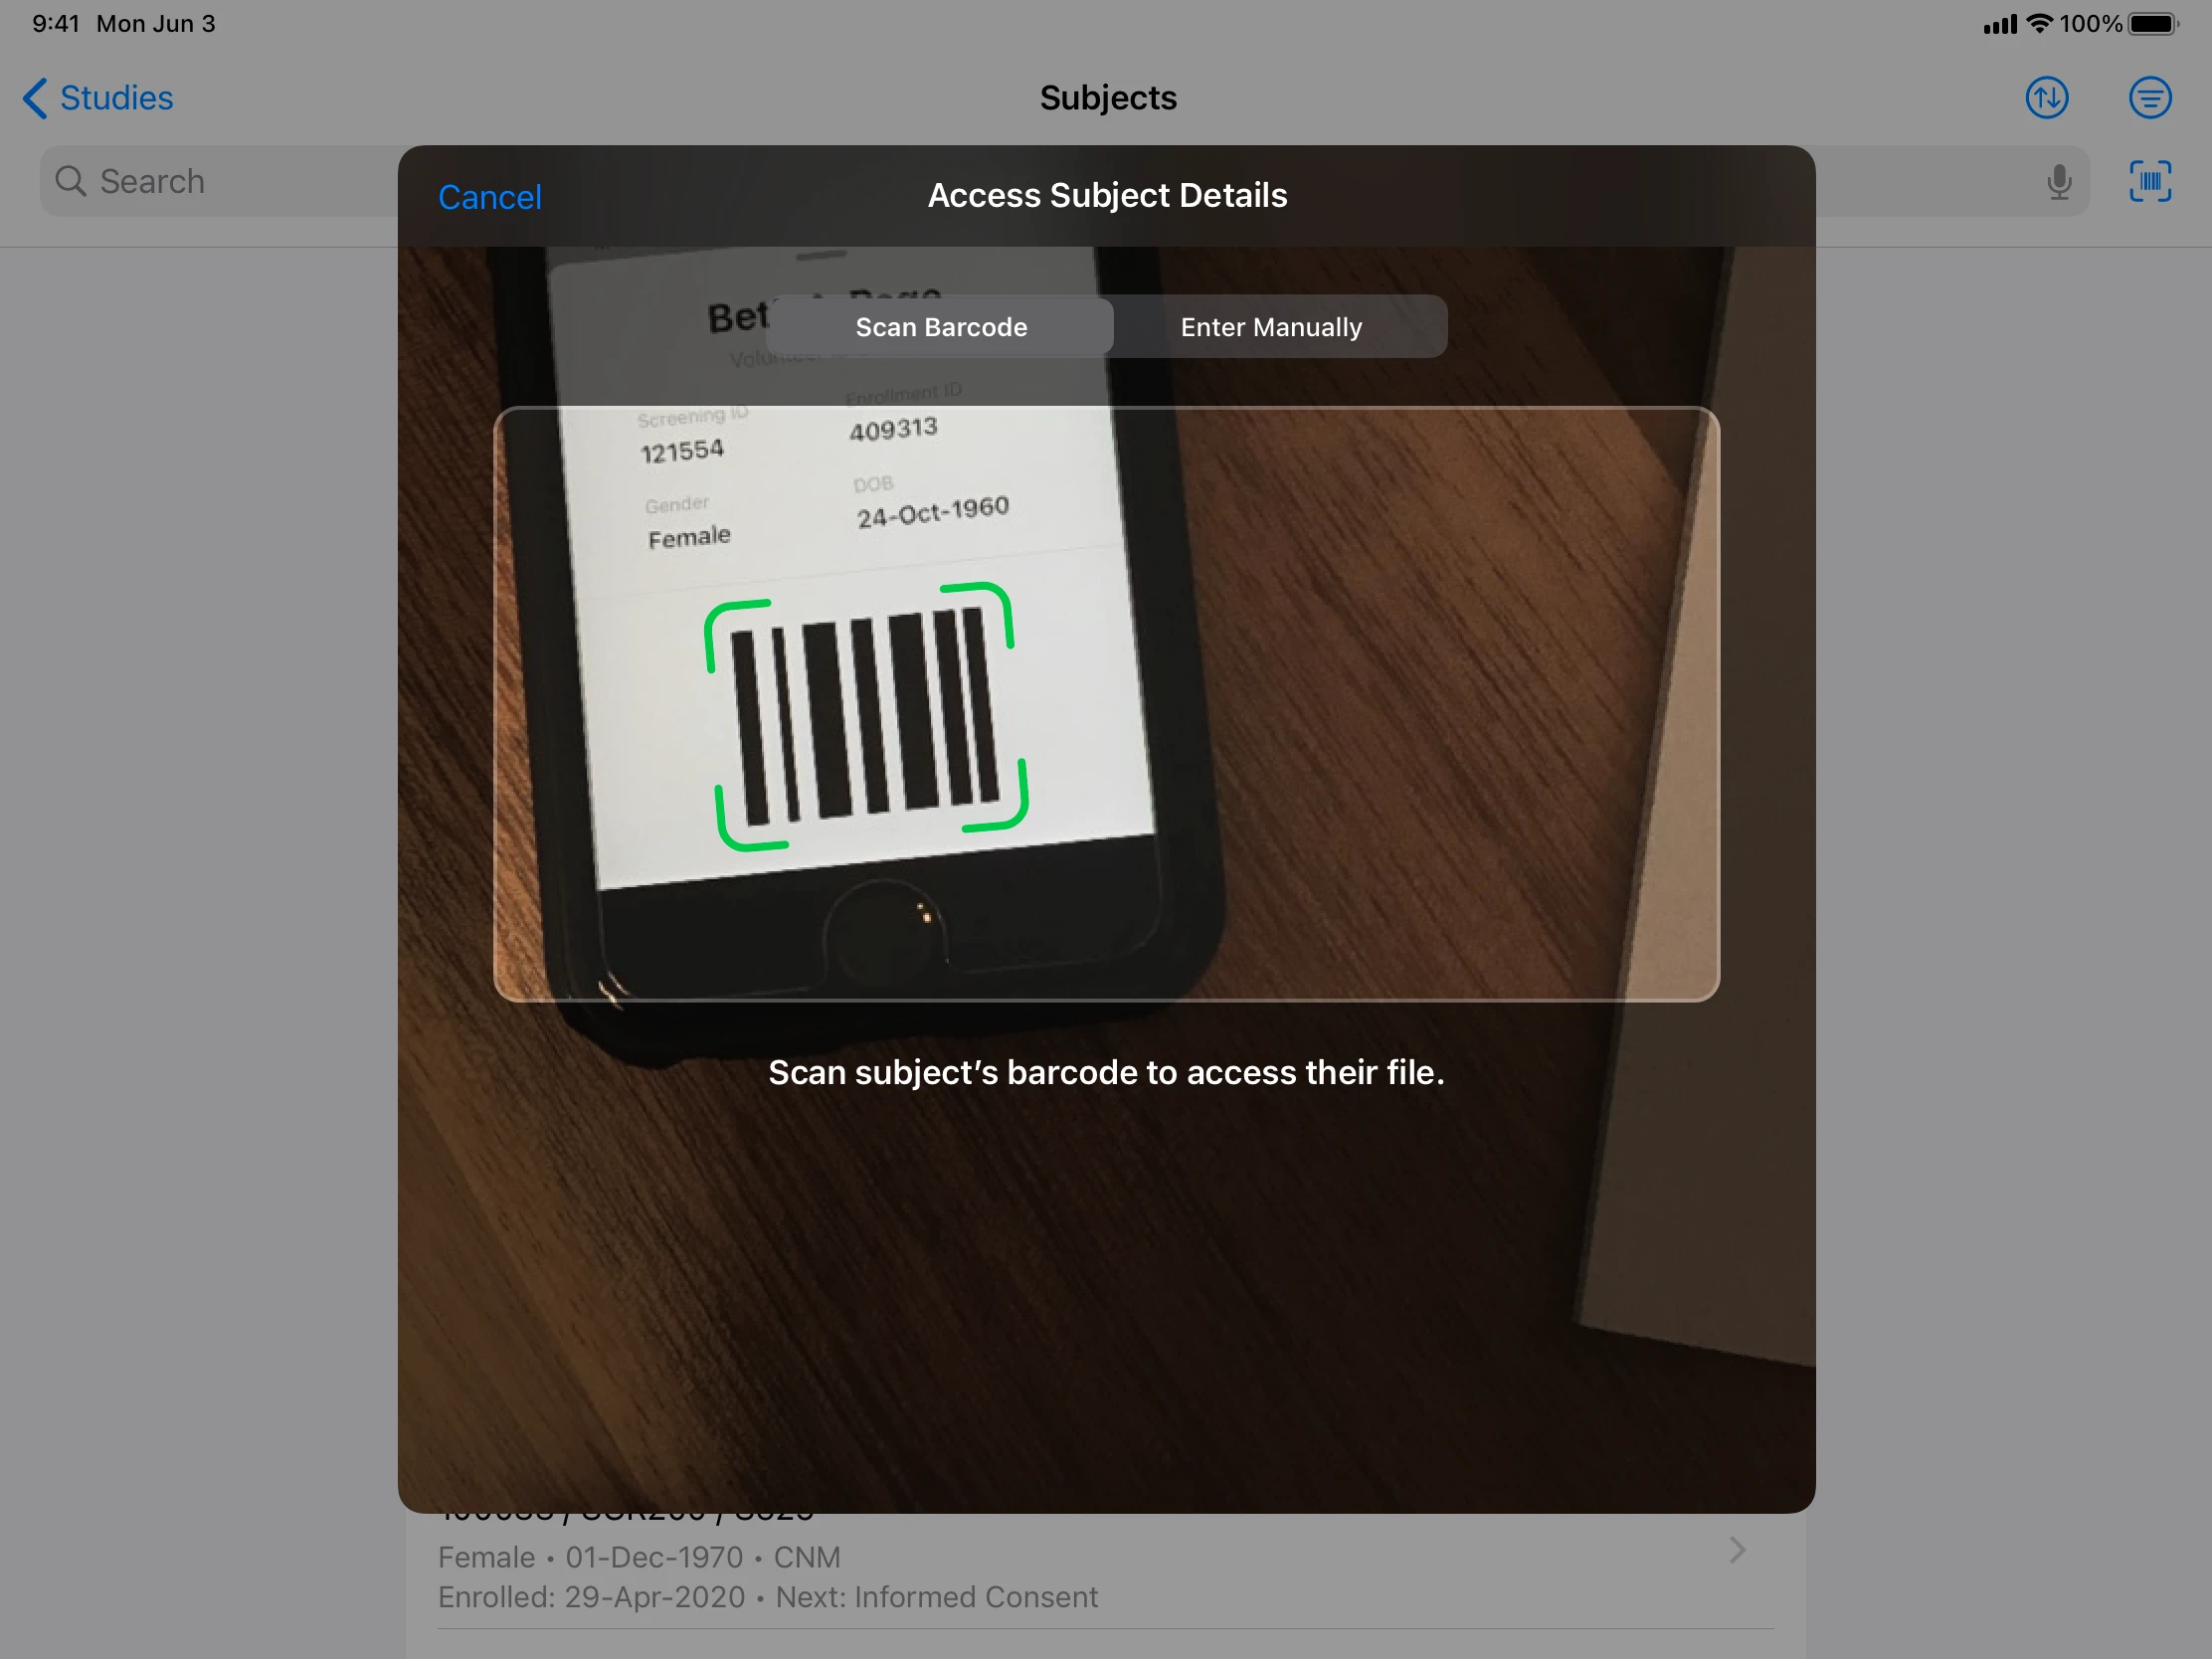
It was time to design the main scanner UI. Knowing we preferred a sheet modal approach was a good baseline constraint. I needed to account for some basic functionality and content:
- A viewport to show the user what the camera sees
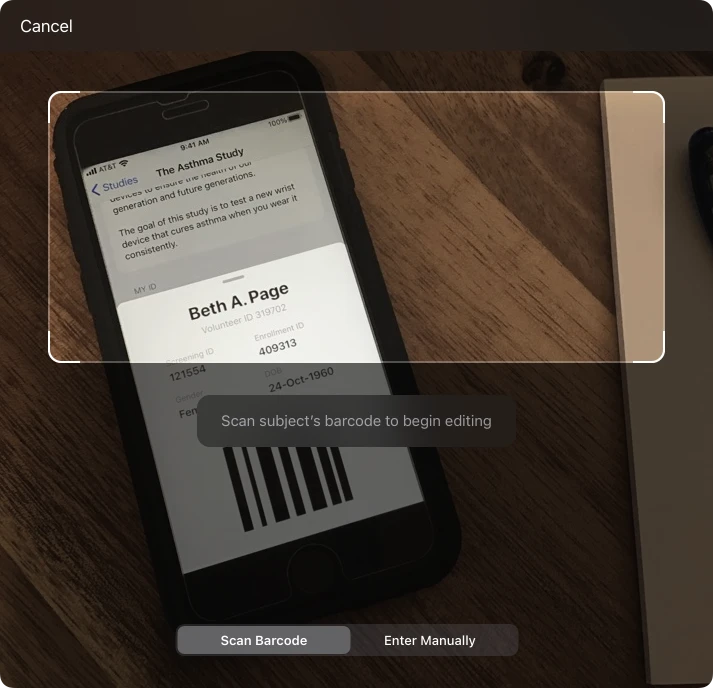
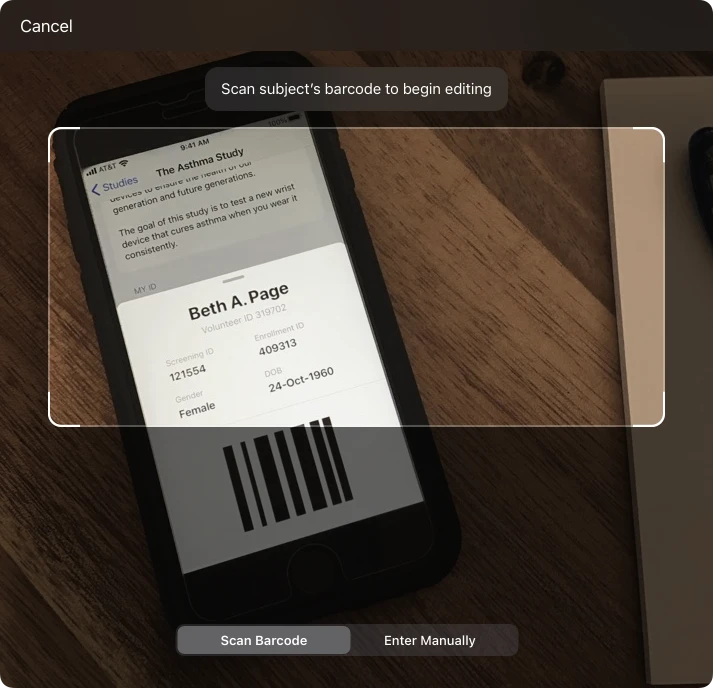
- Instructional copy/messaging
- A way to manually enter the ID
- A way to cancel/close the modal
Wireframes
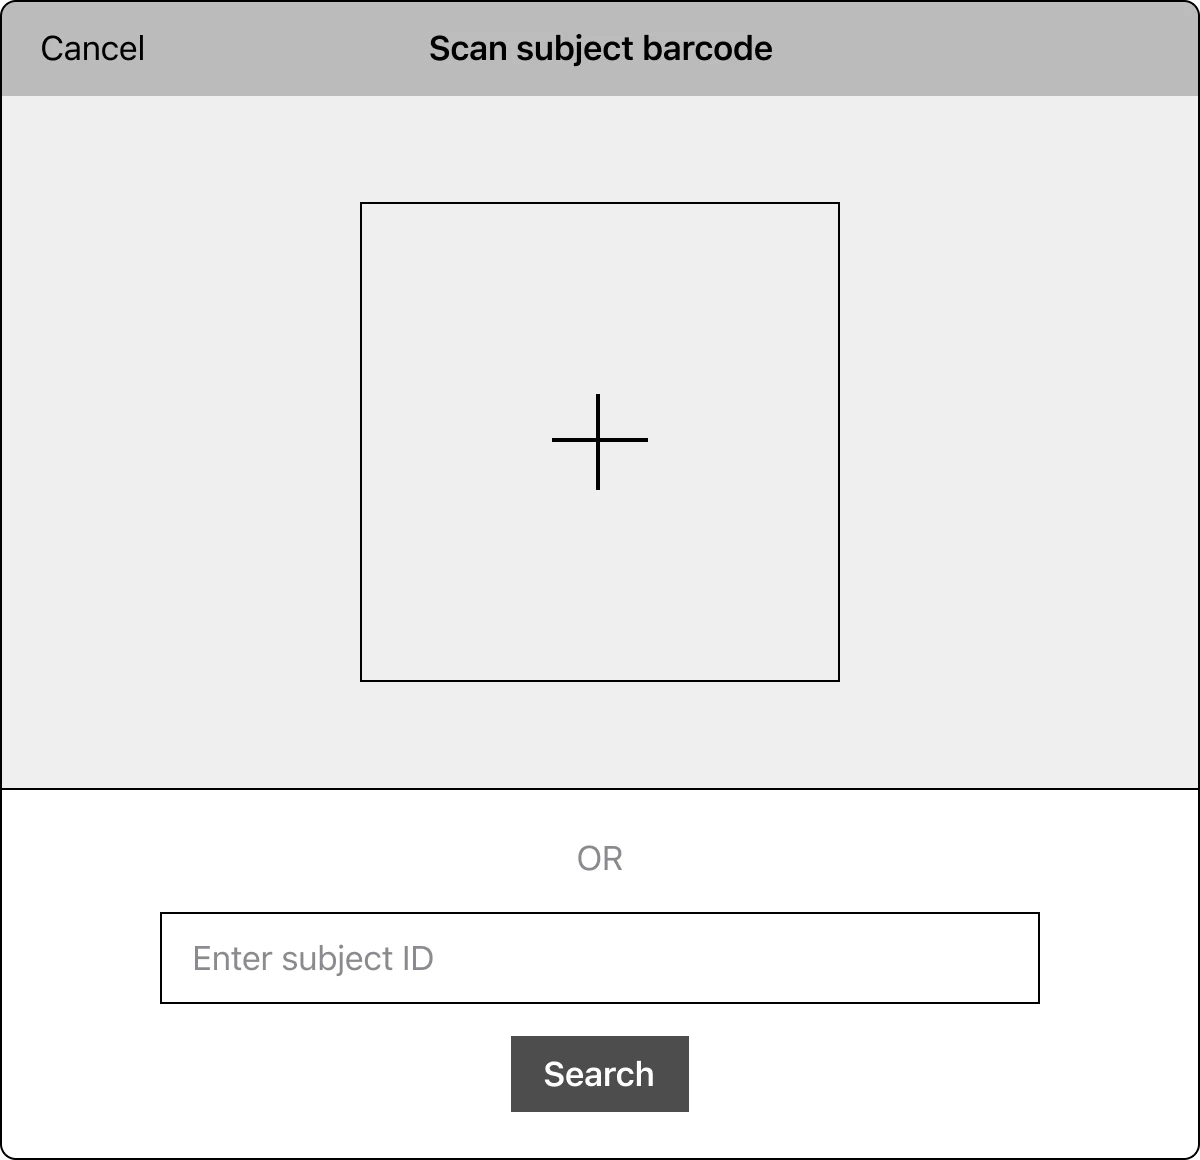
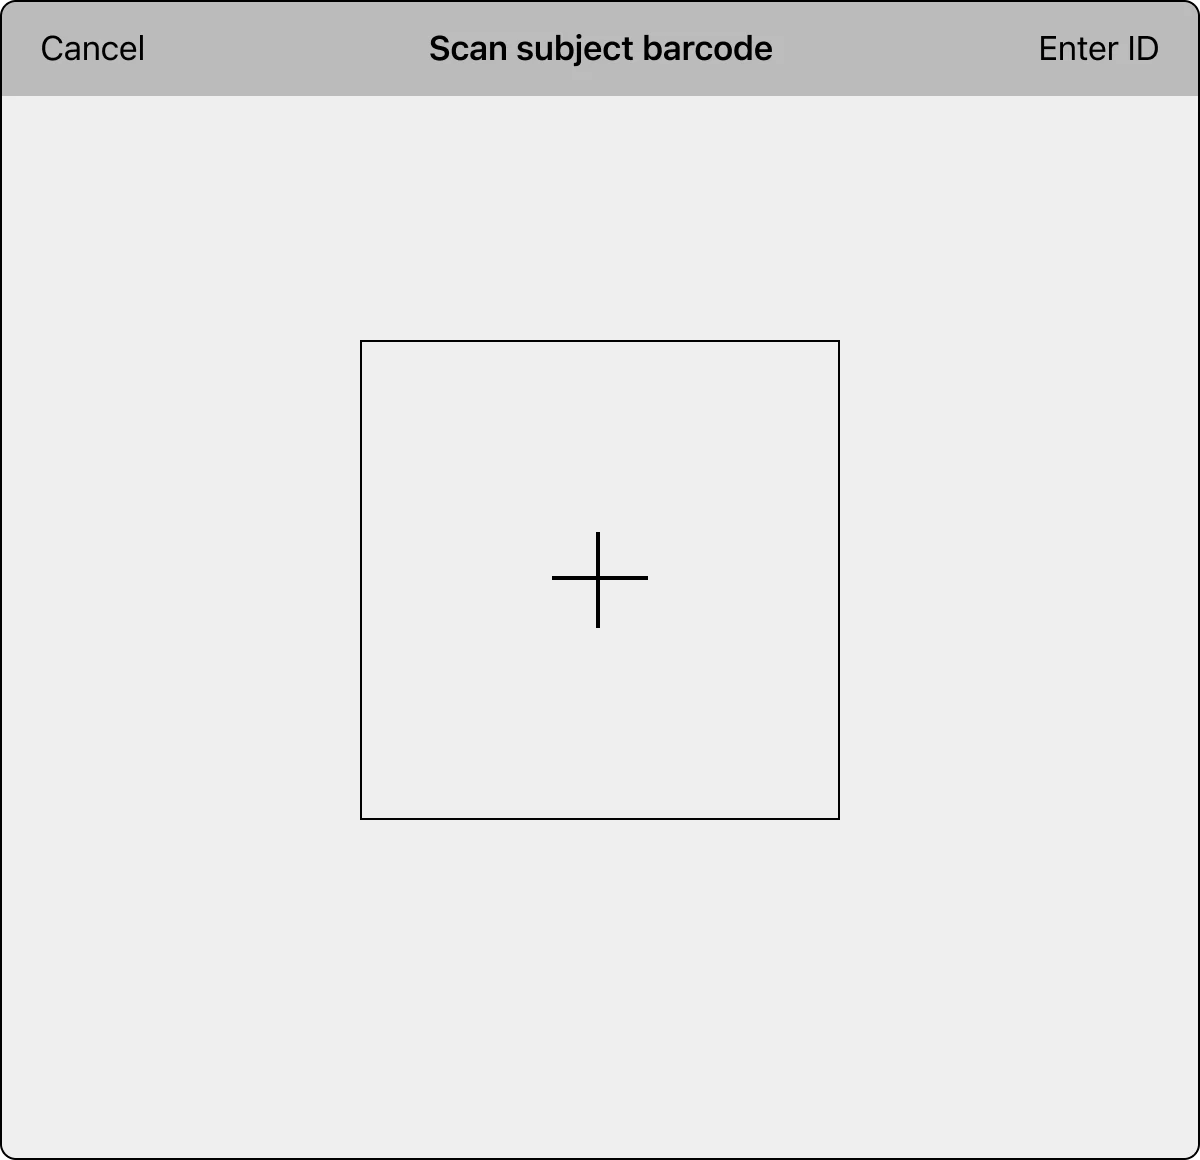
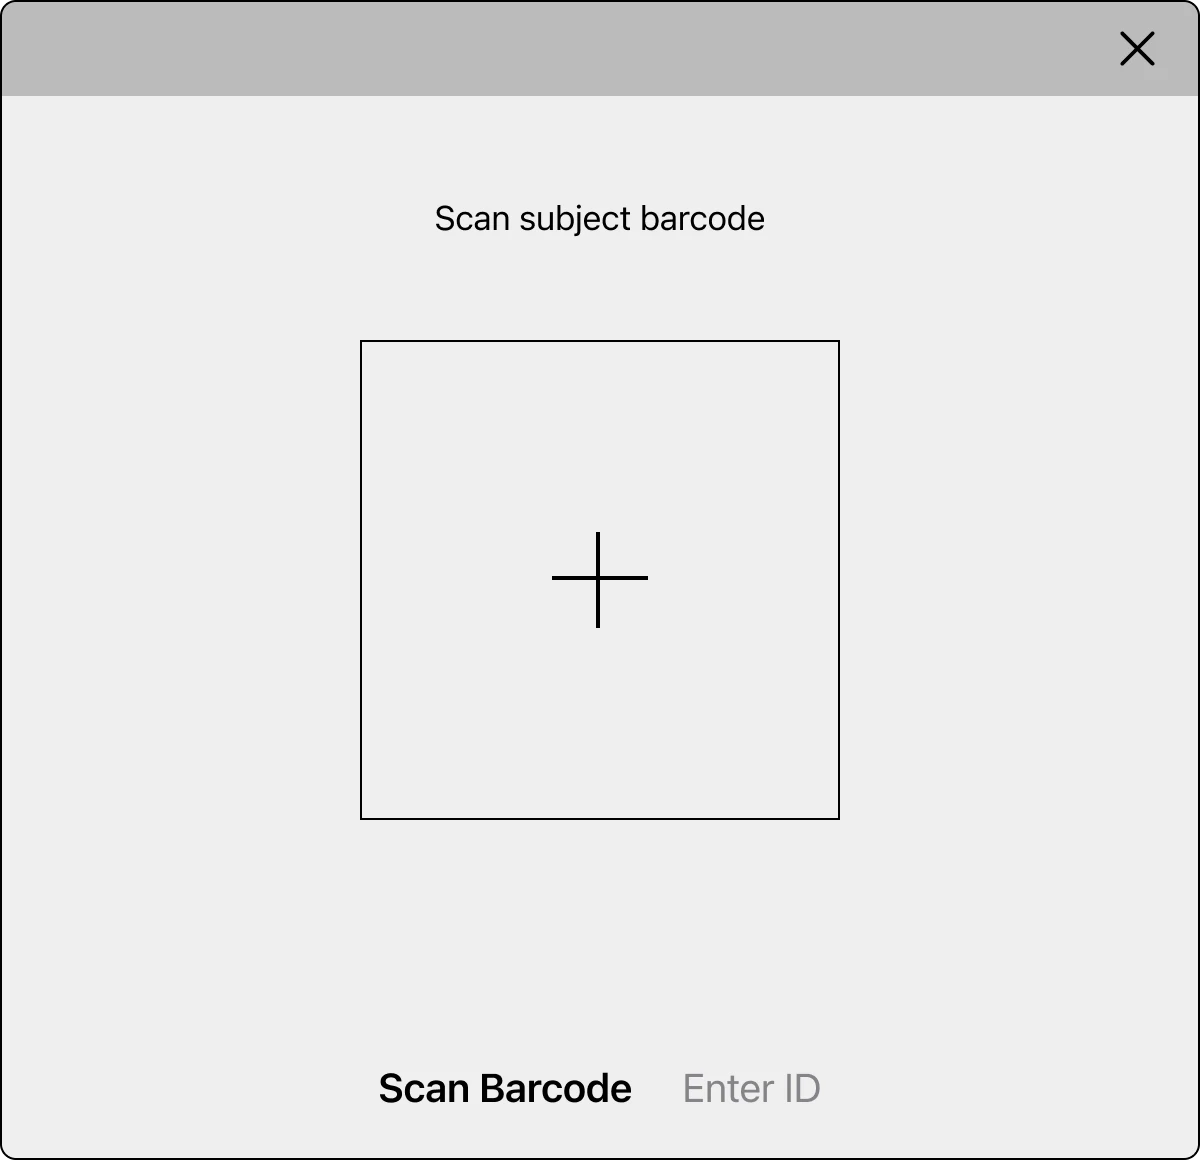
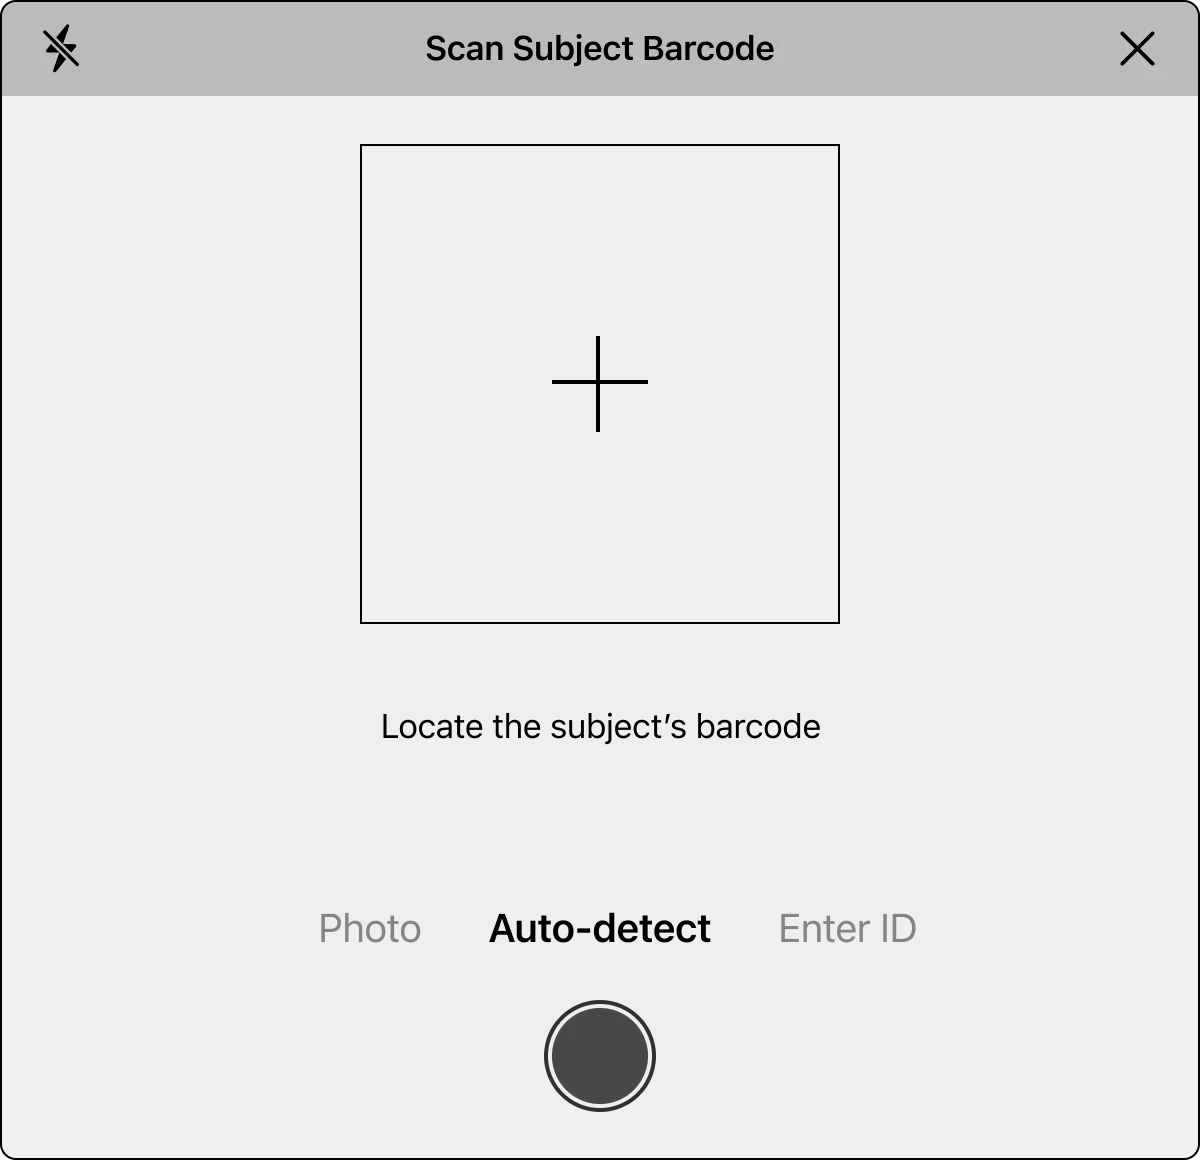
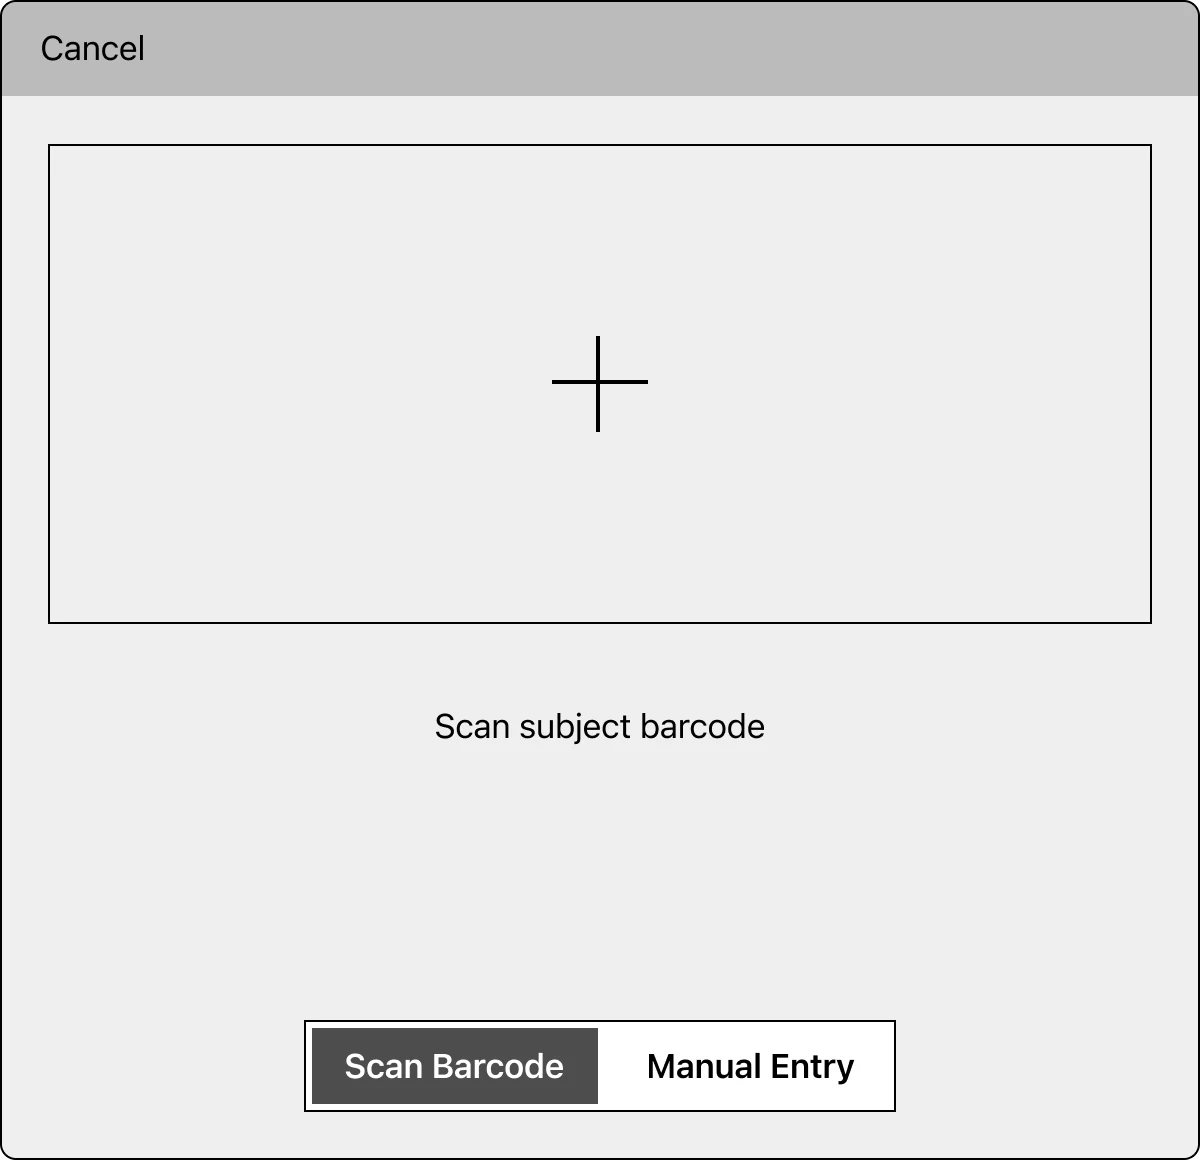
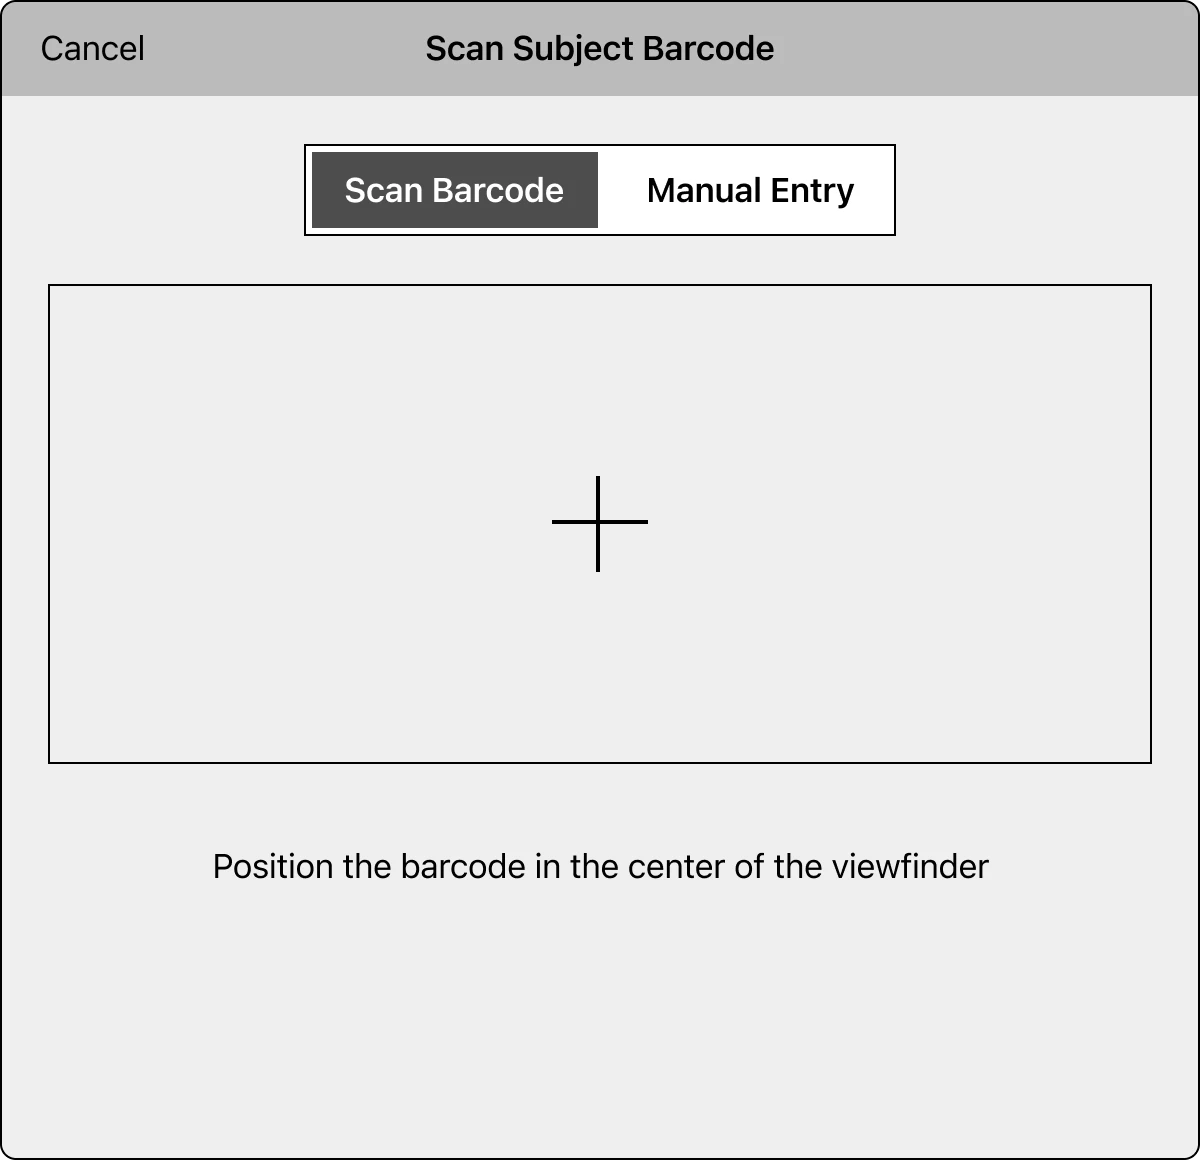
Combining scan functionality with manual entry functionality did not feel right. The manual entry UI added too much clutter and distracted from the intended approach of scanning. We were also banking on manual entry being infrequently used, if ever. It was more of a fail-safe after all.
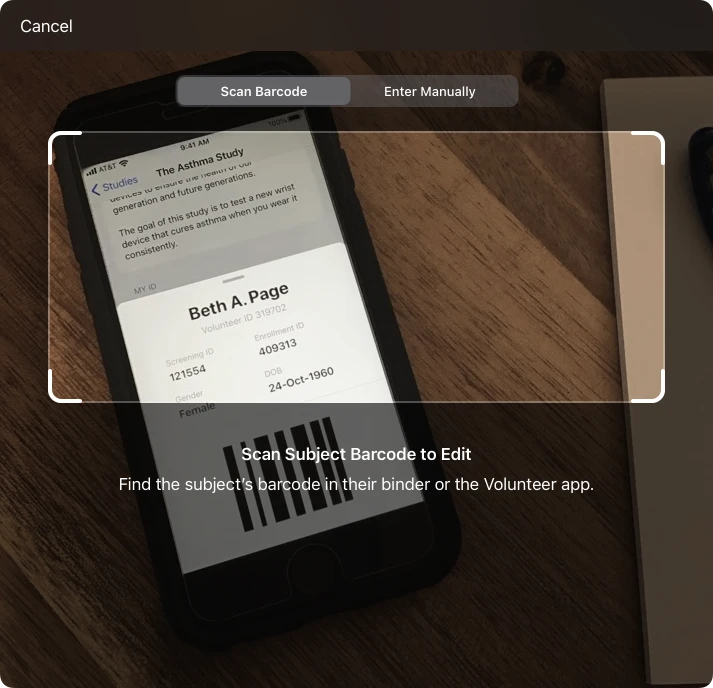
I decided to use the native segmented control to let the user switch modes, drawing inspiration from how the stock camera app lets you switch between various camera modes, such as photo, video, and portrait.
High-Fidelity Explorations

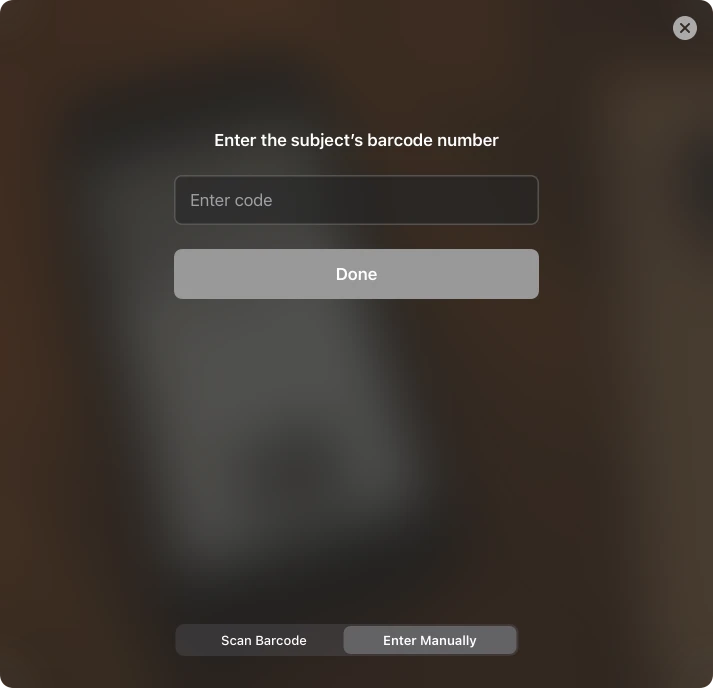
Manual Entry Mode

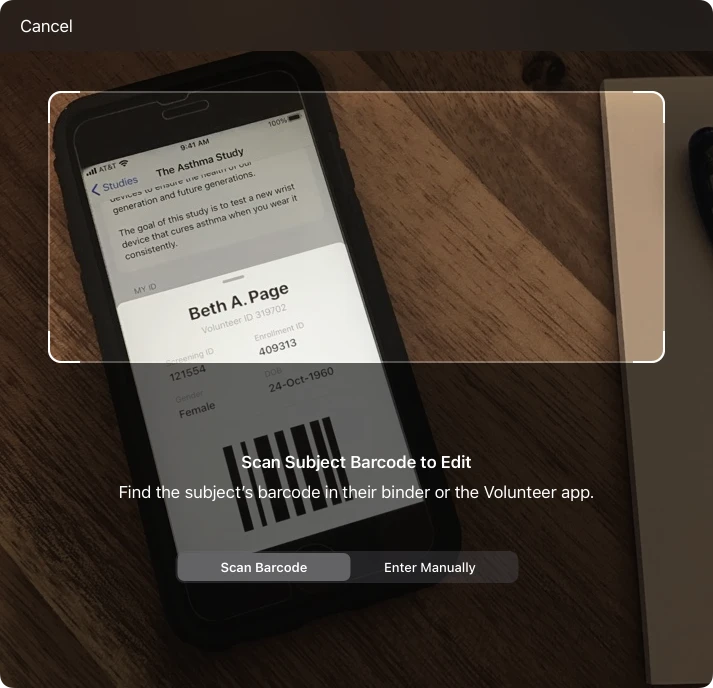
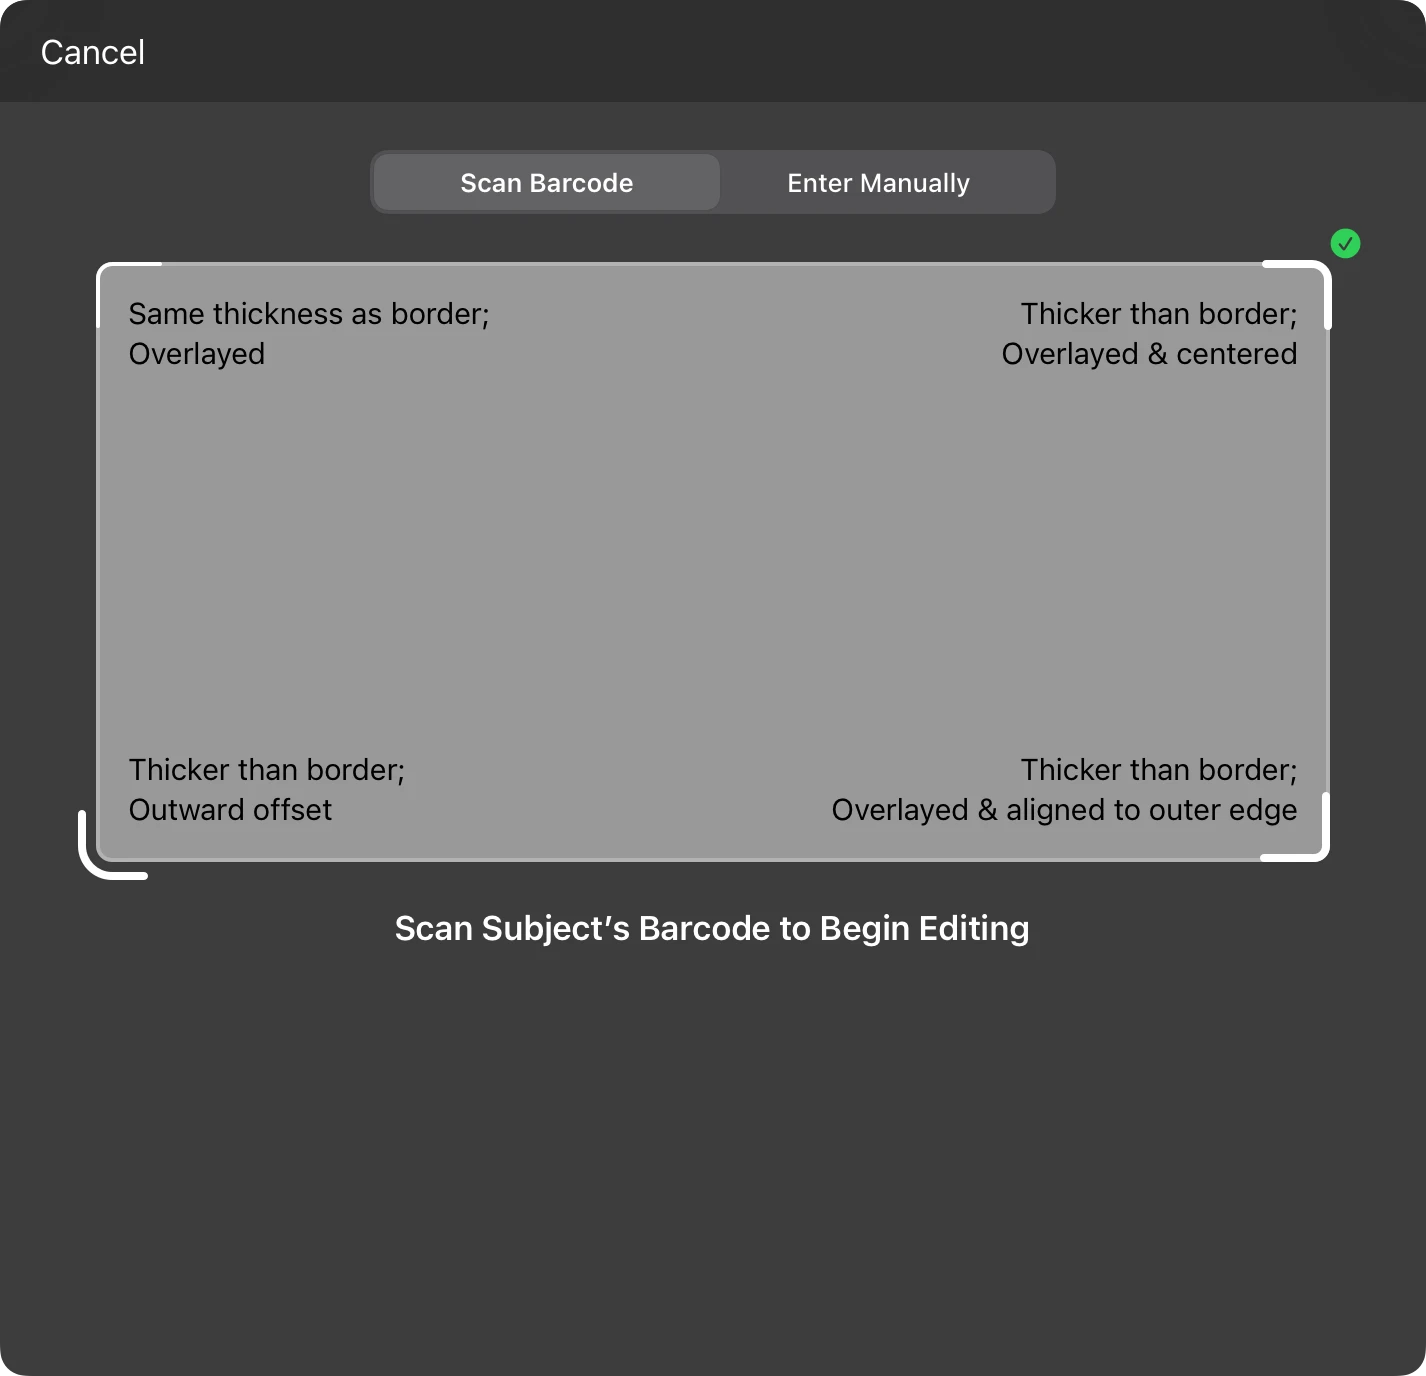
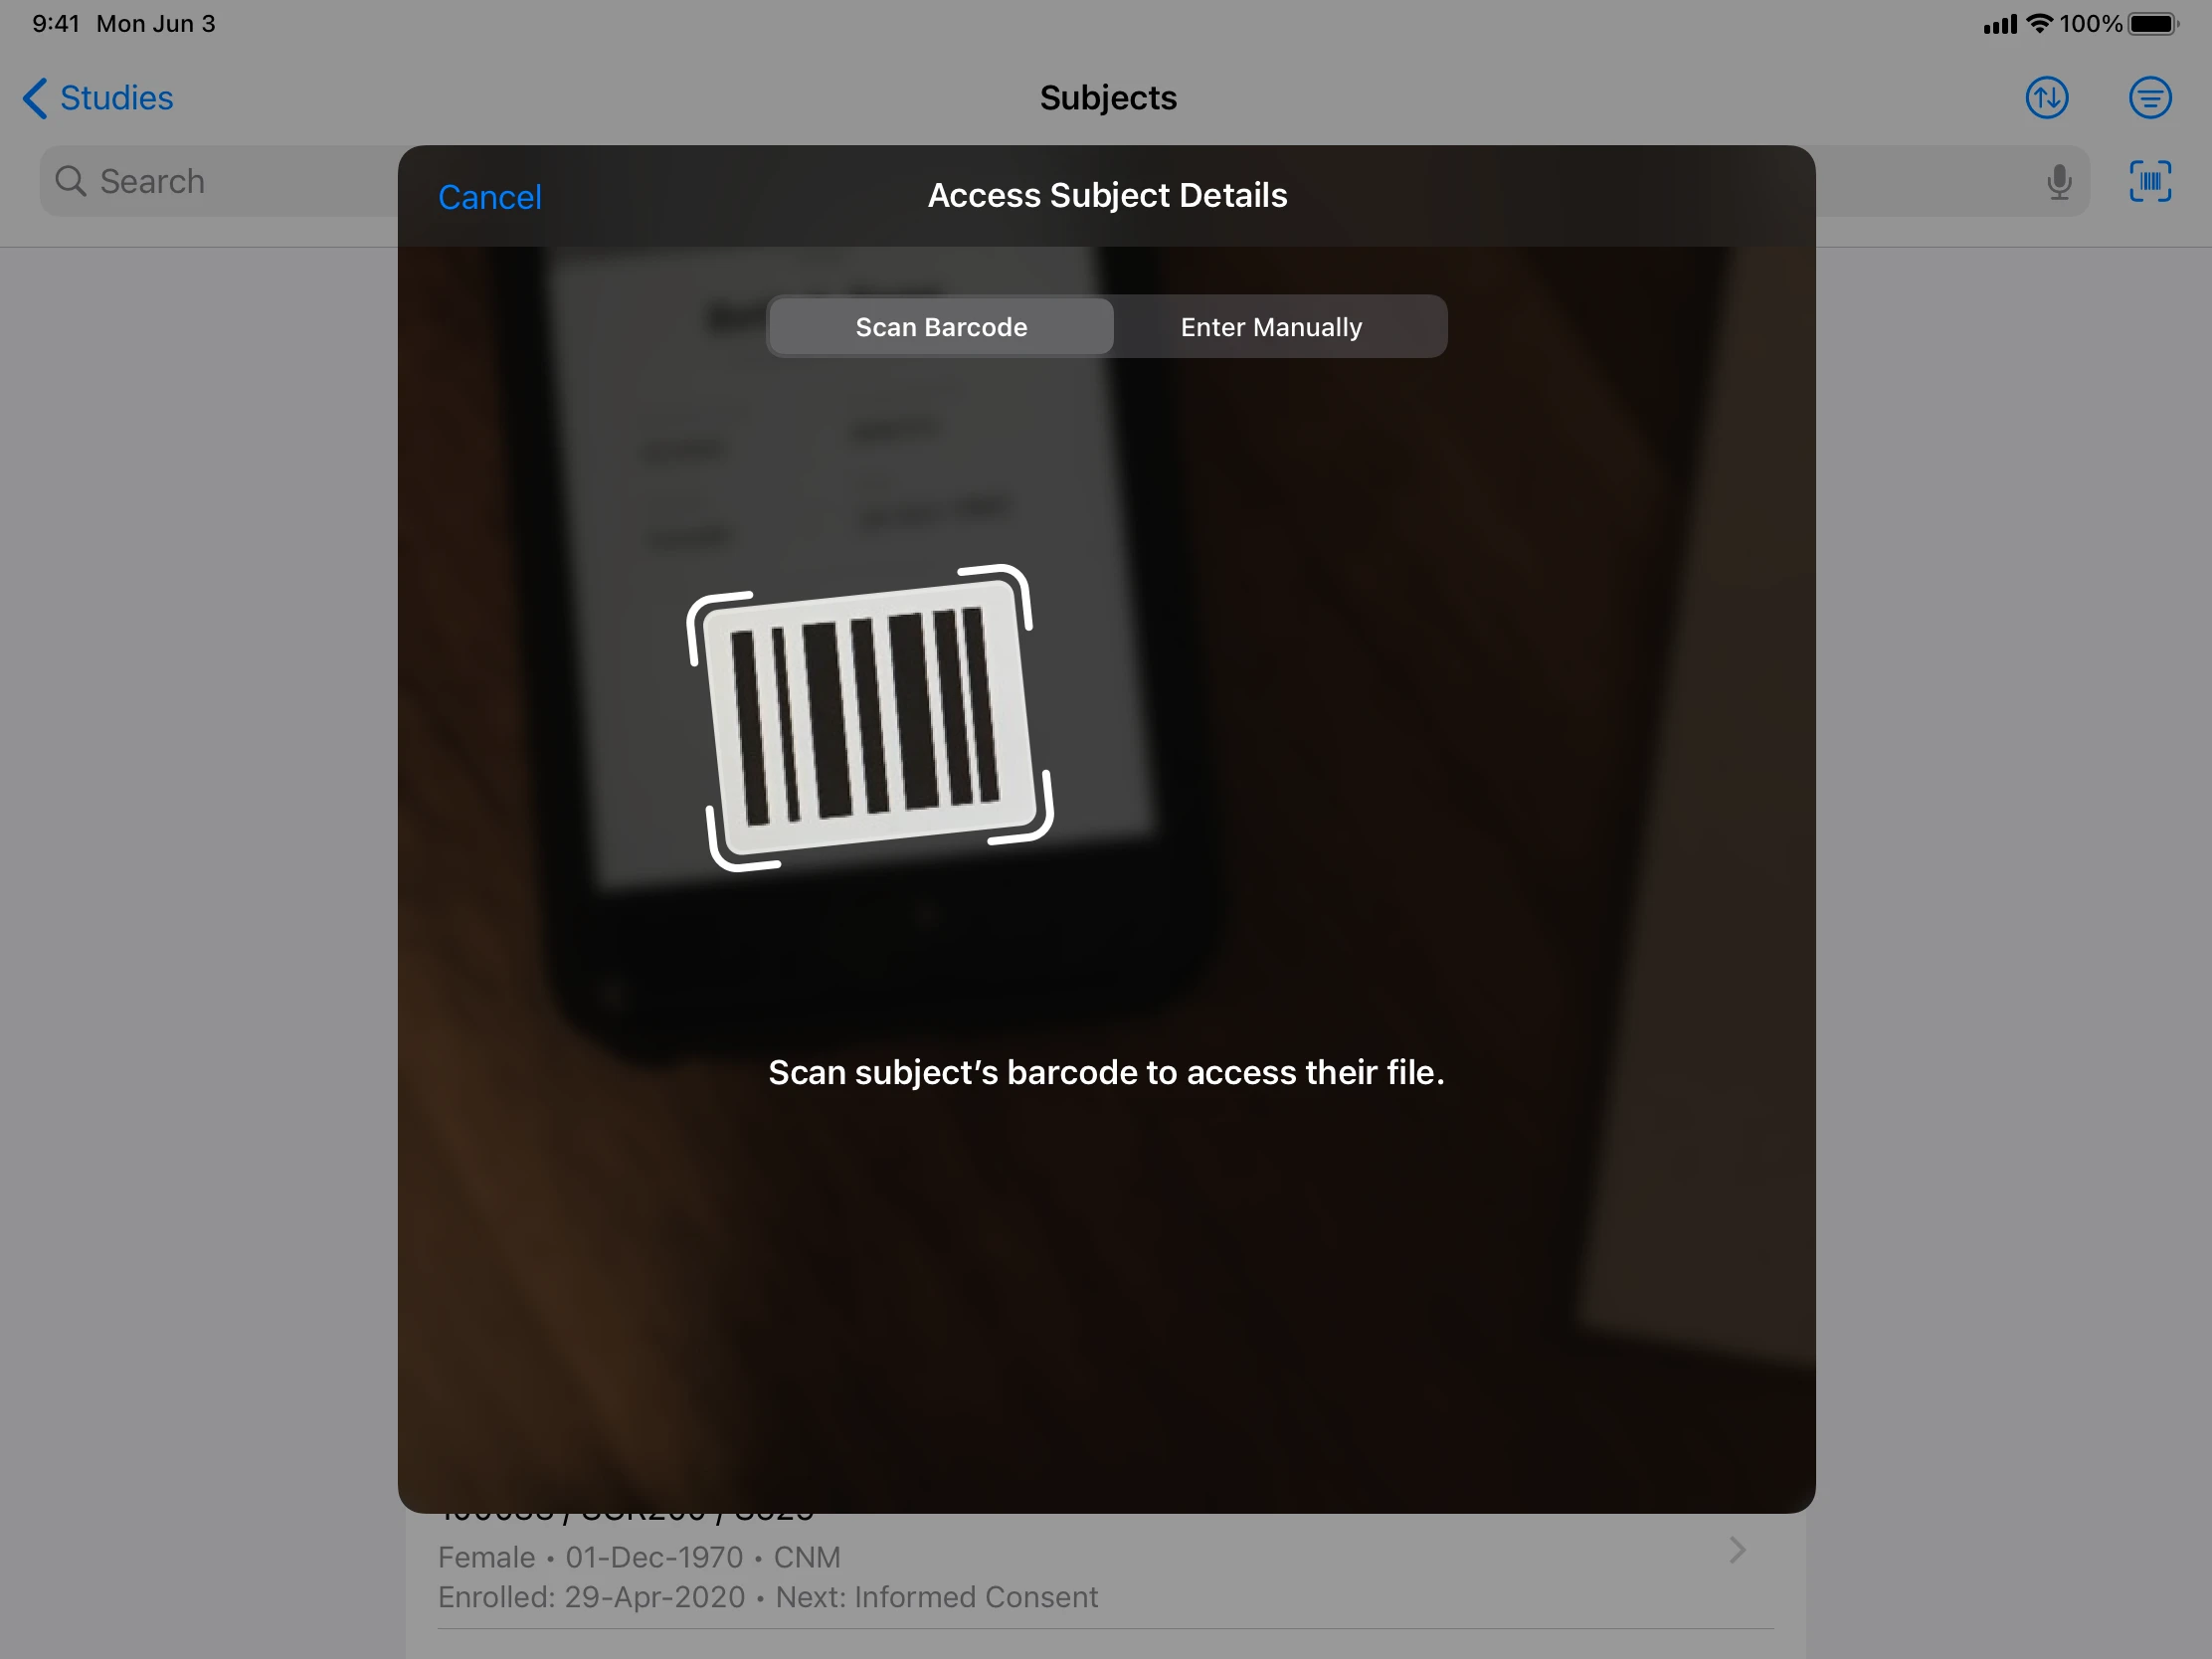
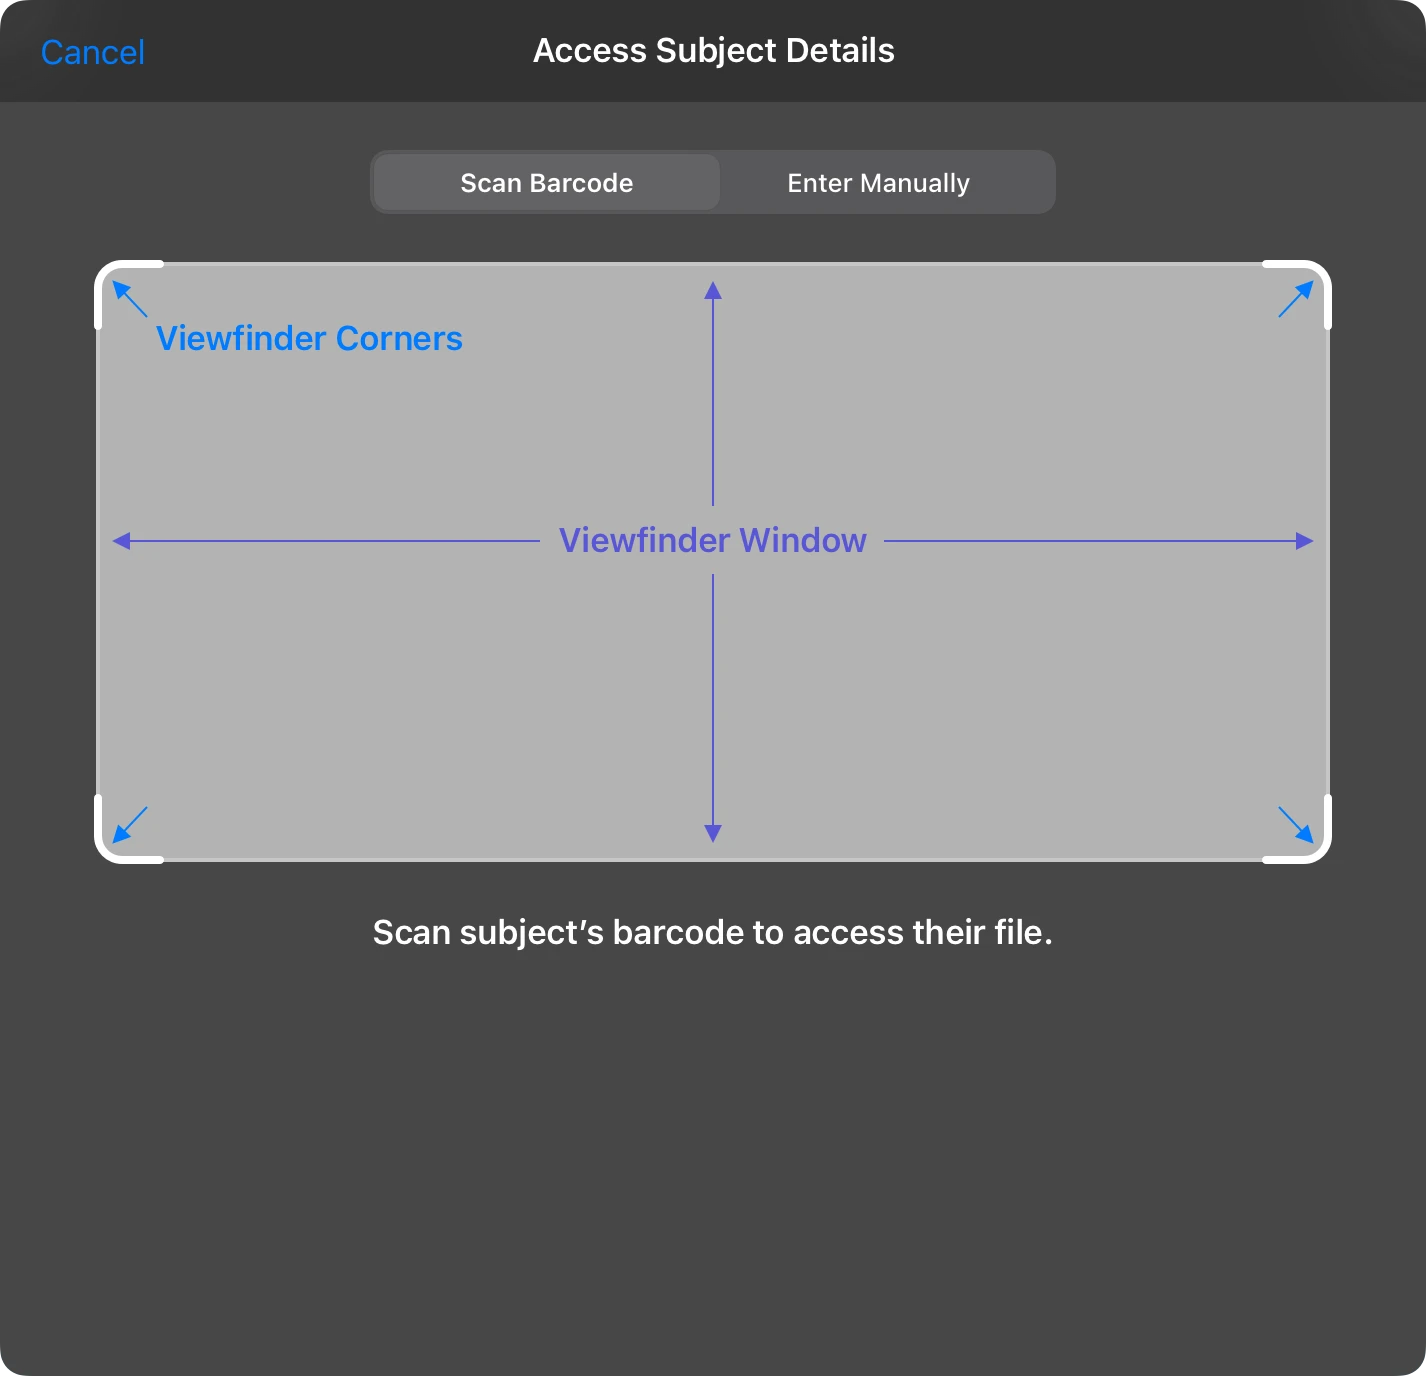
Viewfinder Window: Corner Treatment
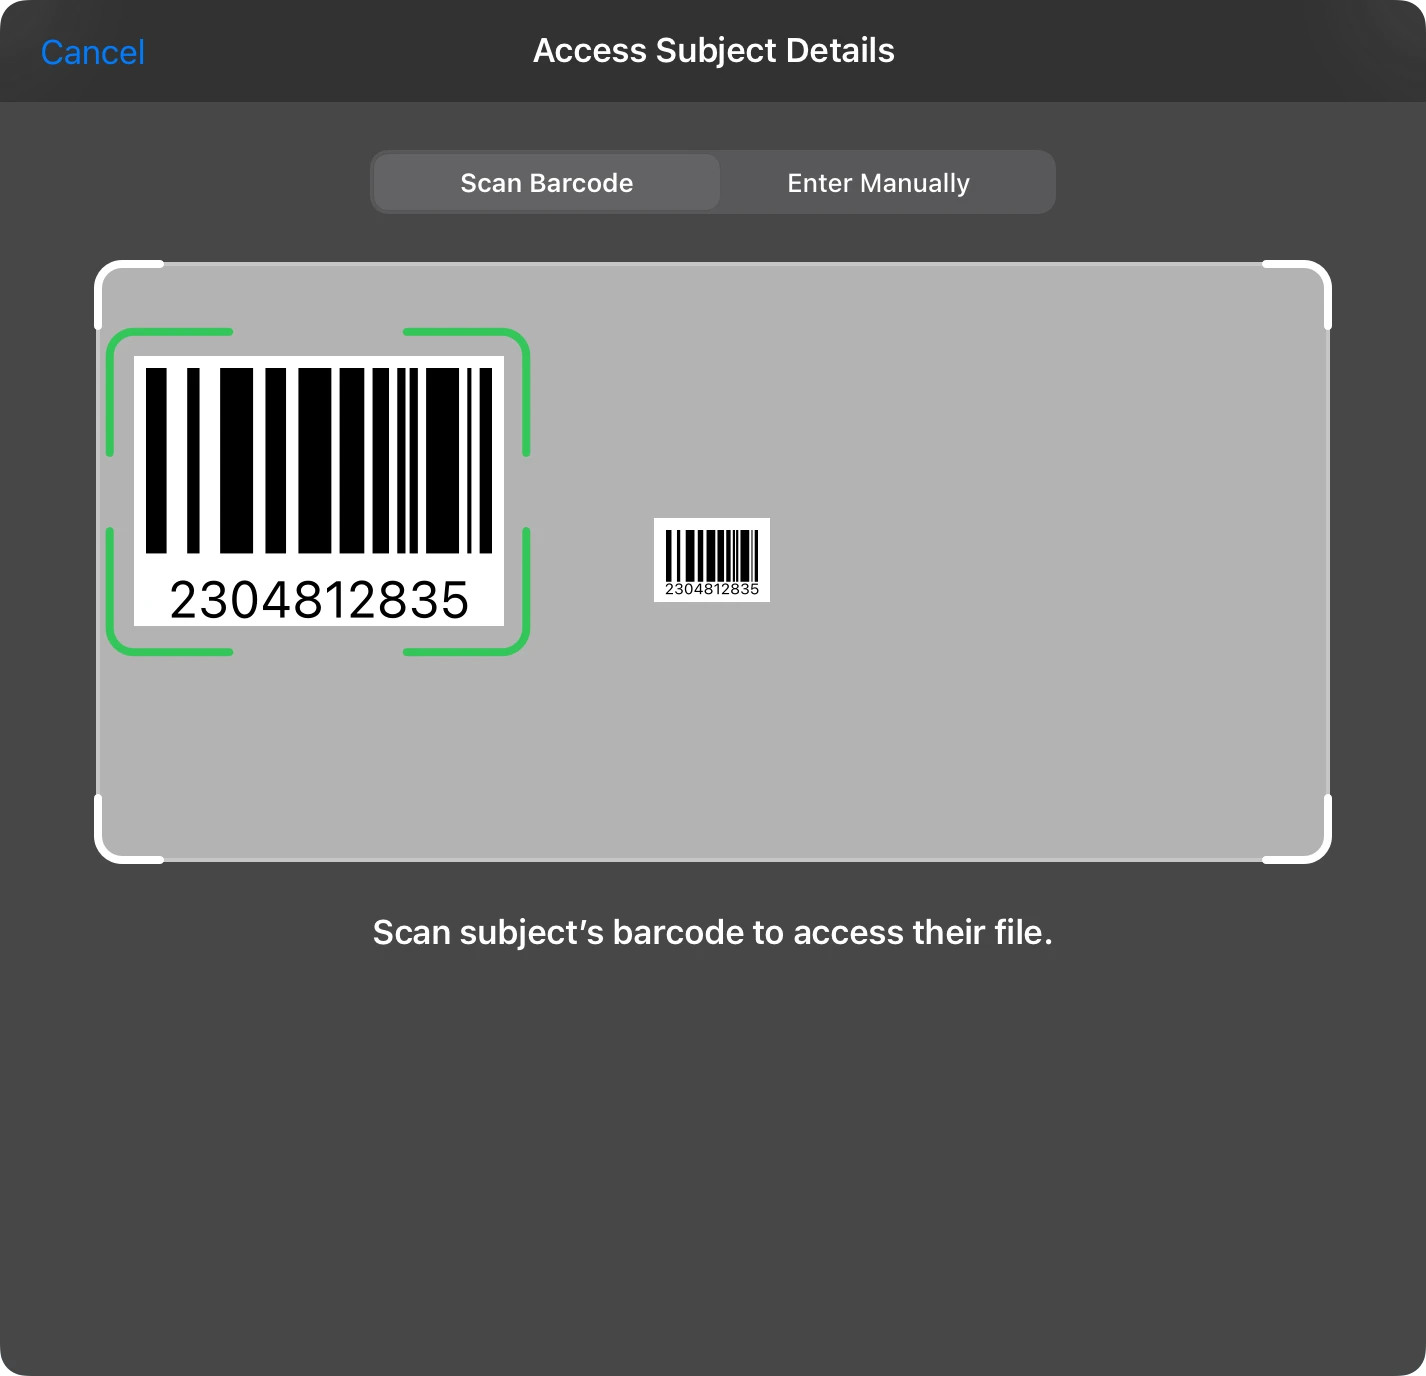
I wanted the viewfinder window to have four "living" corners that would locate and move to any prominent barcodes. This would help the user see which barcode the camera was actively prioritizing (in case there were multiple). To emphasize this detail, I carefully considered the shape of the corners, the prominence of the lines, and their alignment within the window.


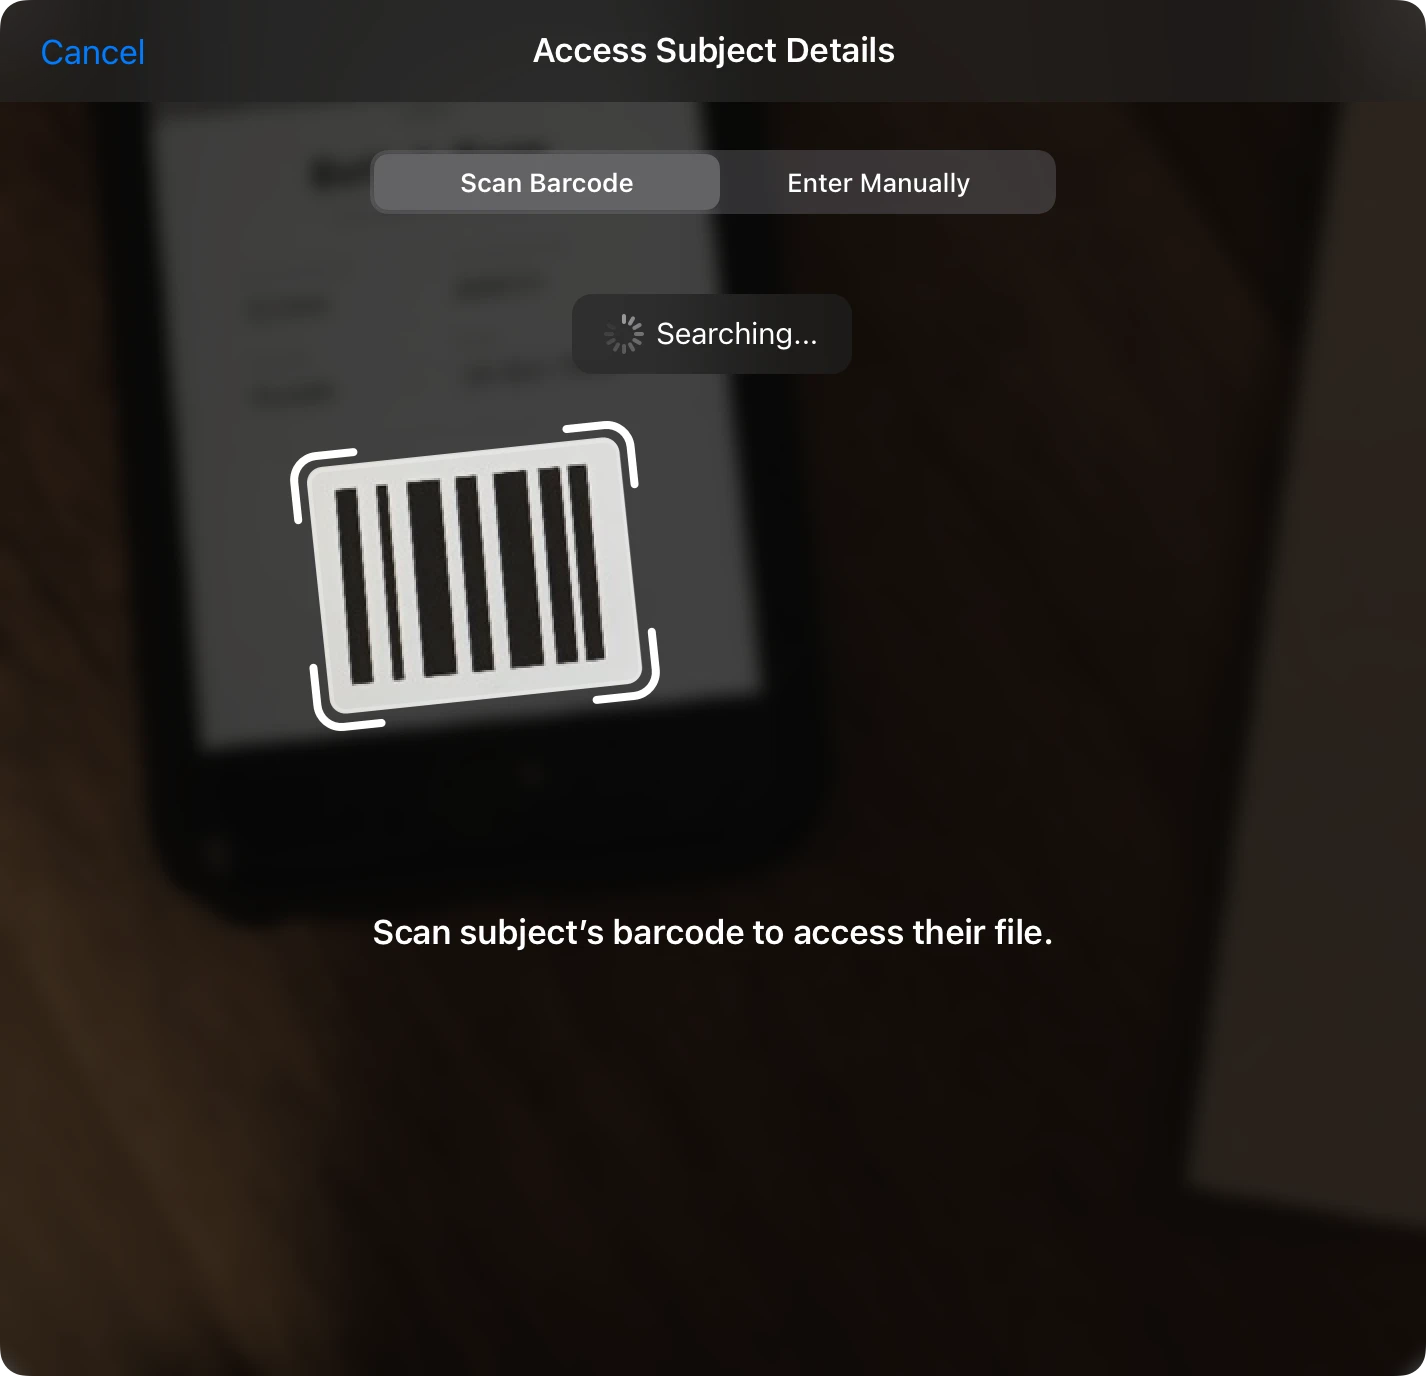
Identifying the Barcode


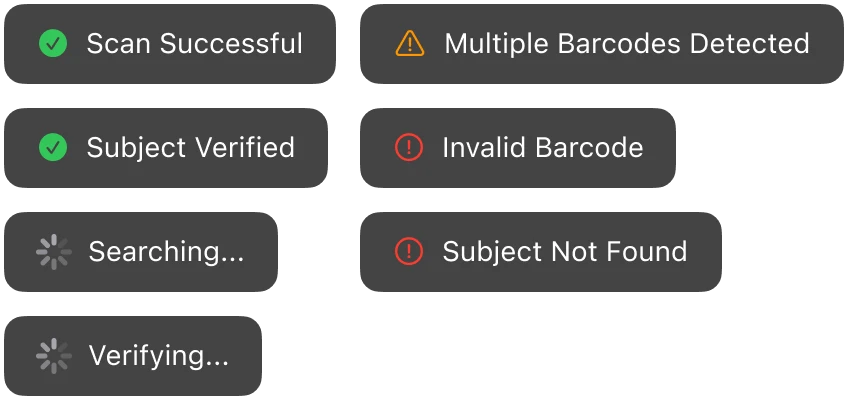
Errors & Stateful Feedback
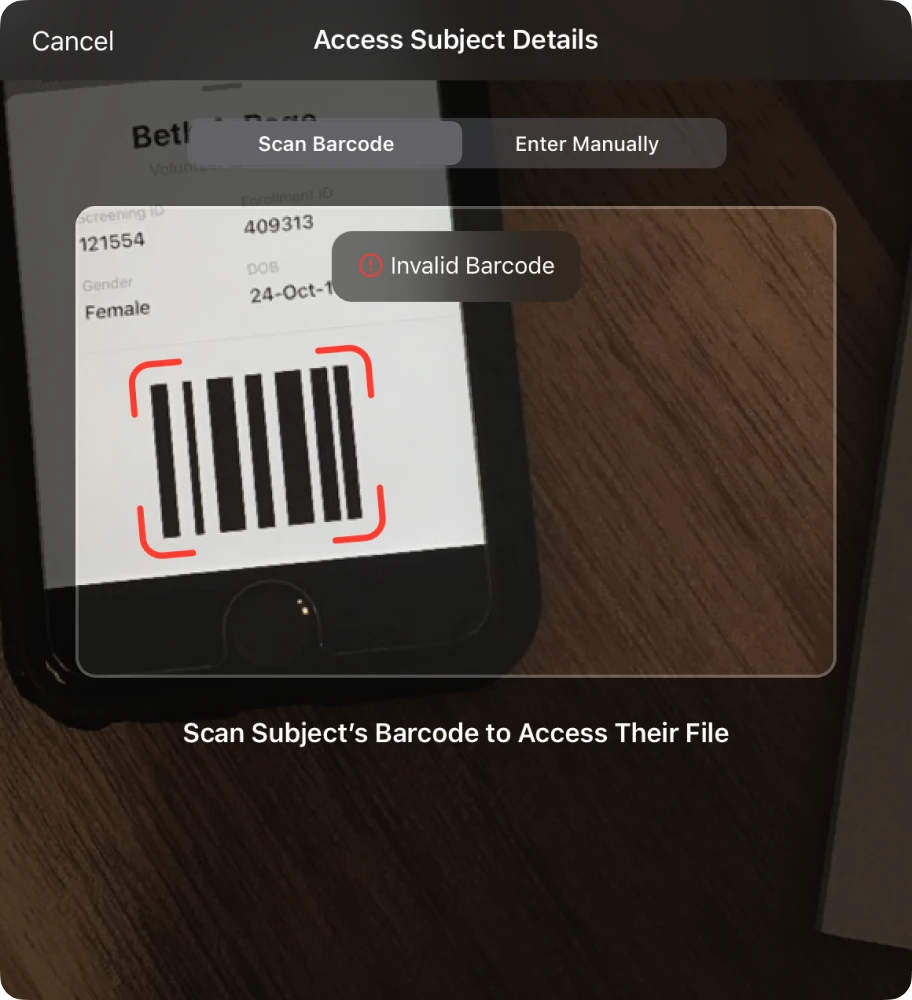
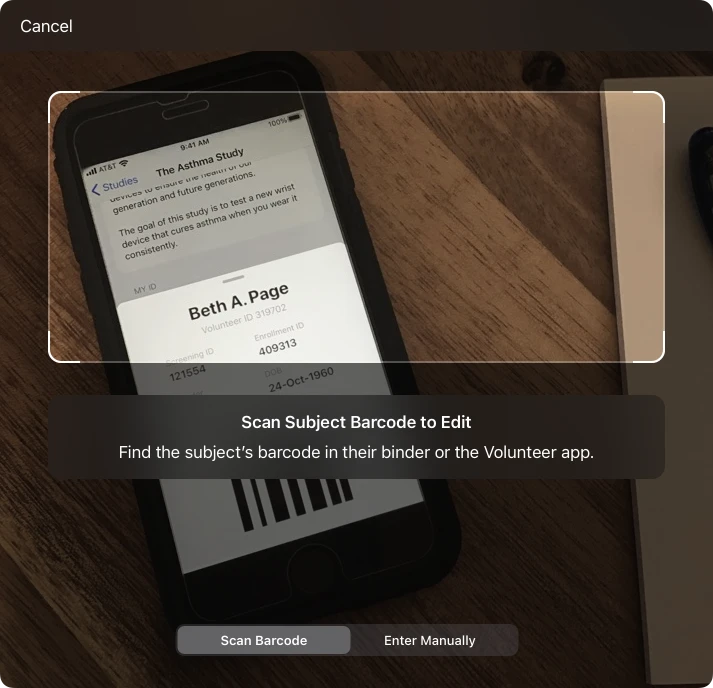
Message Treatment
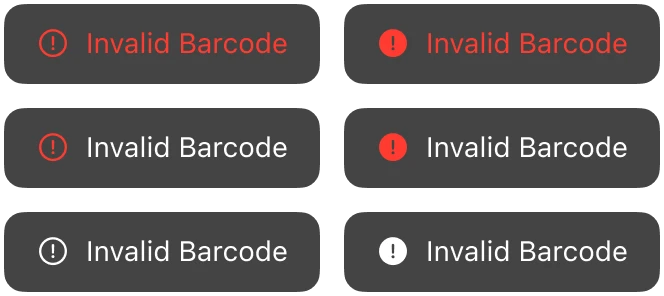
Message Ideas
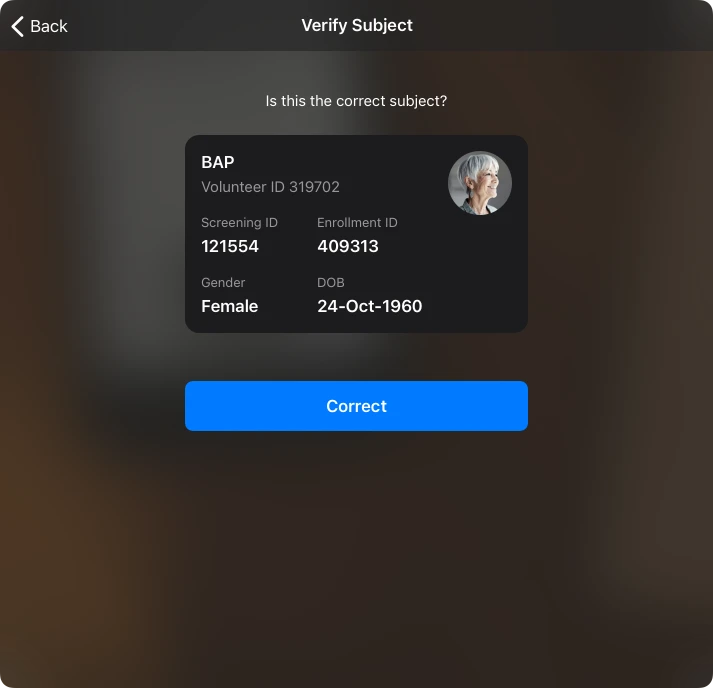
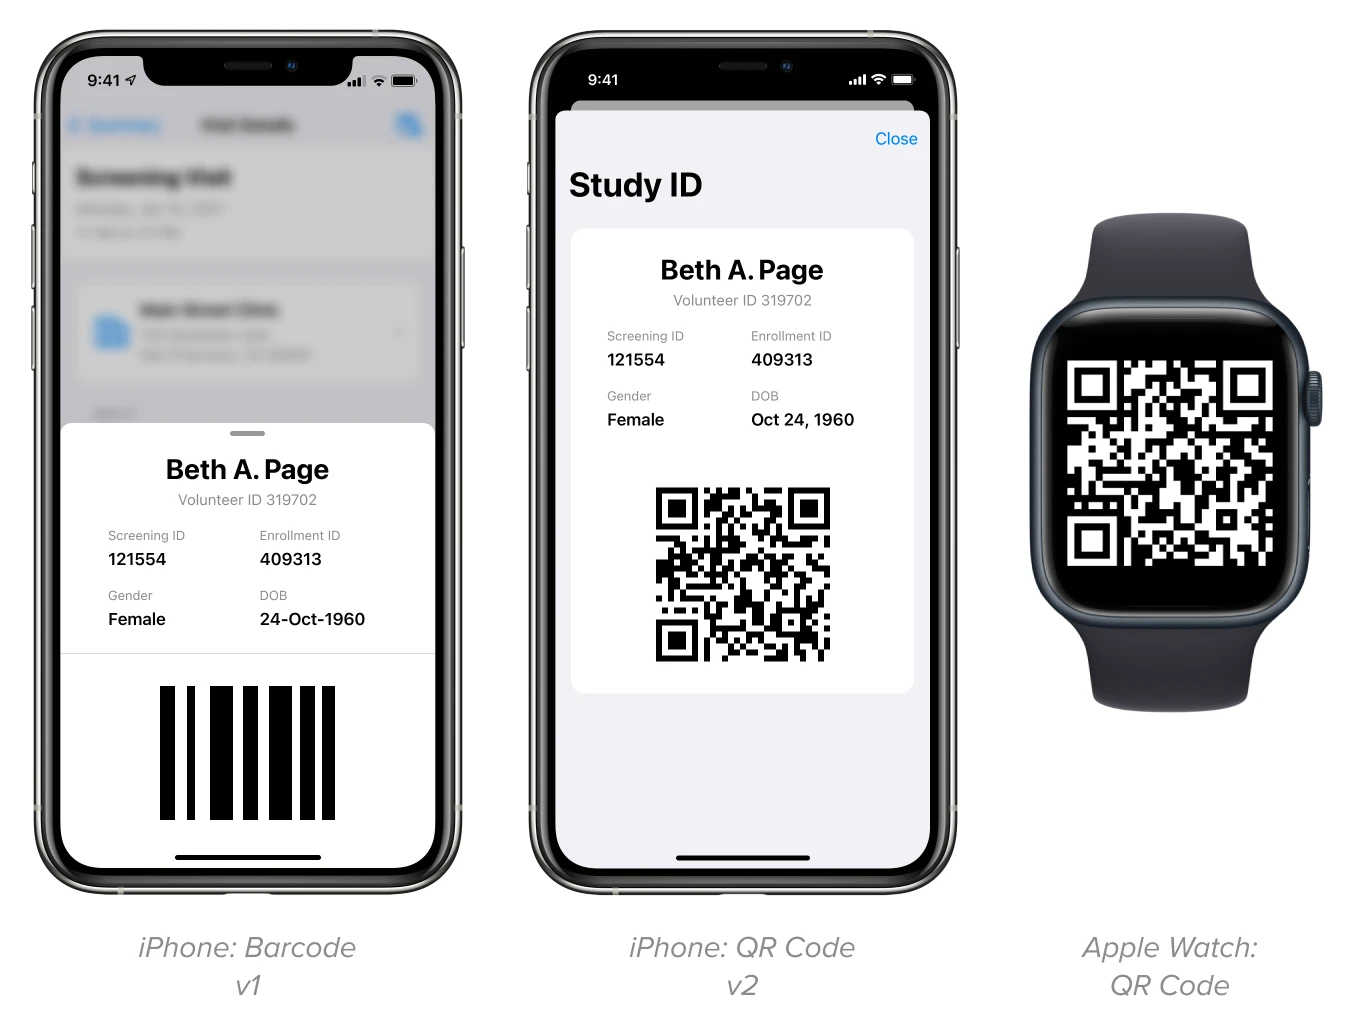
Participant Study IDs for Verification
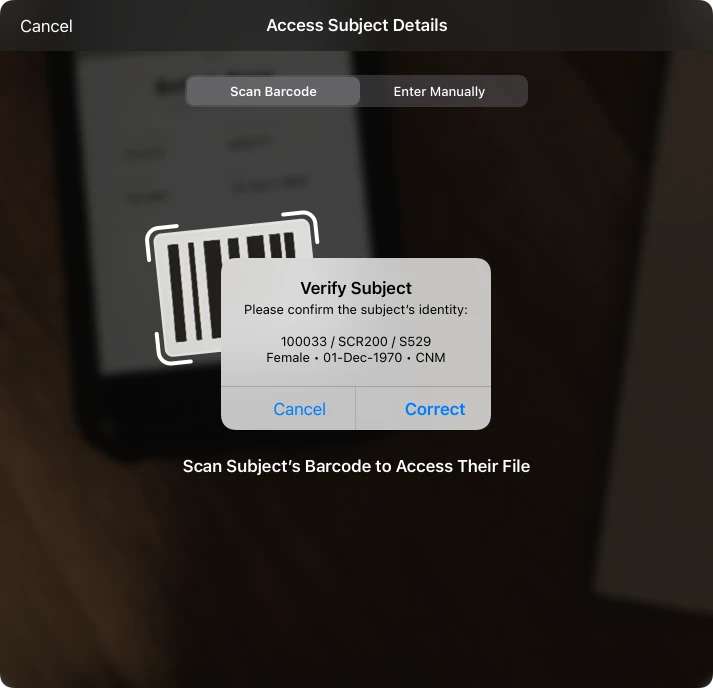
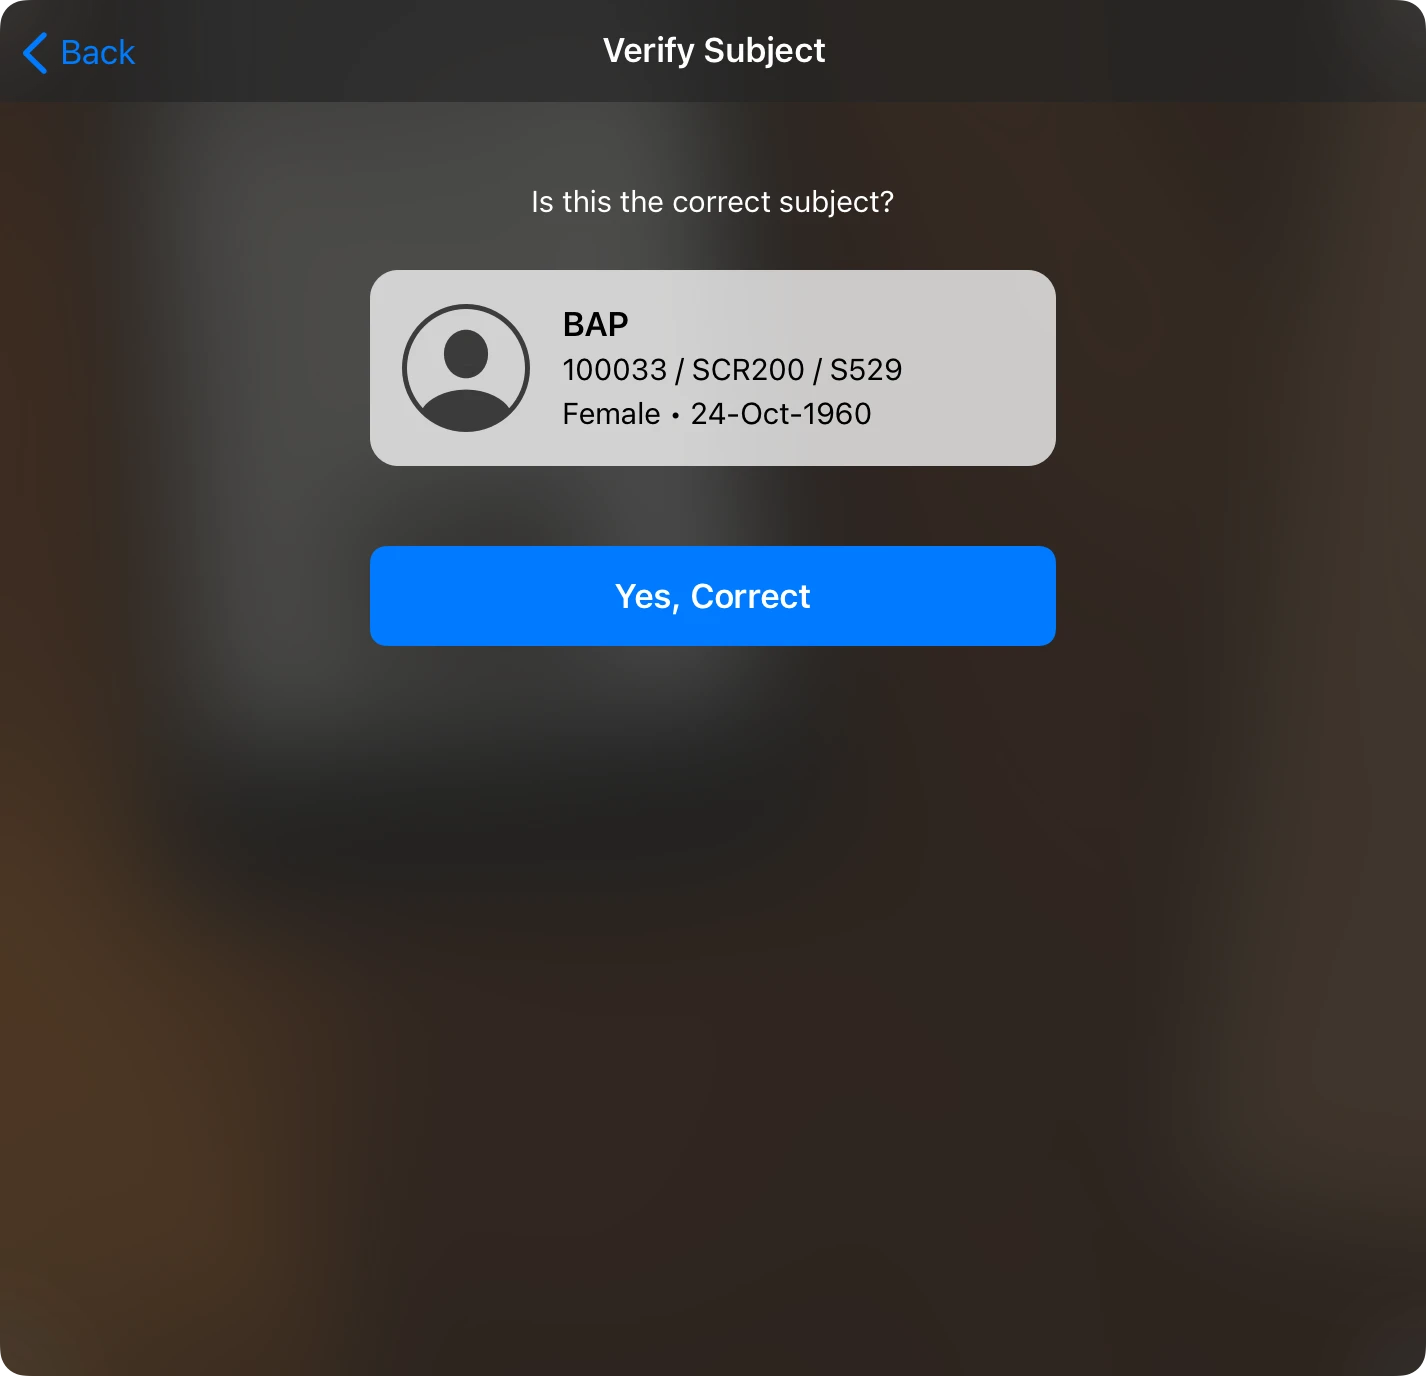
During the discovery phase, CRTs emphasized the importance of data accuracy, especially on high-volume days. To help increase confidence that the correct participant was being selected by the barcode scanner, I included a verification step in my designs.
As part of our participant-facing app, Volunteer, I had previously designed a study ID to be used precisely for verification and check-in purposes. I wanted to reuse that design here as much as possible.
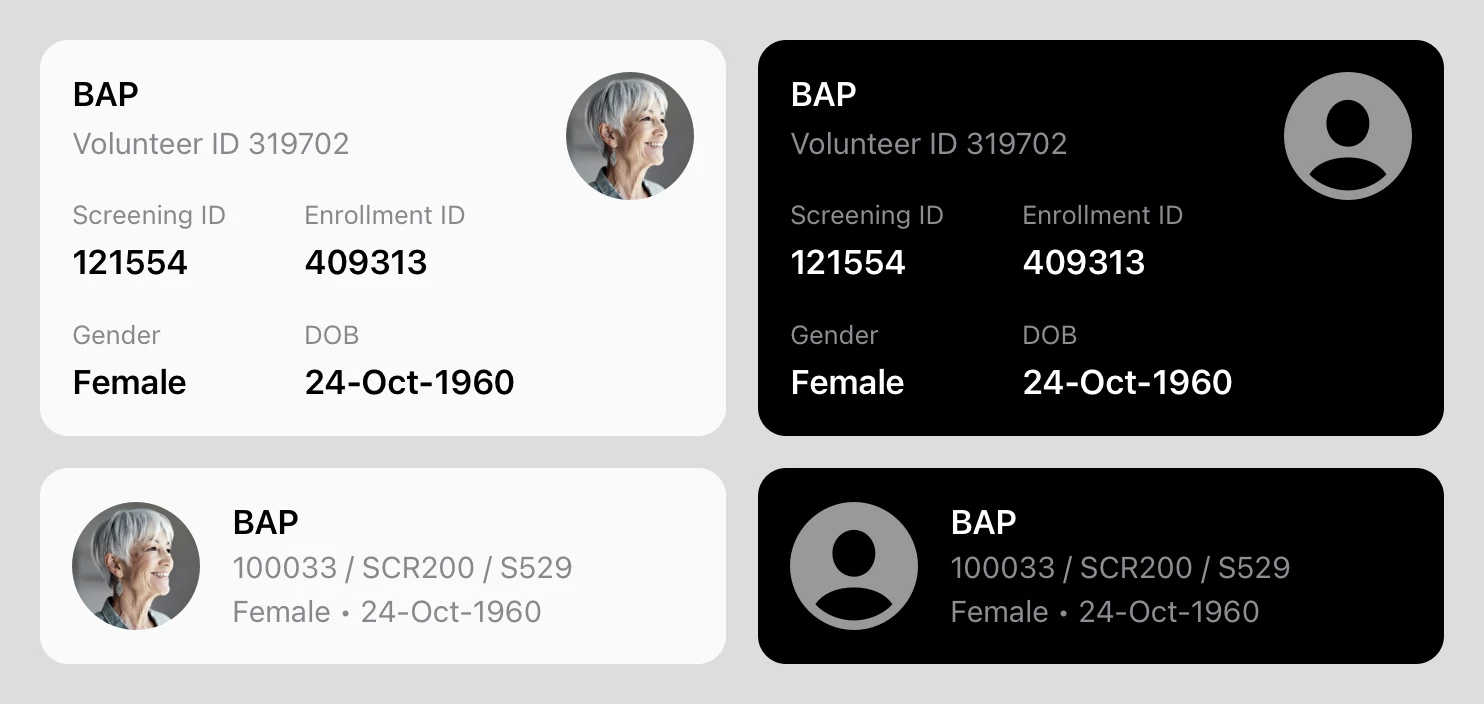
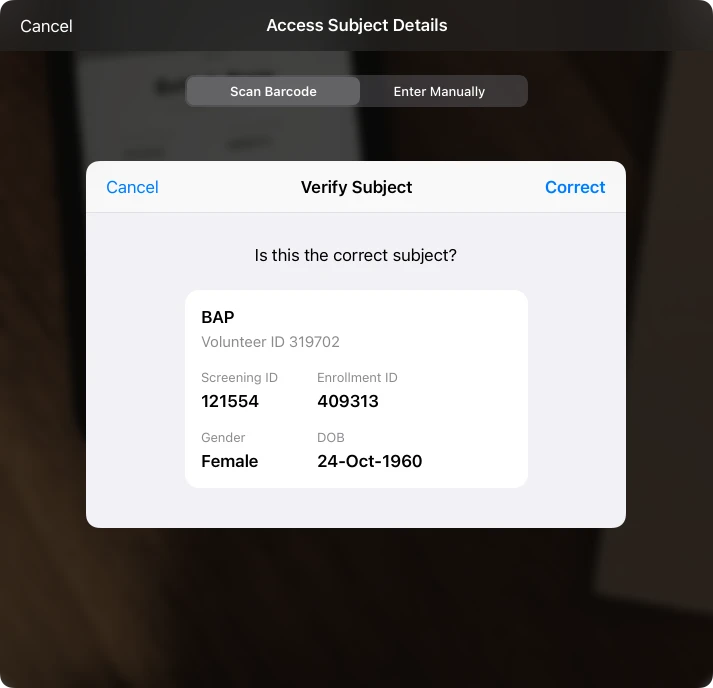
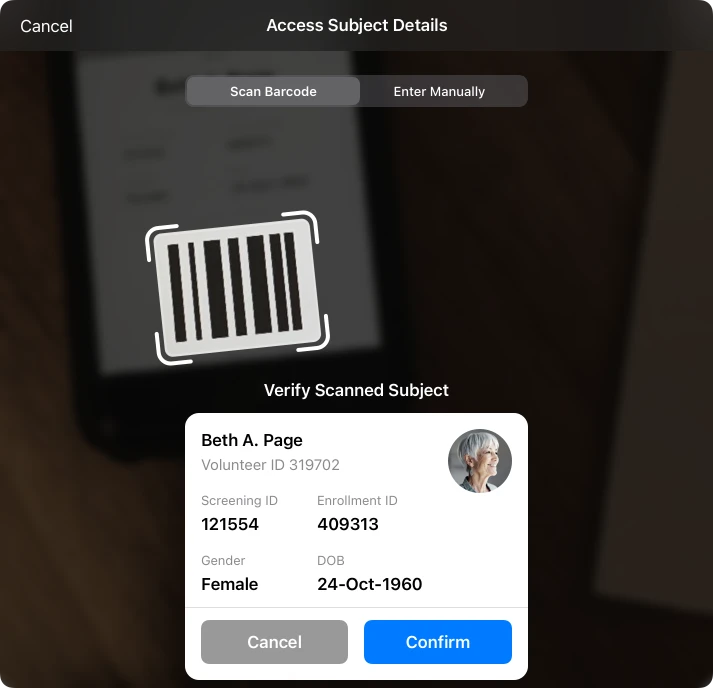
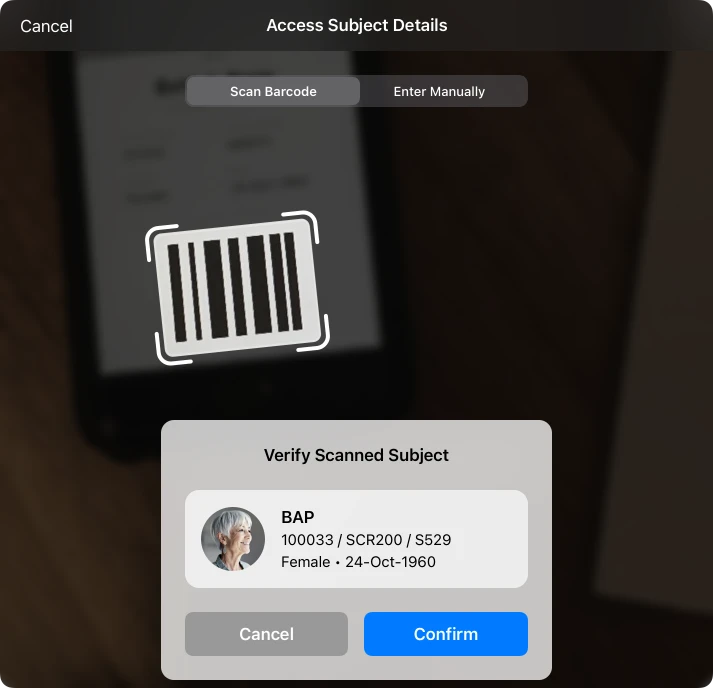
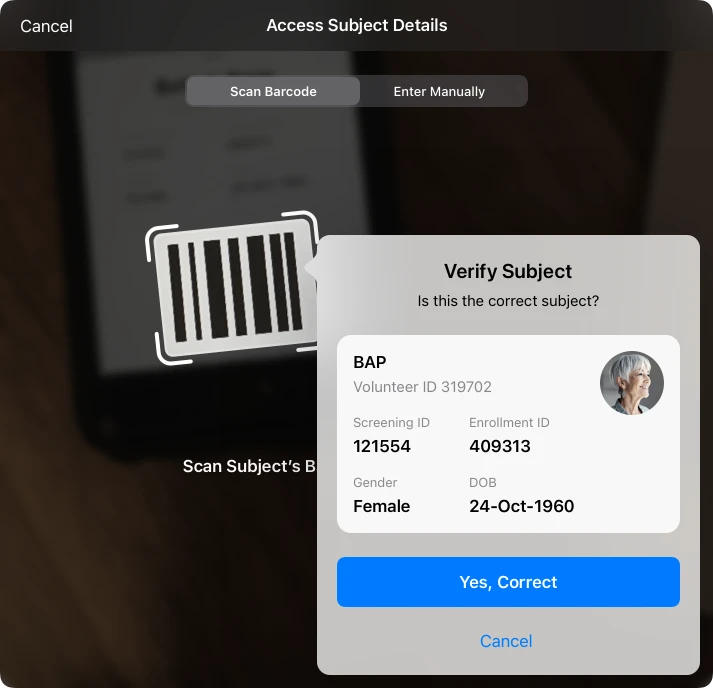
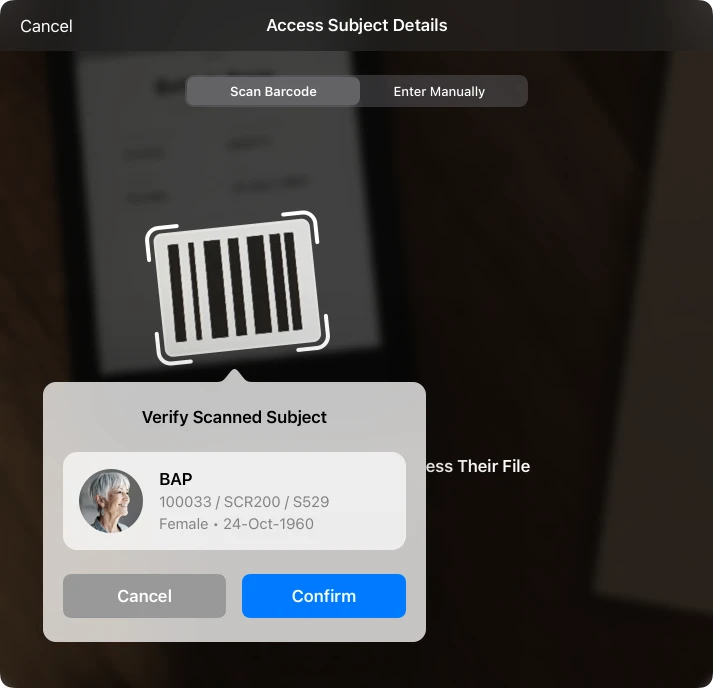
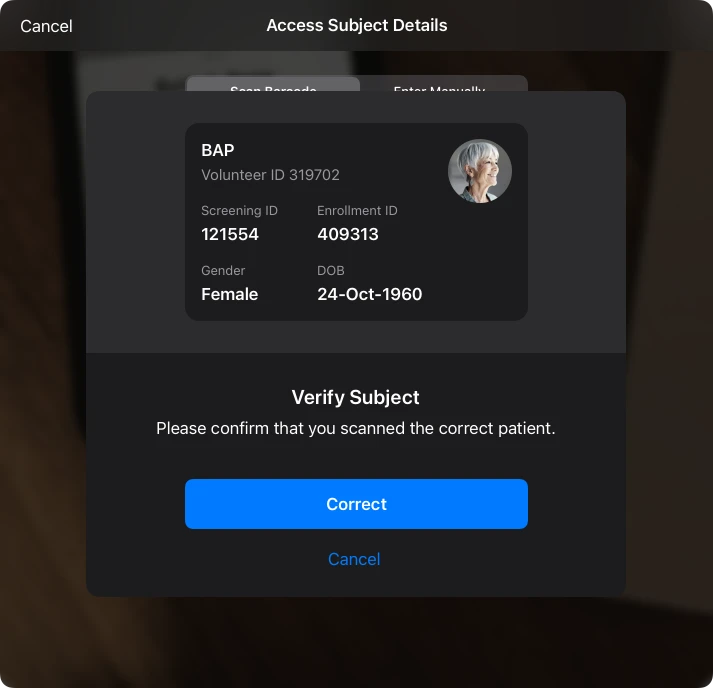
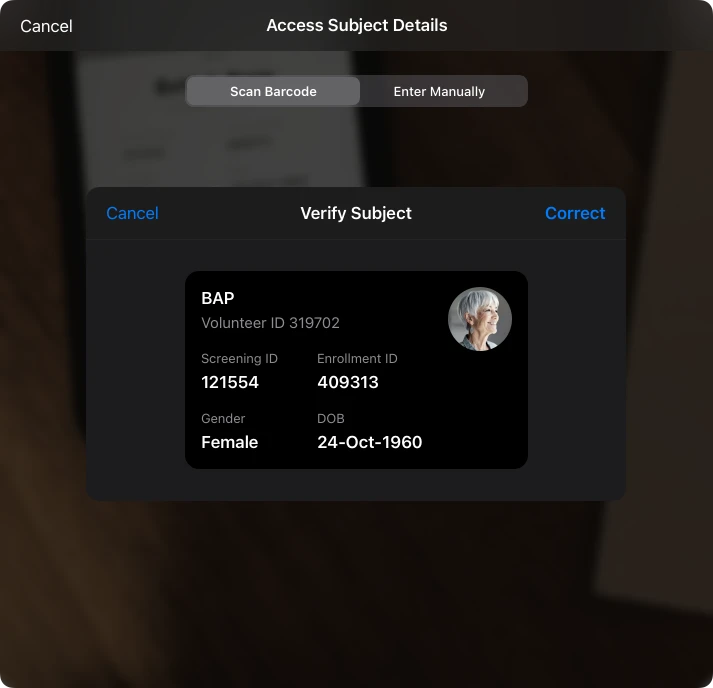
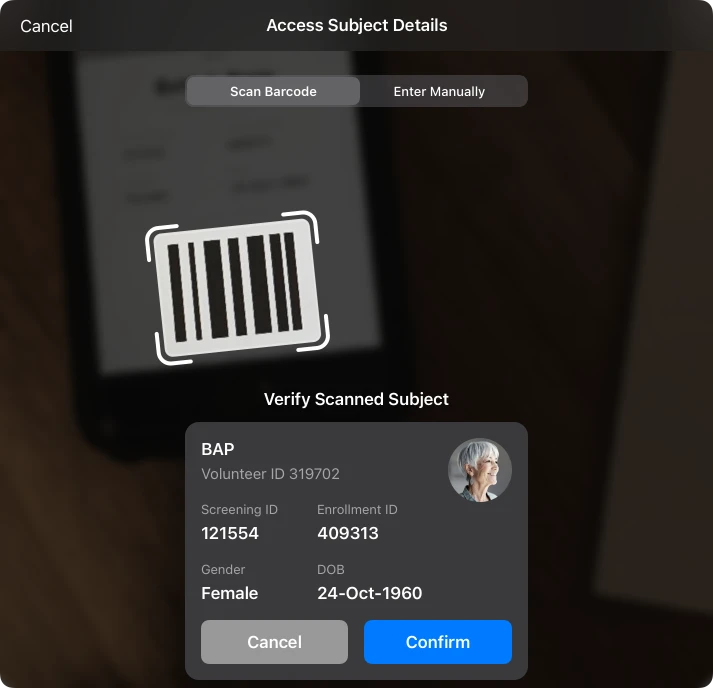
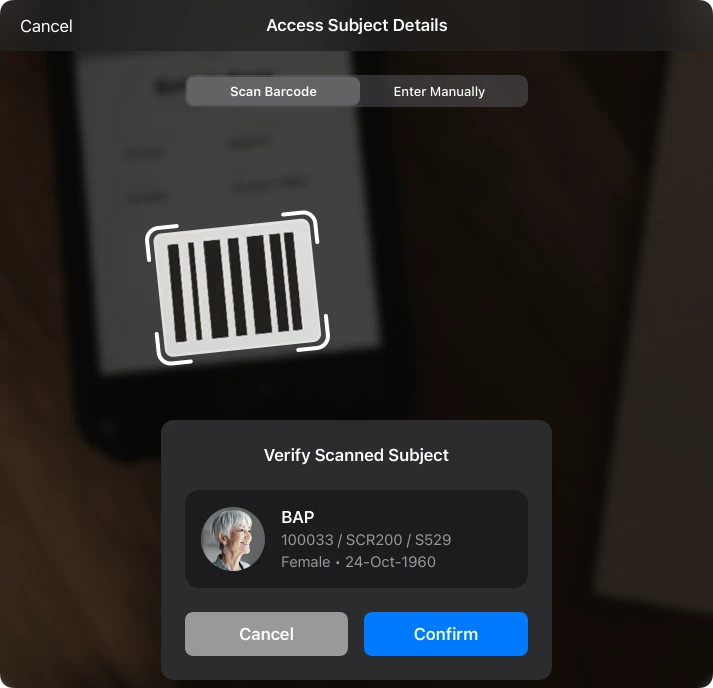
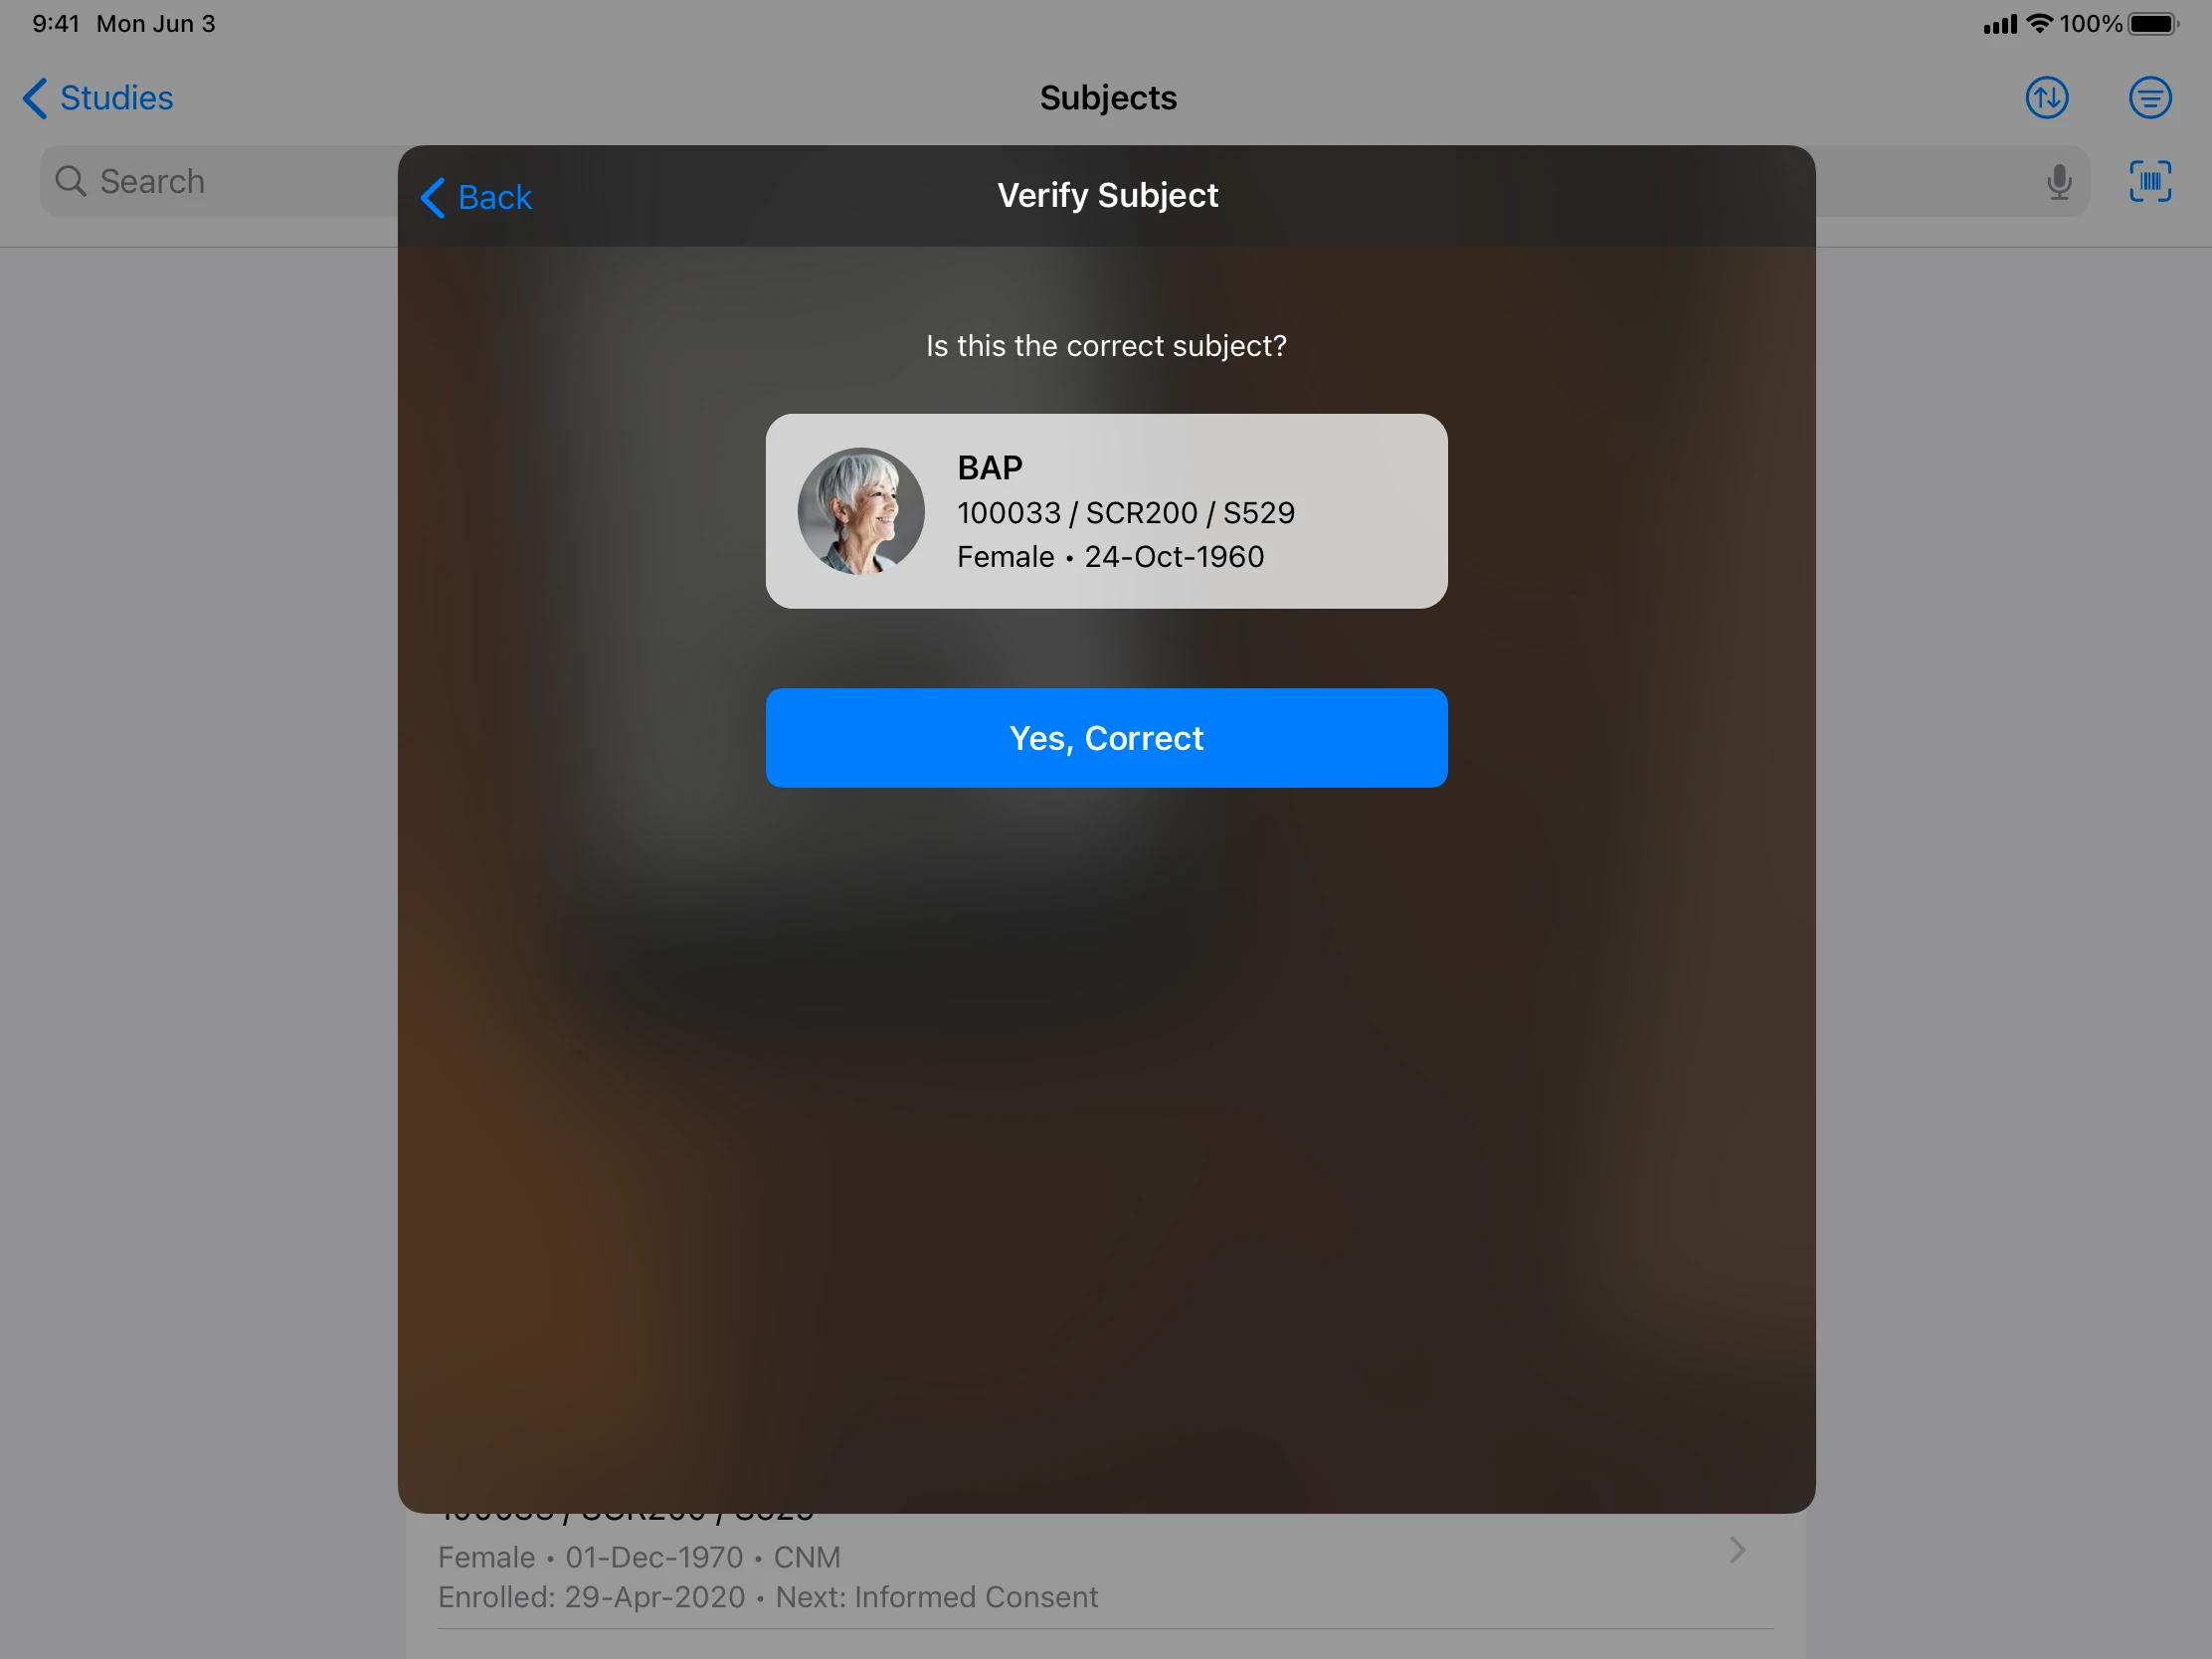
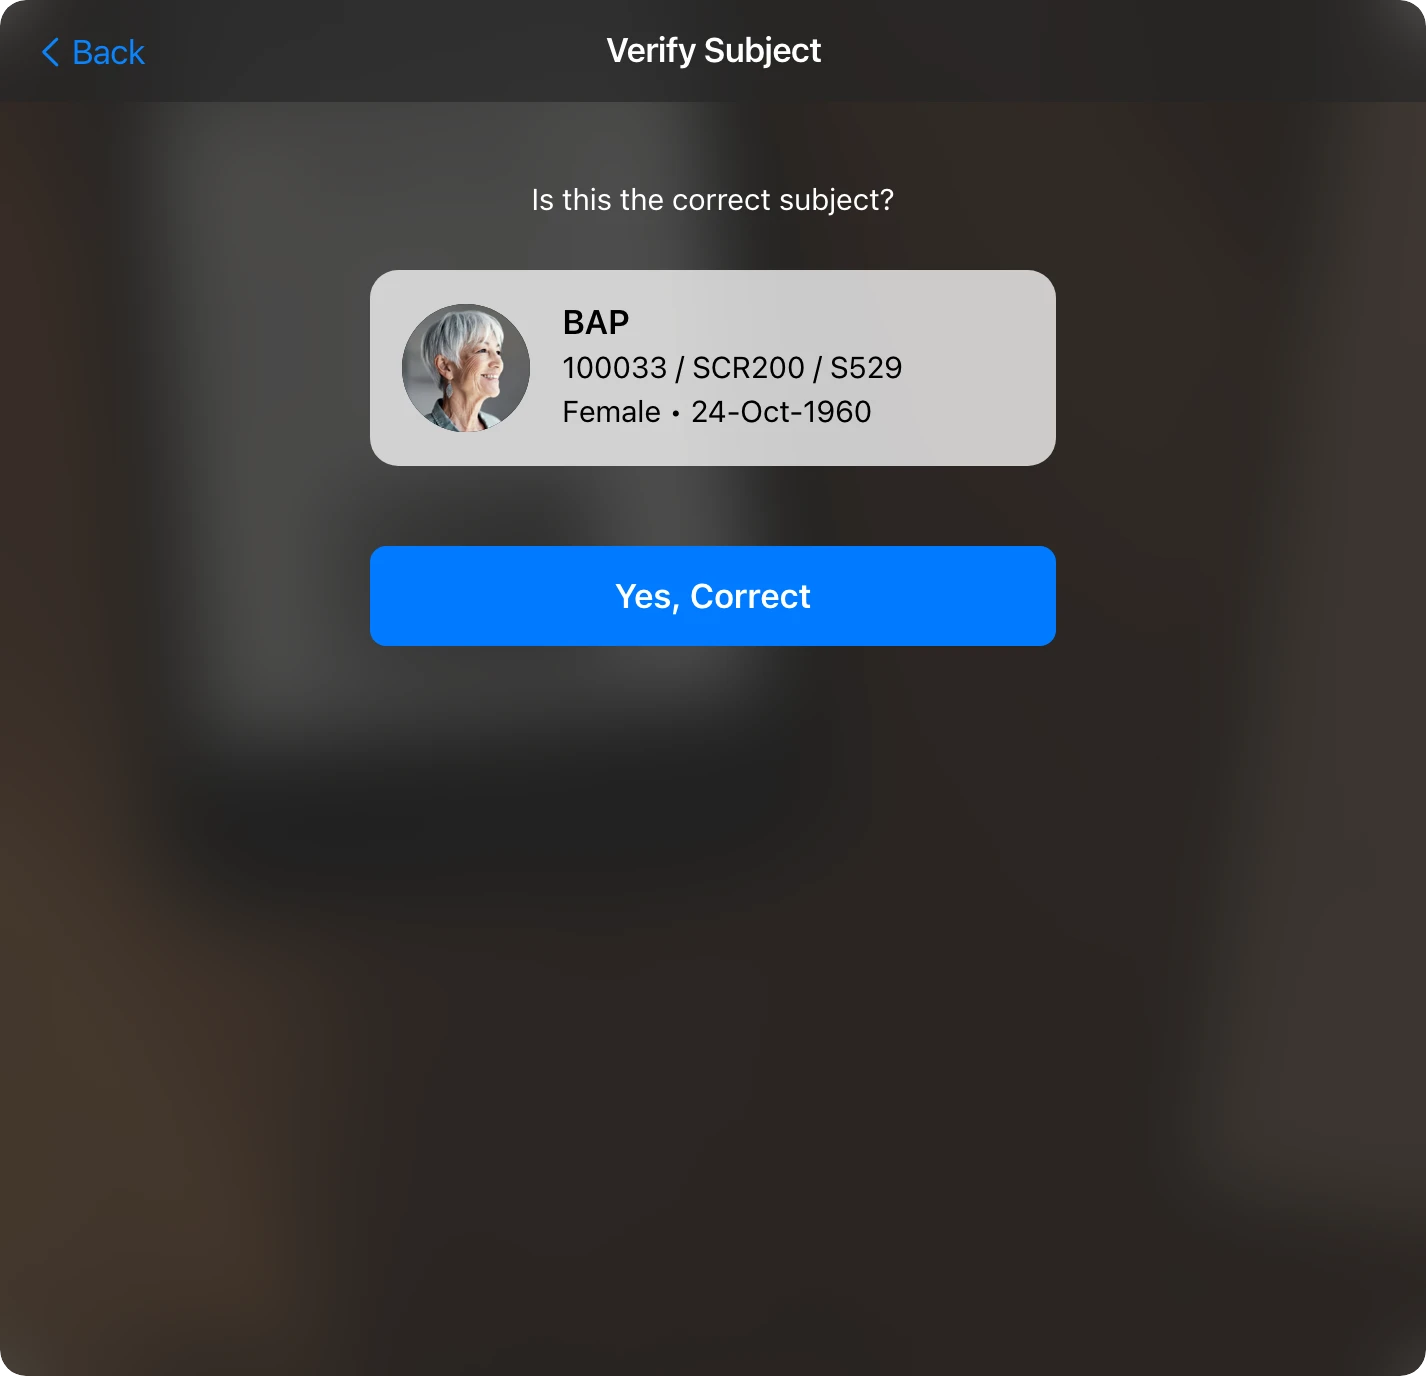
Participant Verification
A variety of UI explorations for verification following a successful barcode scan.
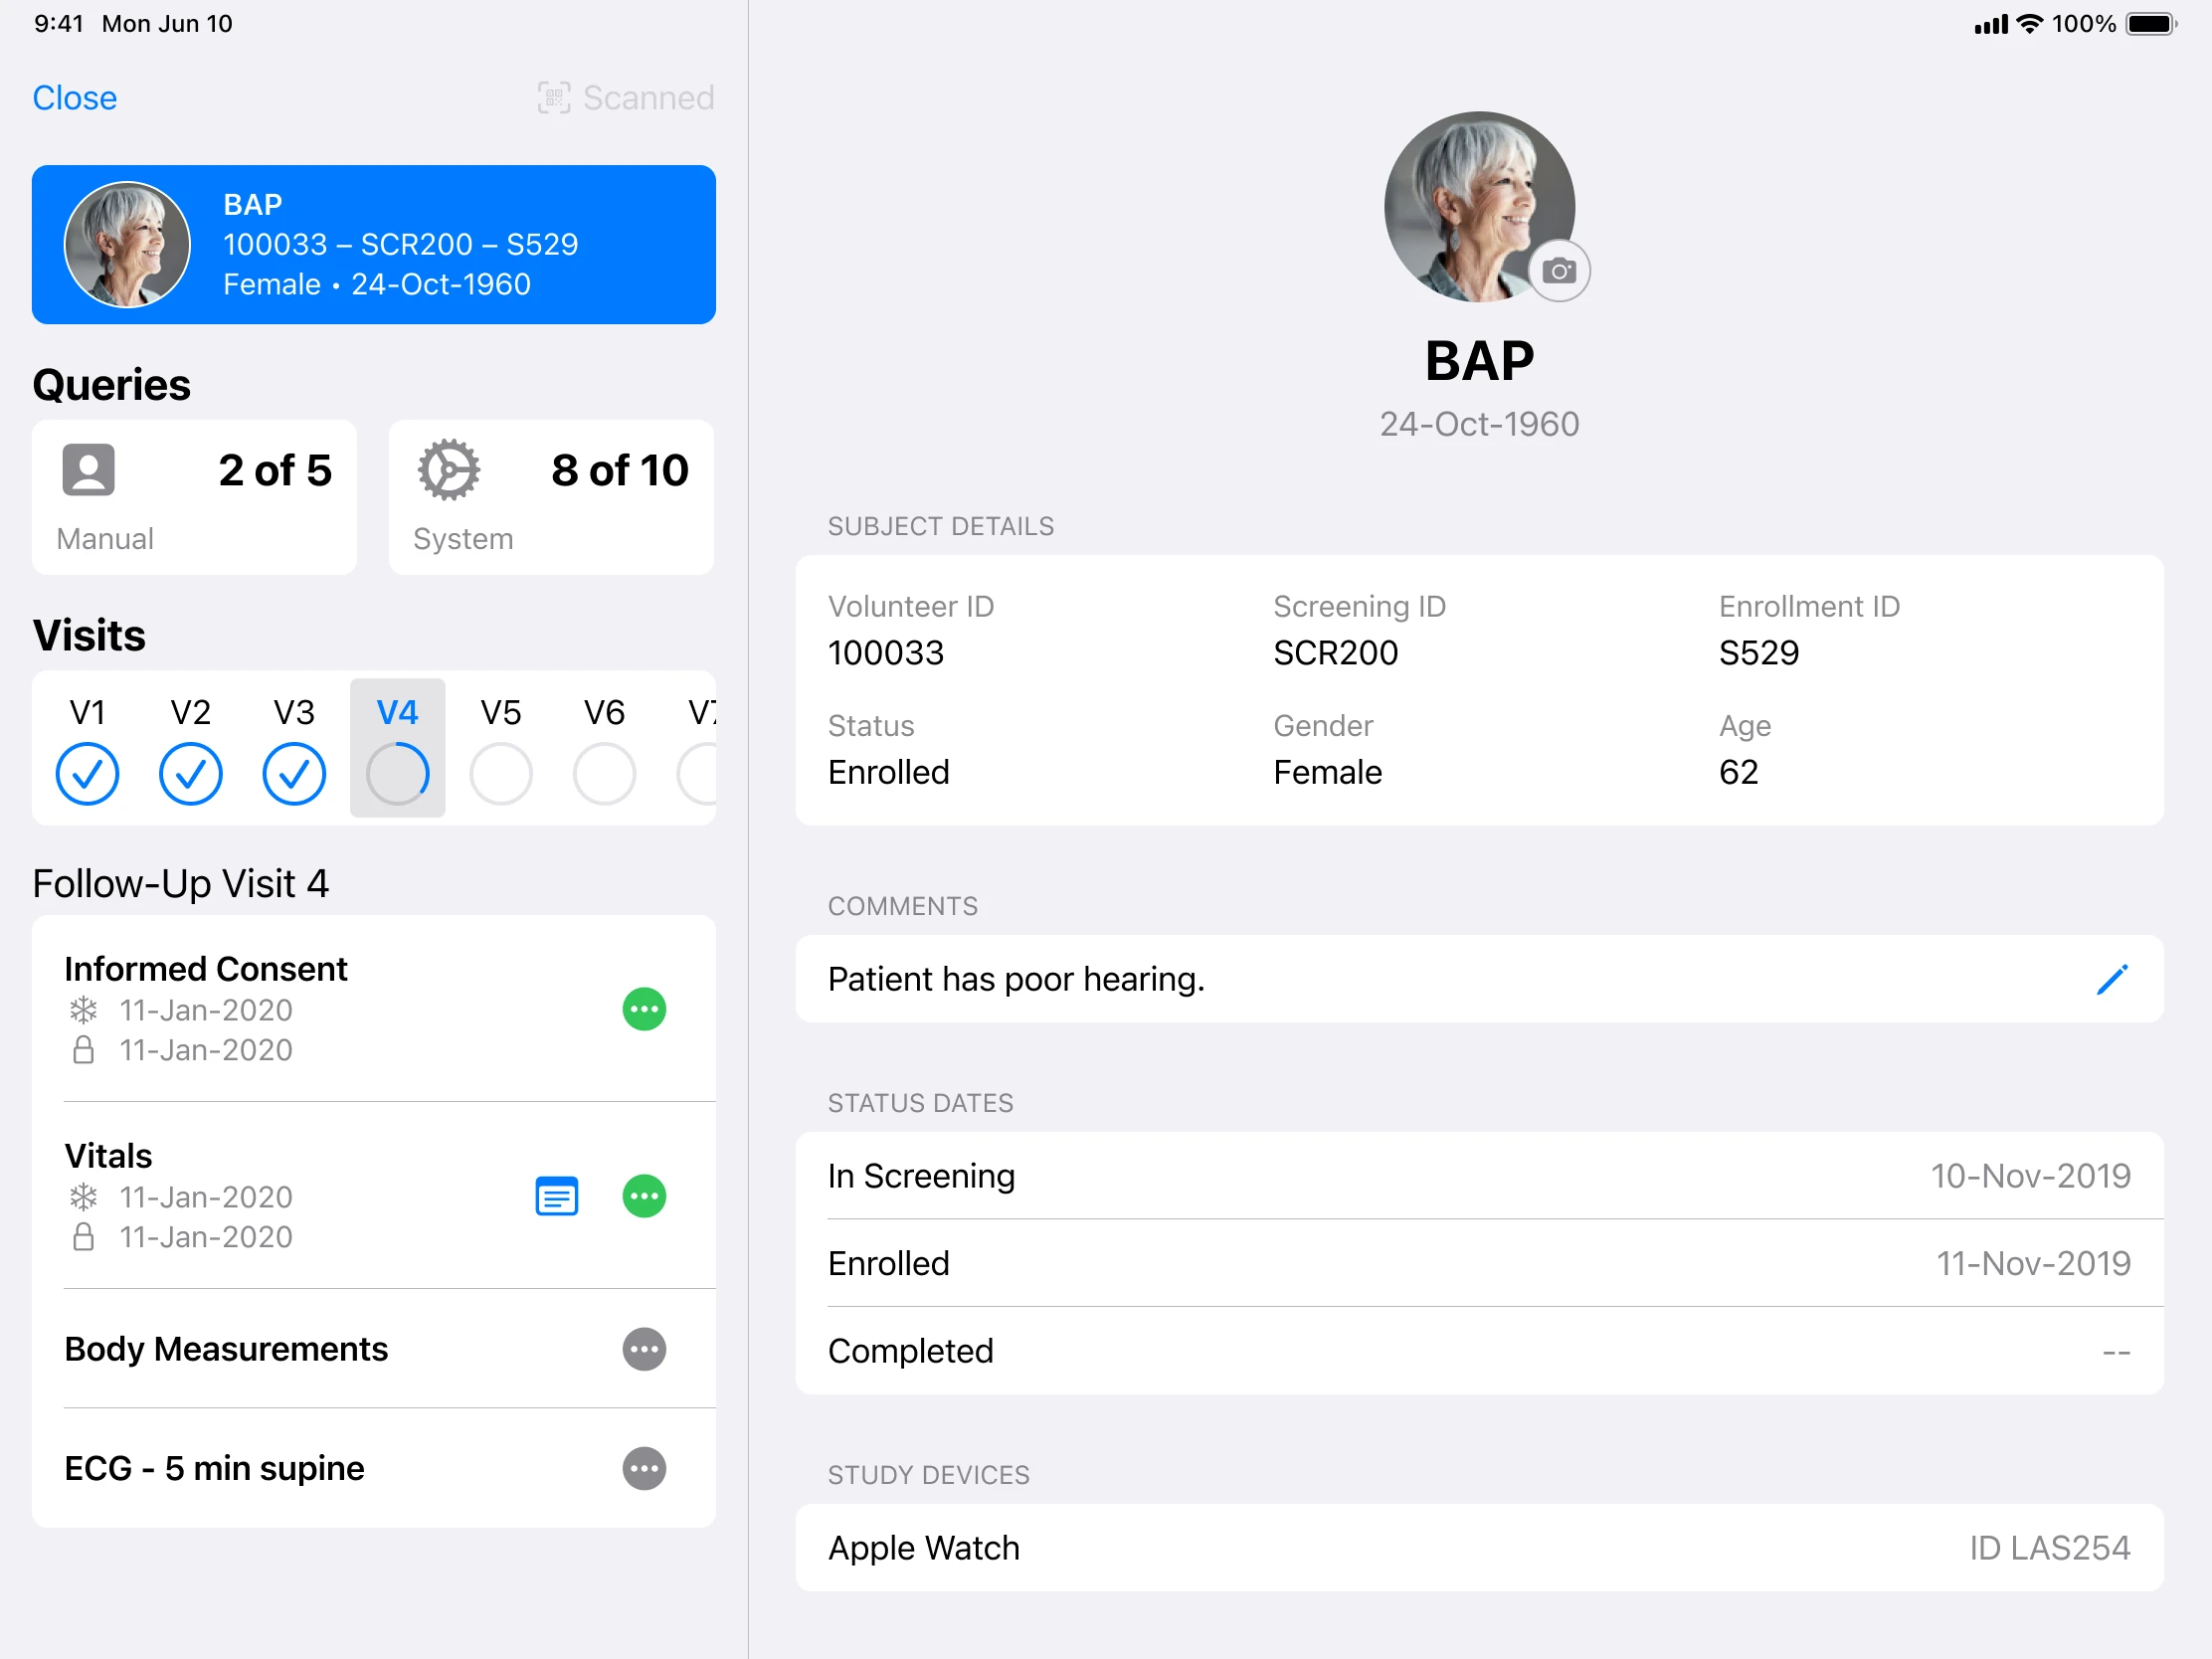
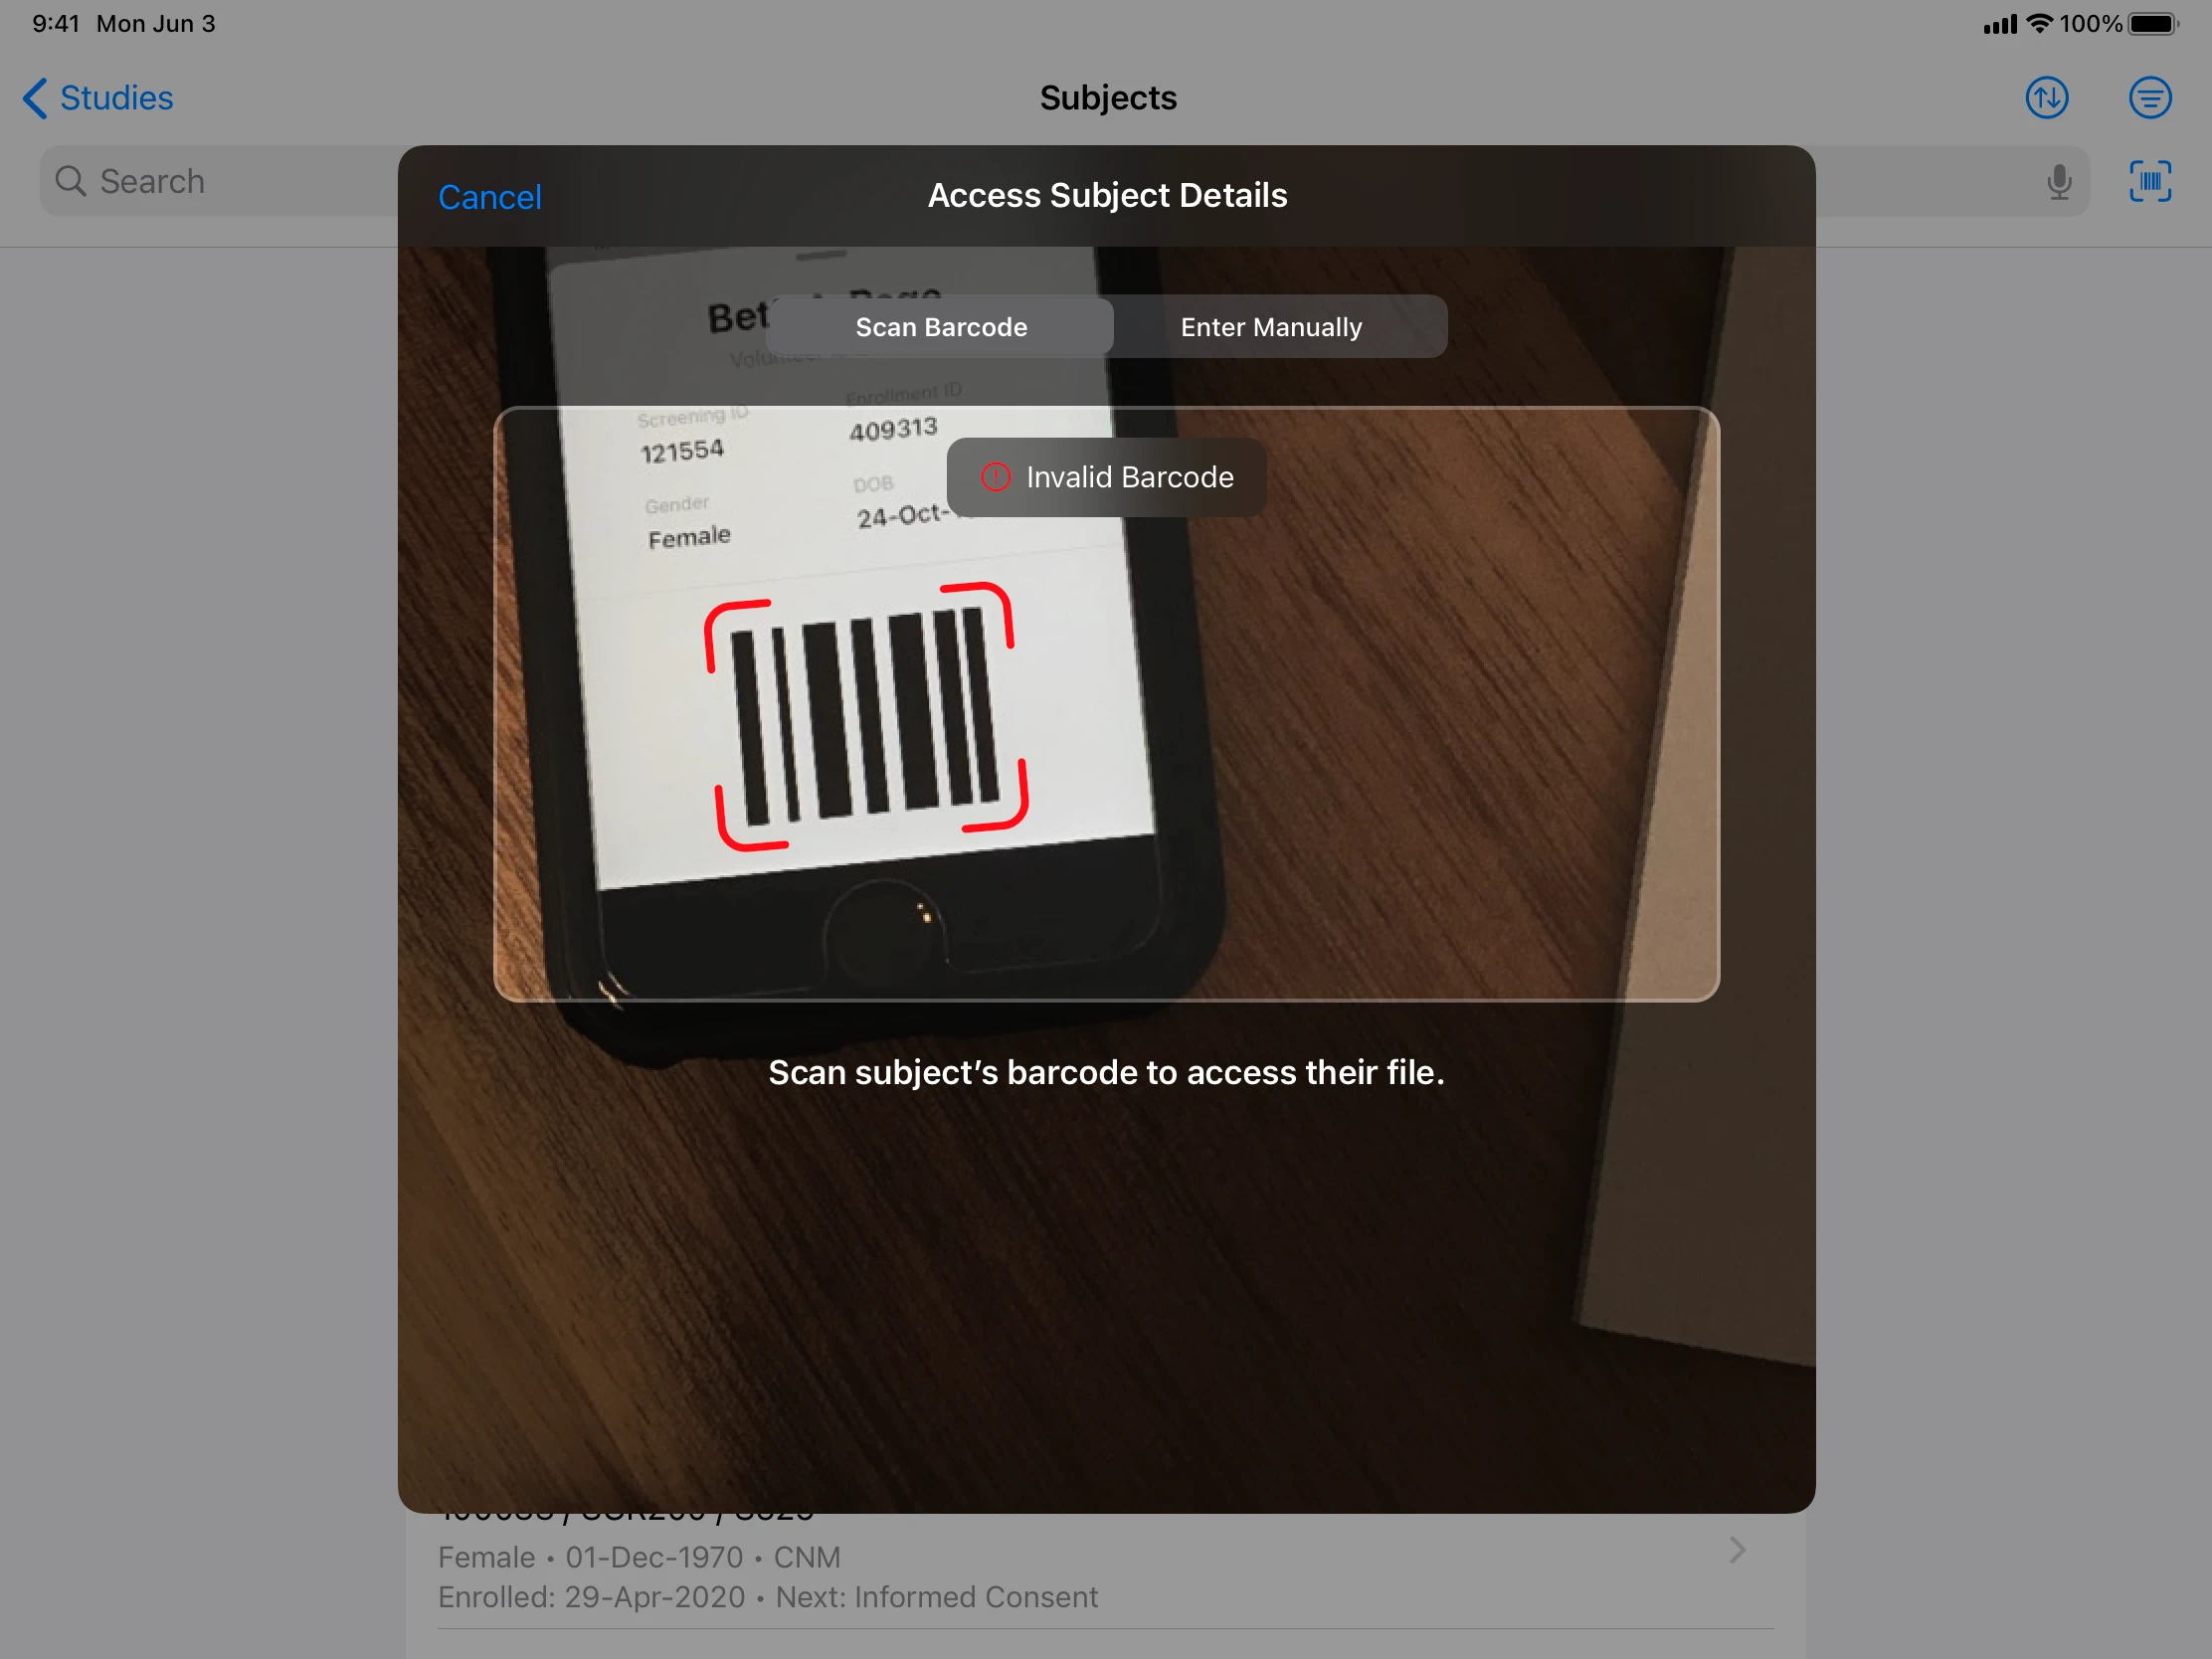
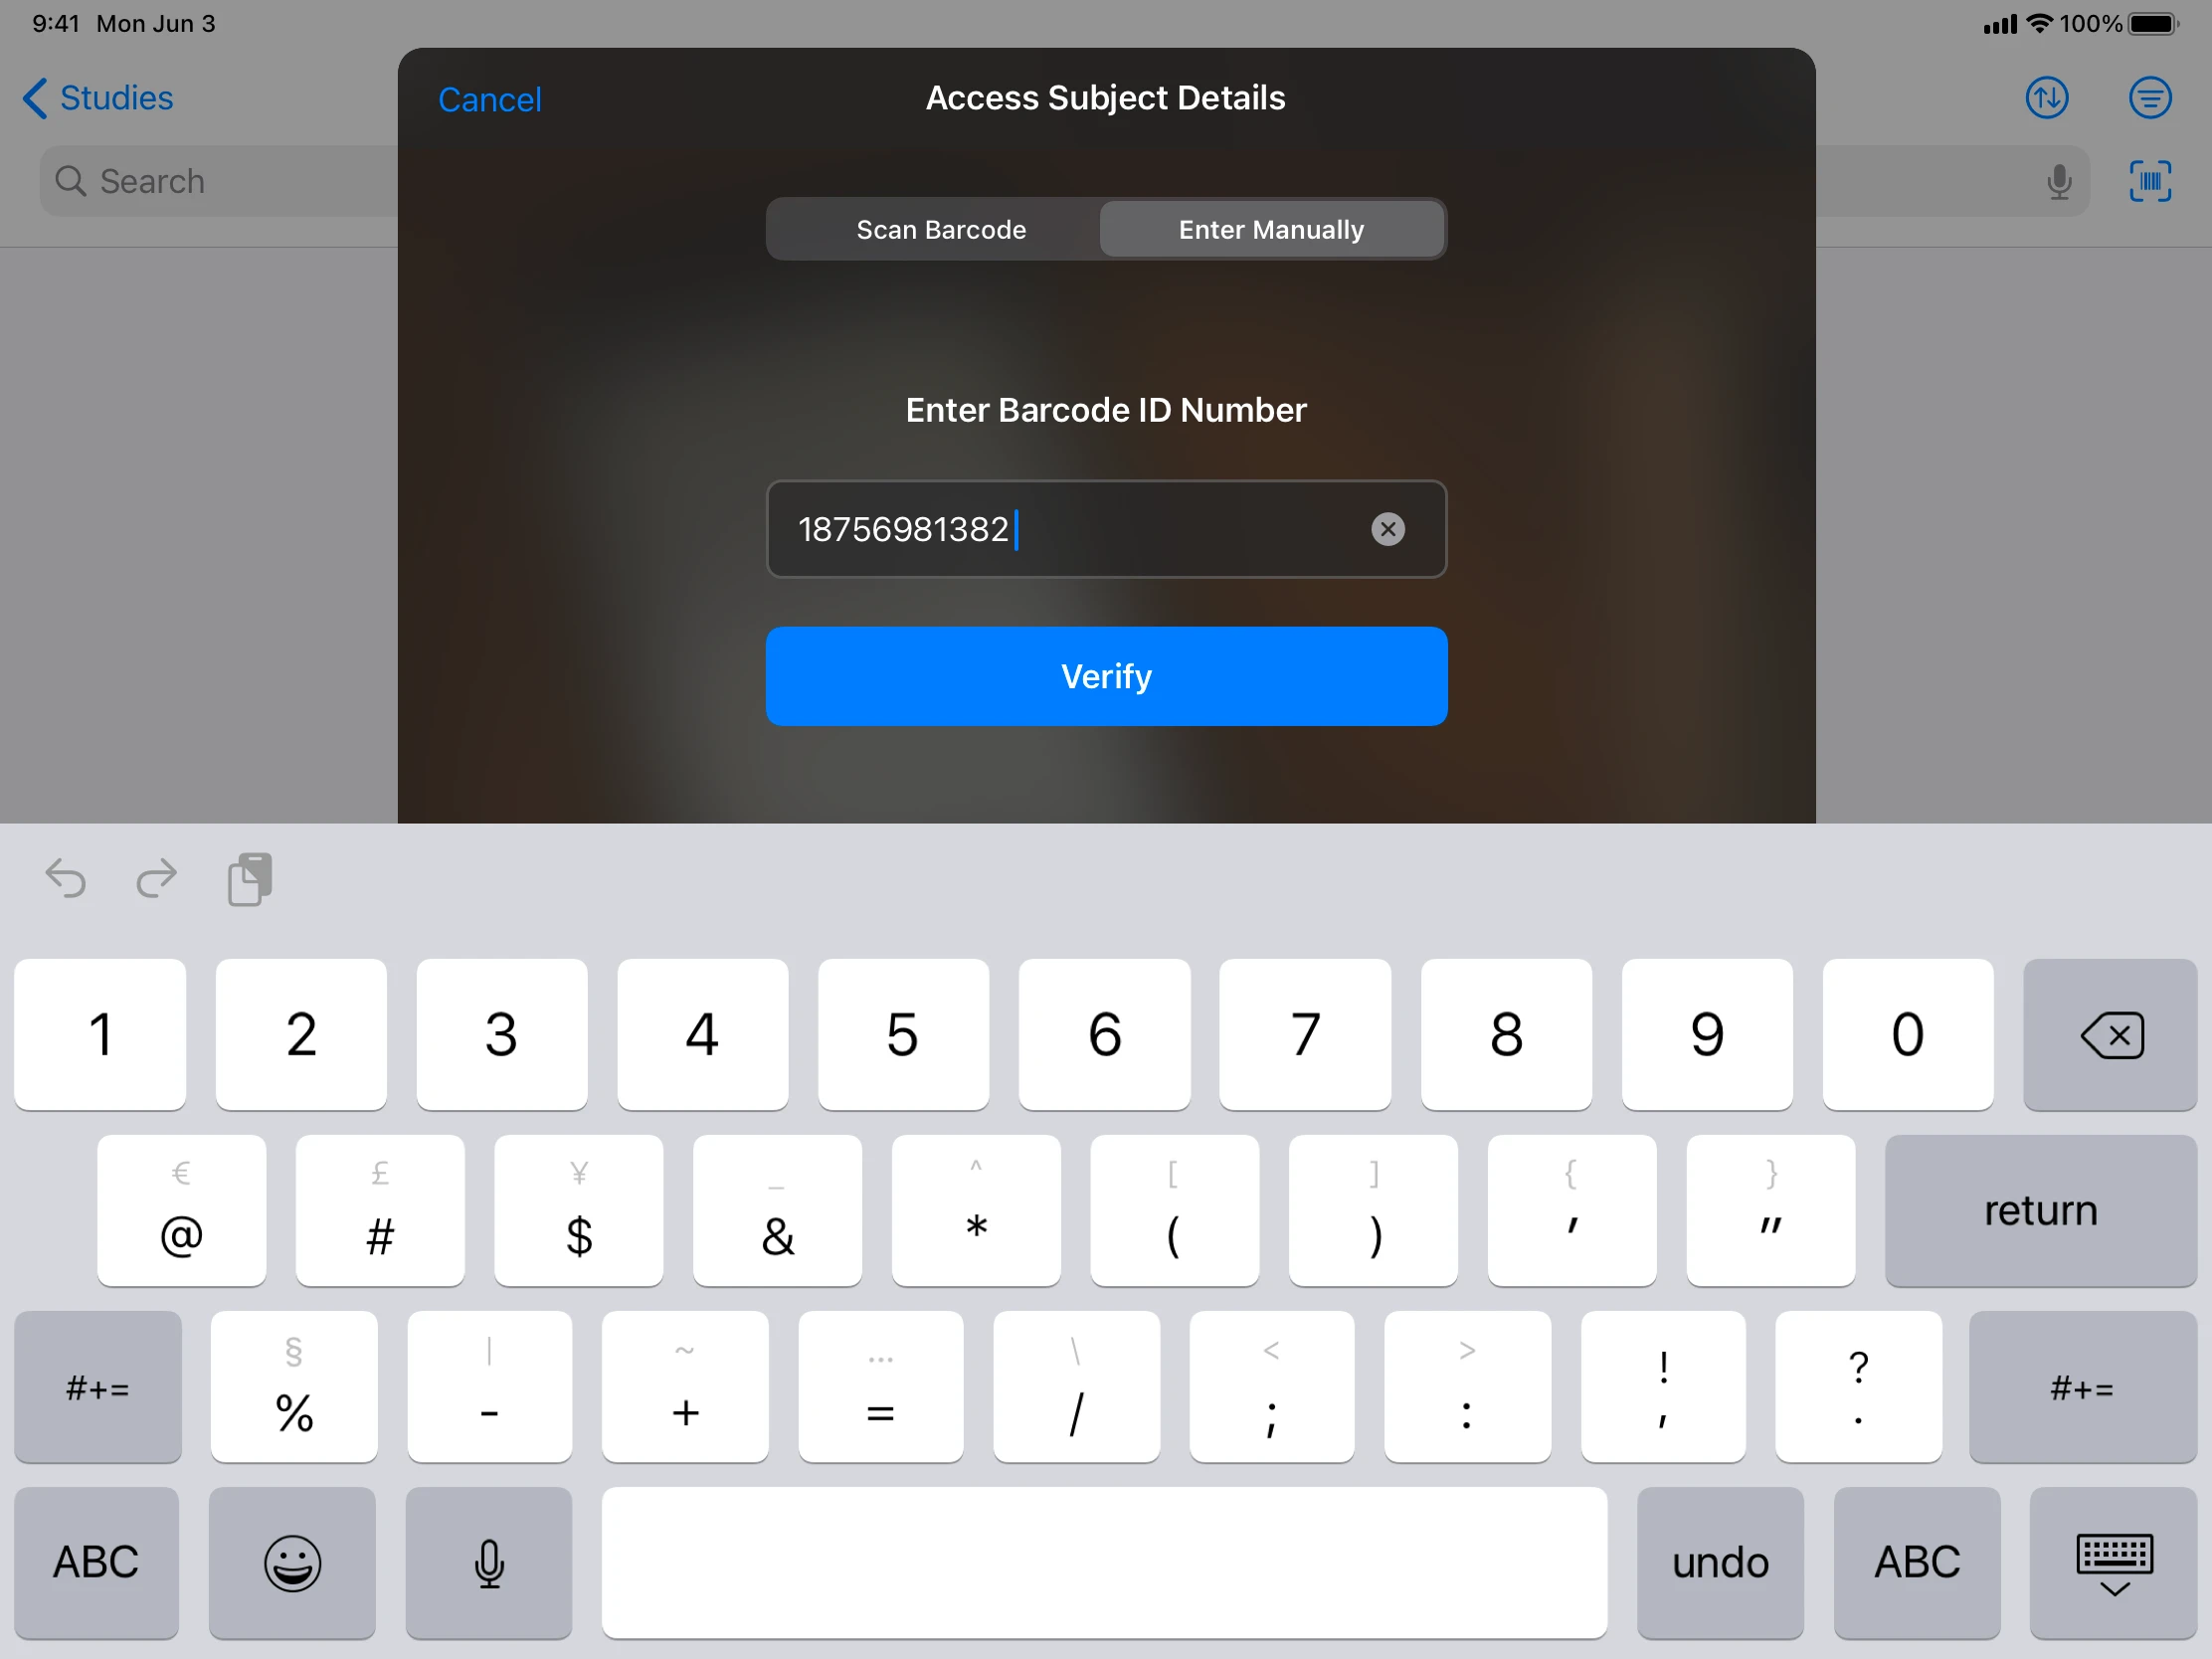
Final Designs
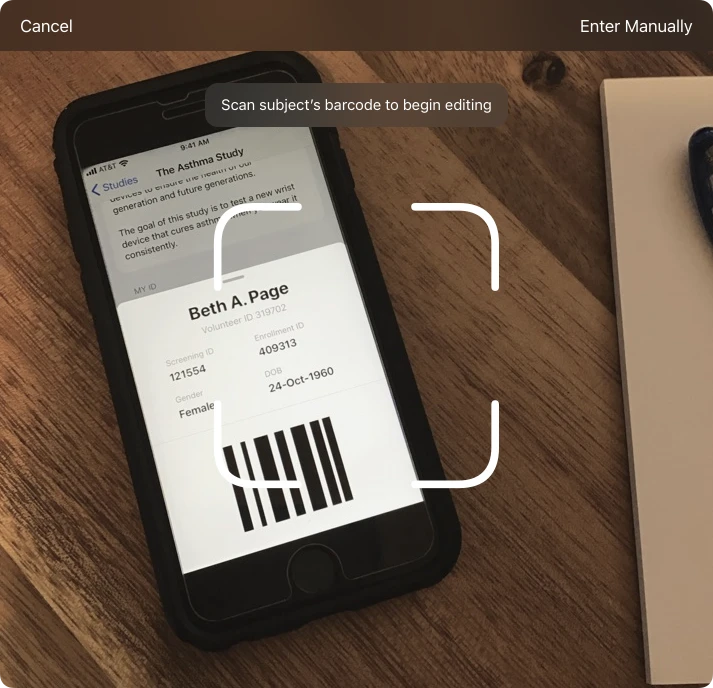
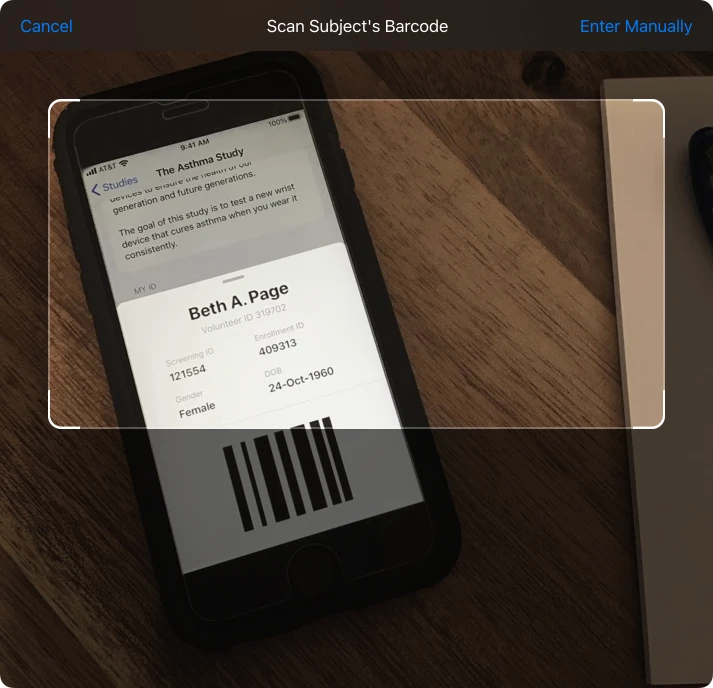
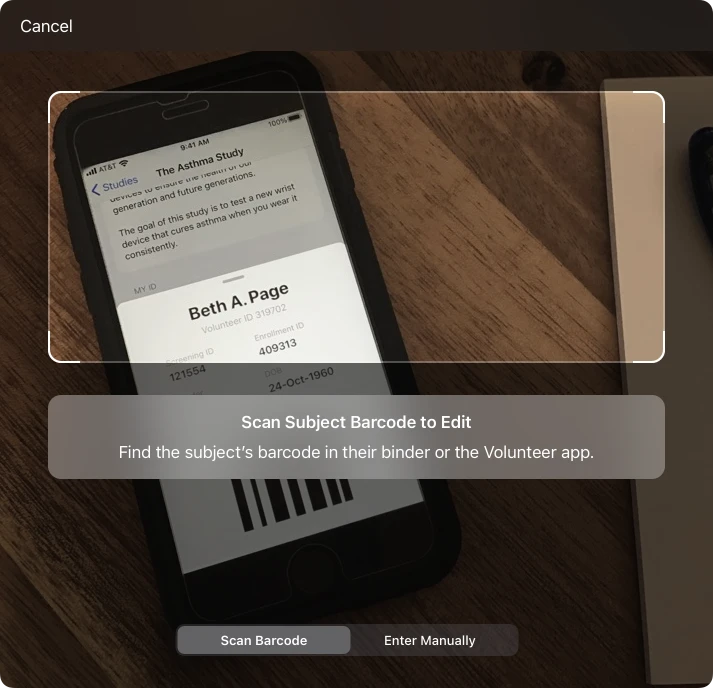
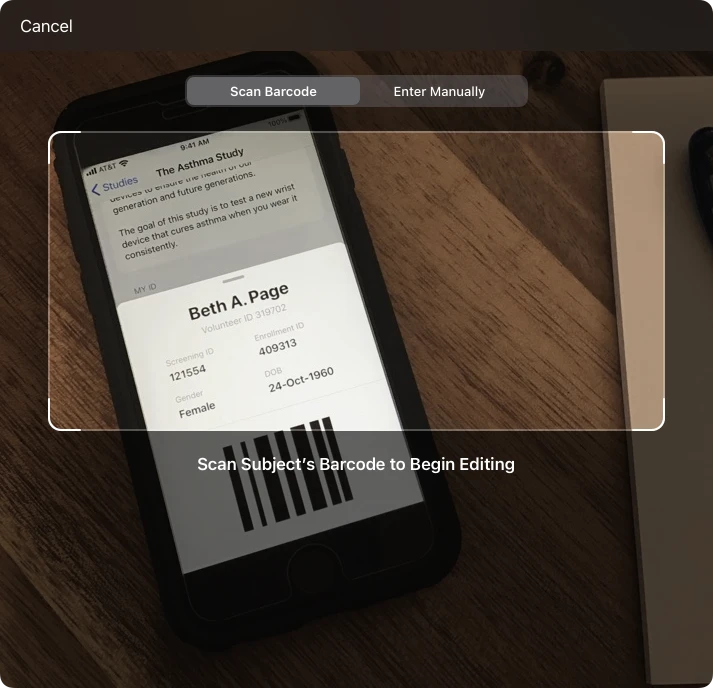
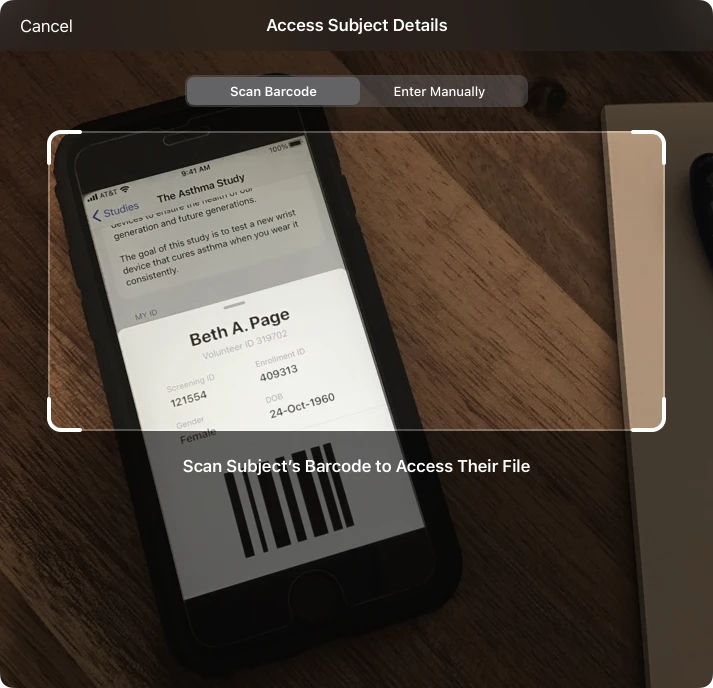
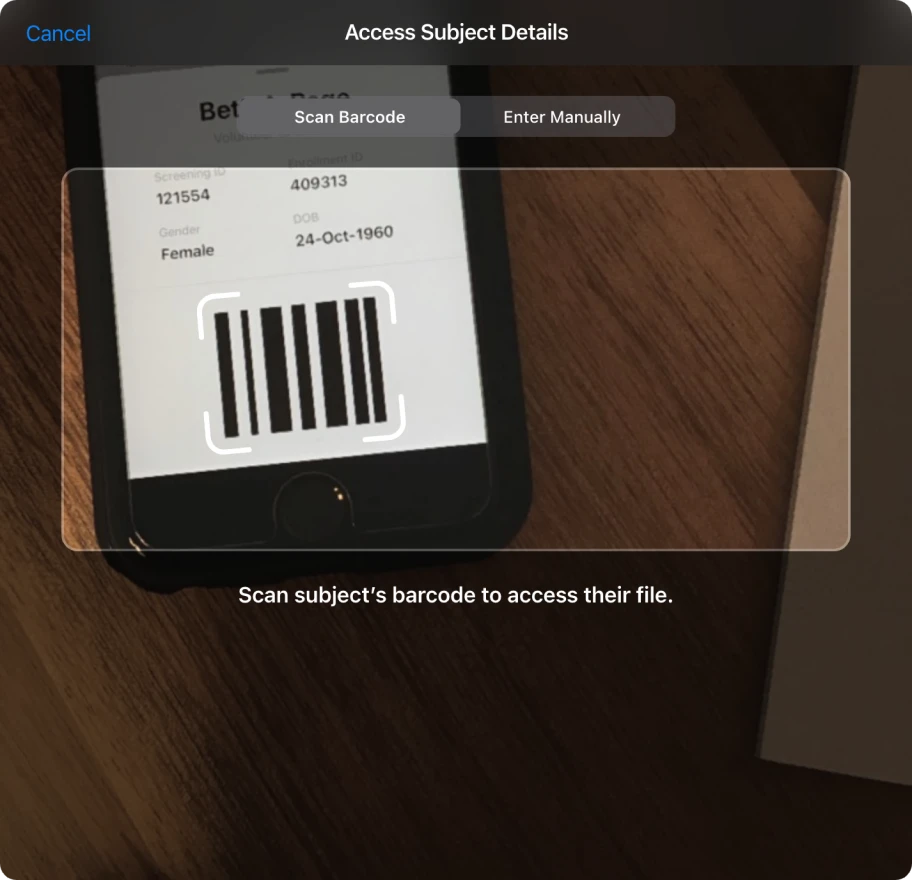
Scan Mode: Happy Path


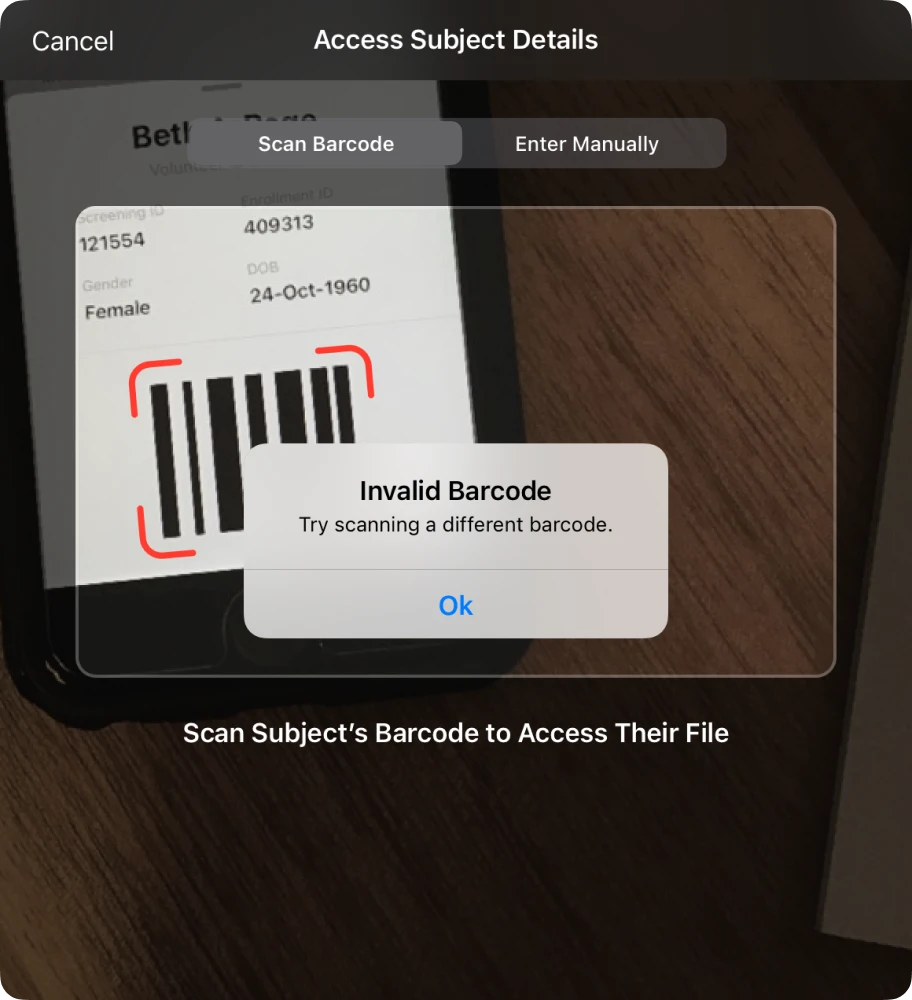
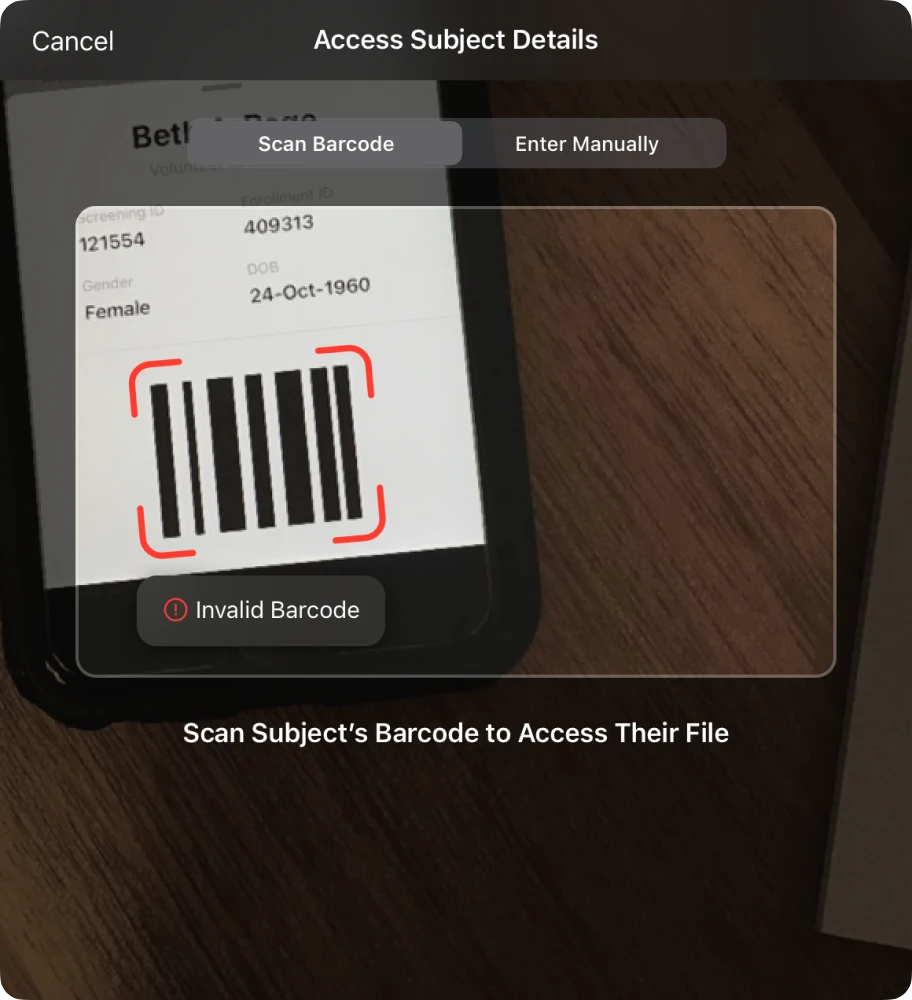
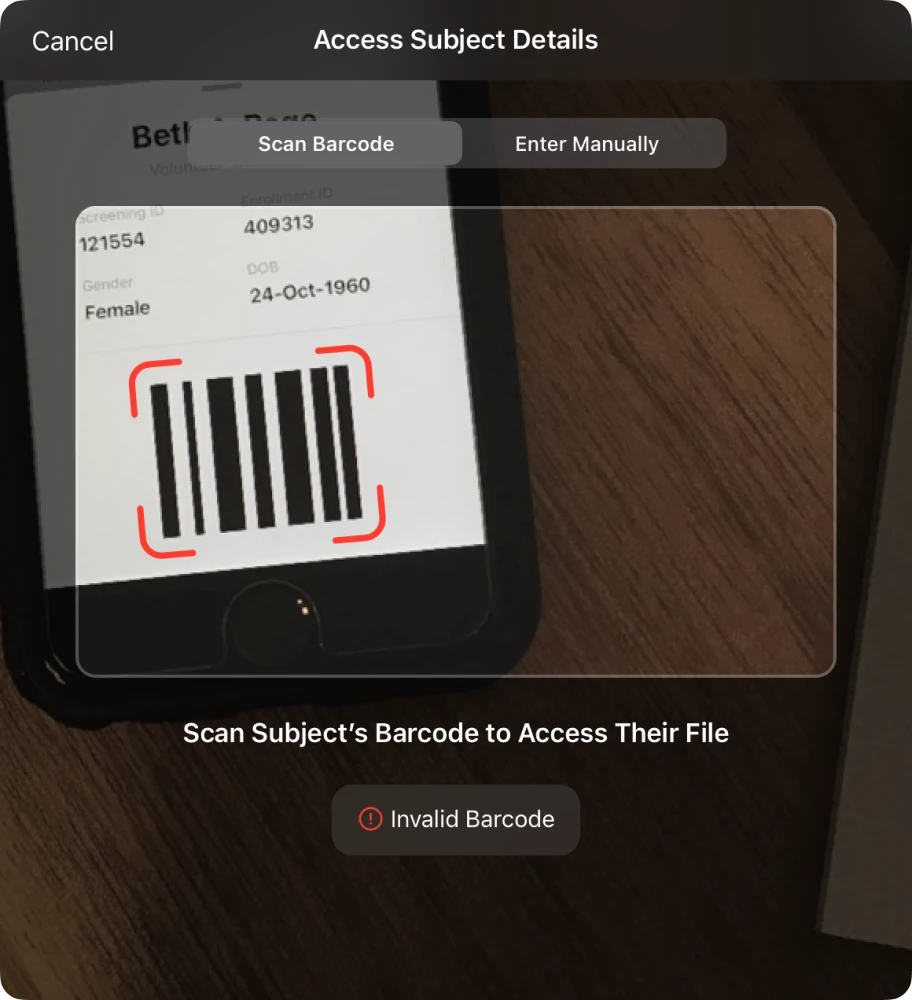
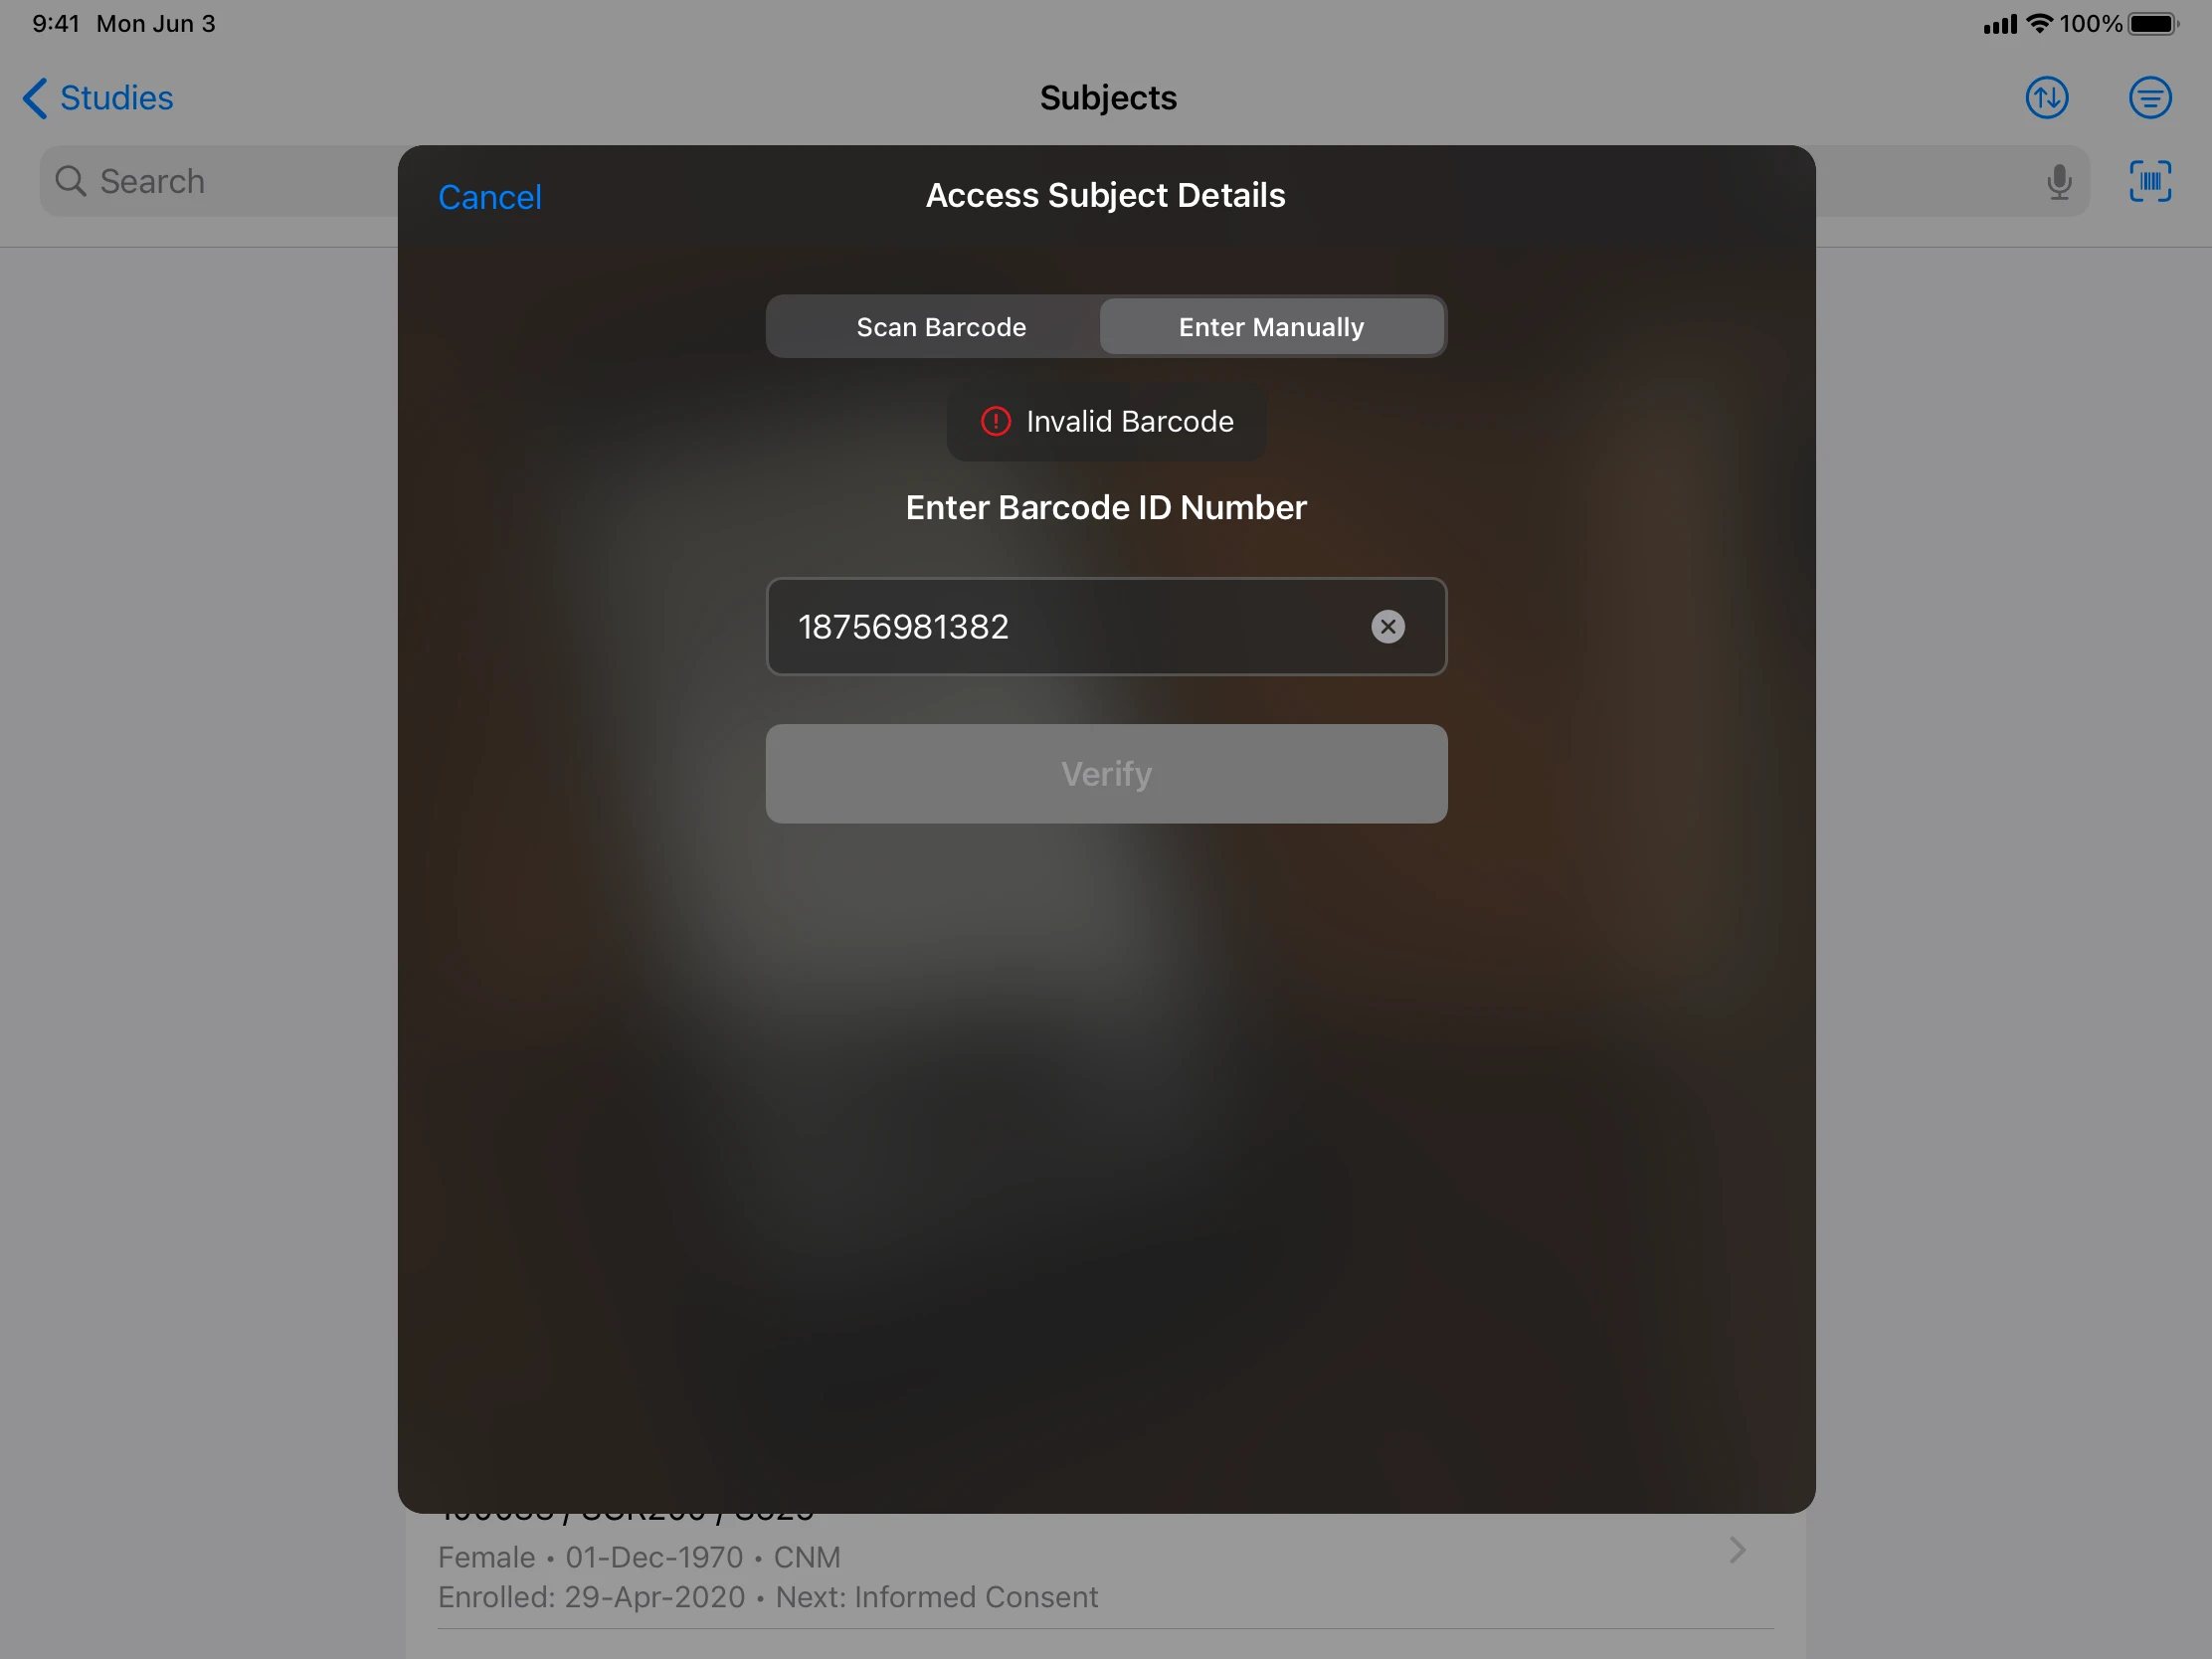
Scan Mode: Invalid Barcode
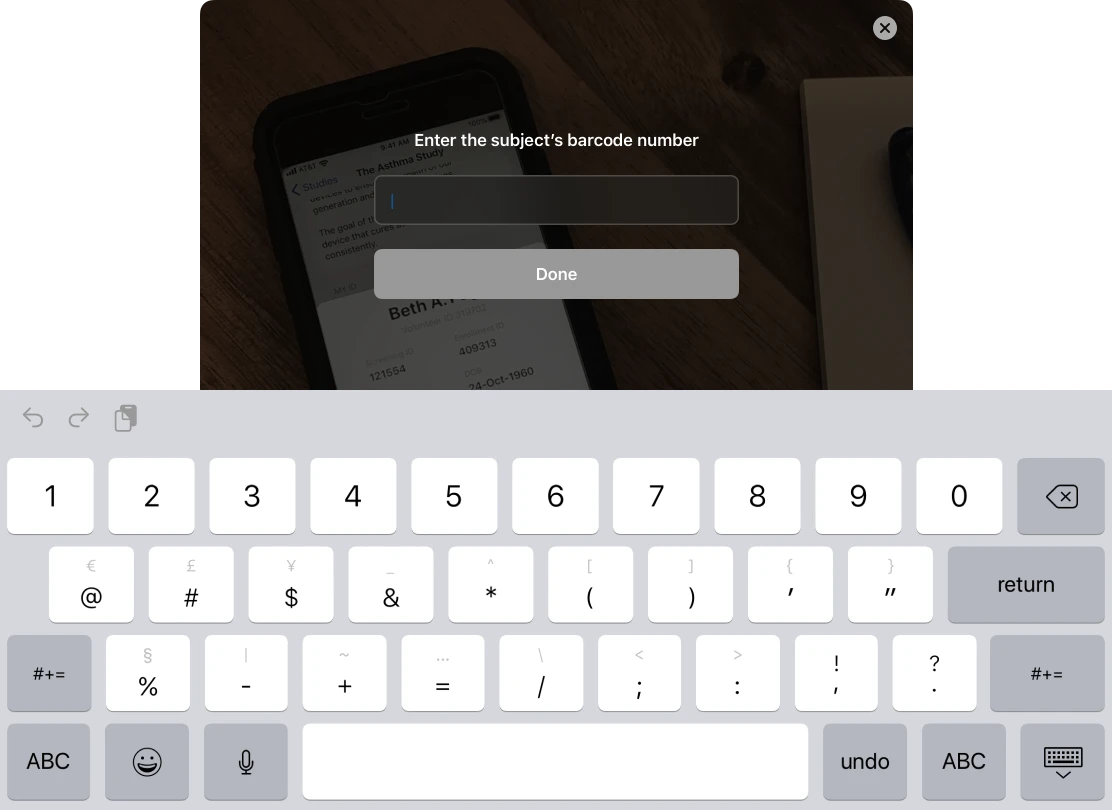
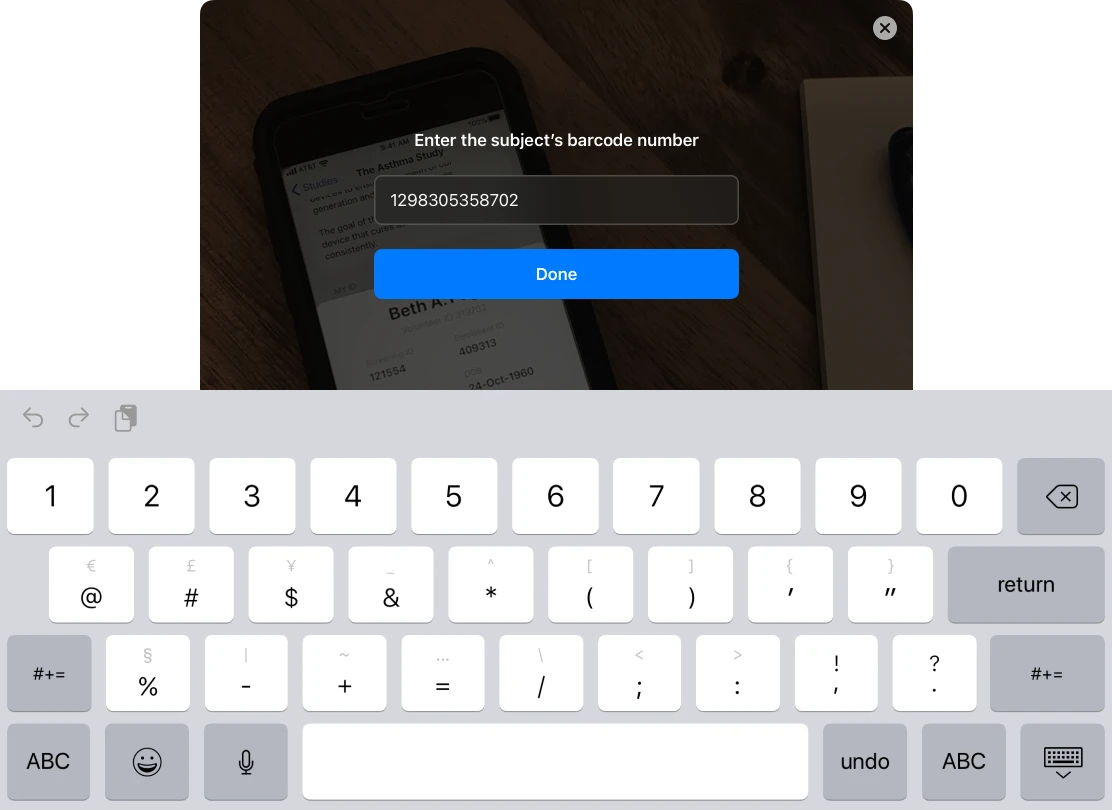
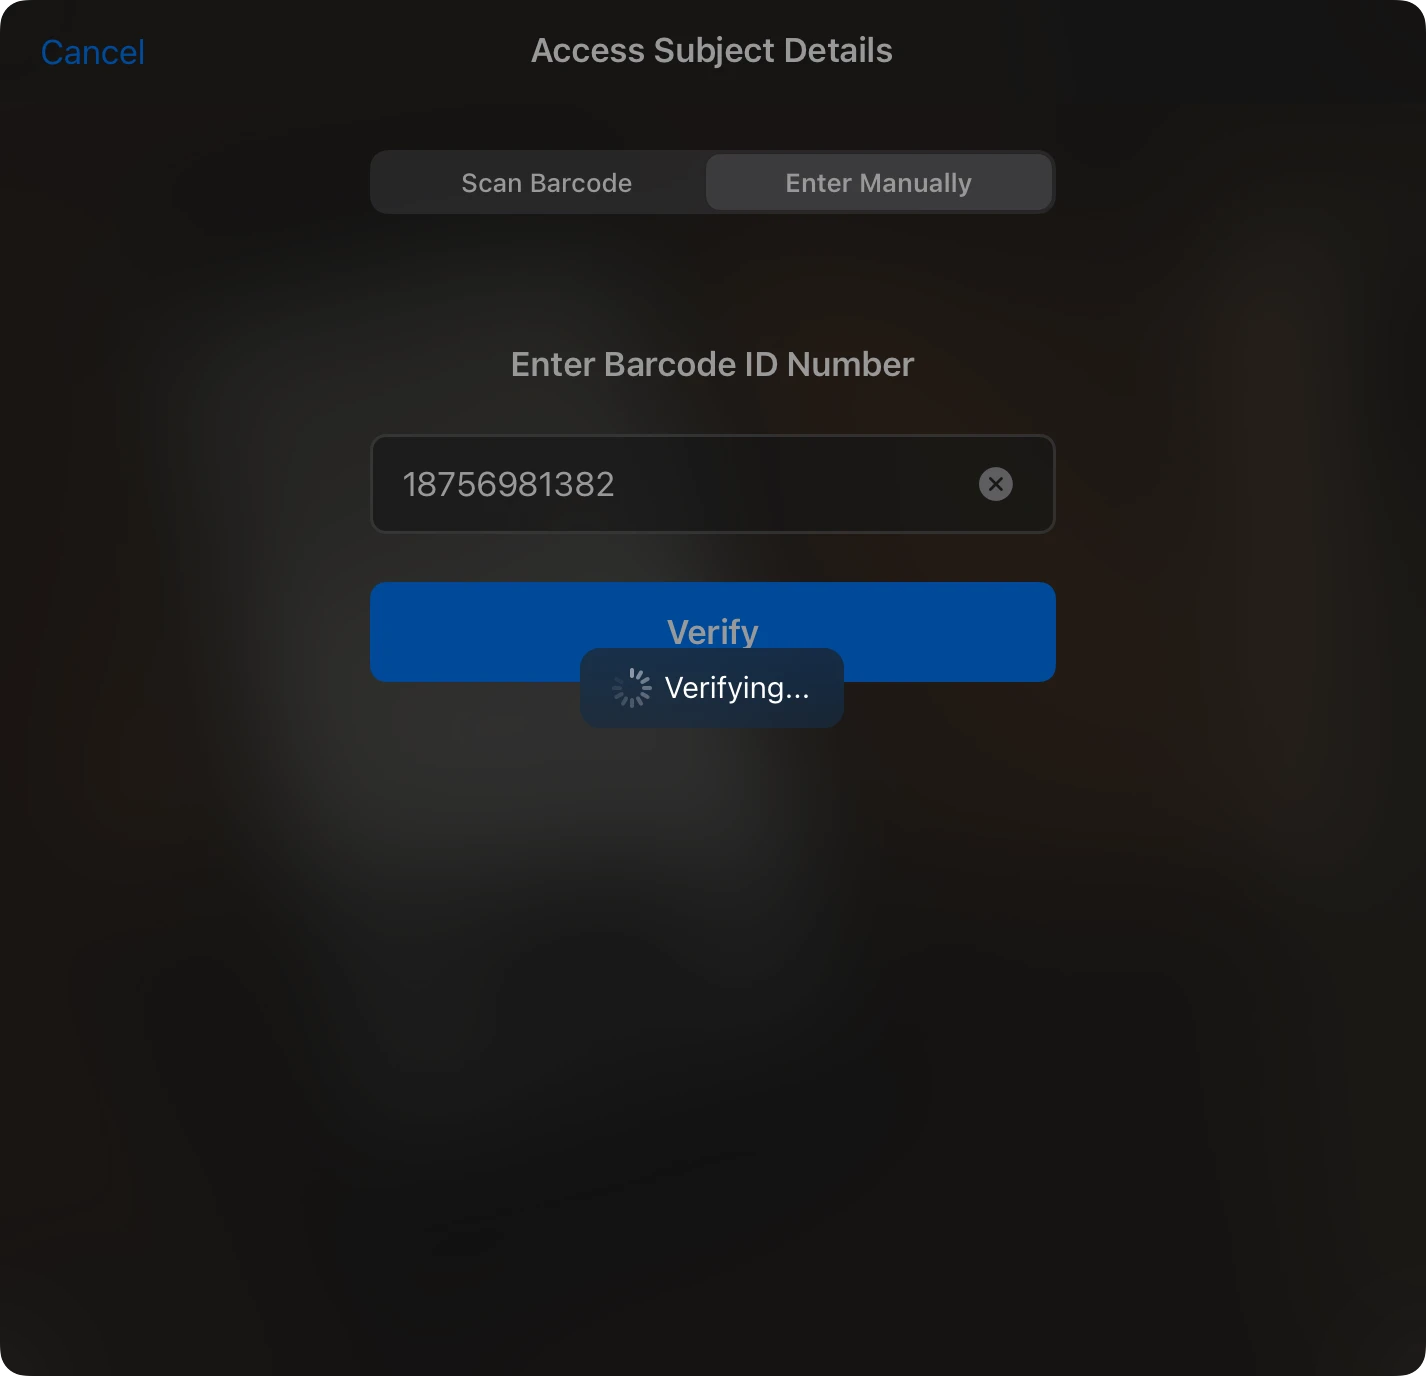
Manual Entry Mode: Happy Path

Manual Entry Mode: Invalid ID
Lengthy Network Calls
Recognizing that barcode lookups might occasionally experience delays, I wanted to provide feedback to the user that the system was actively processing information.
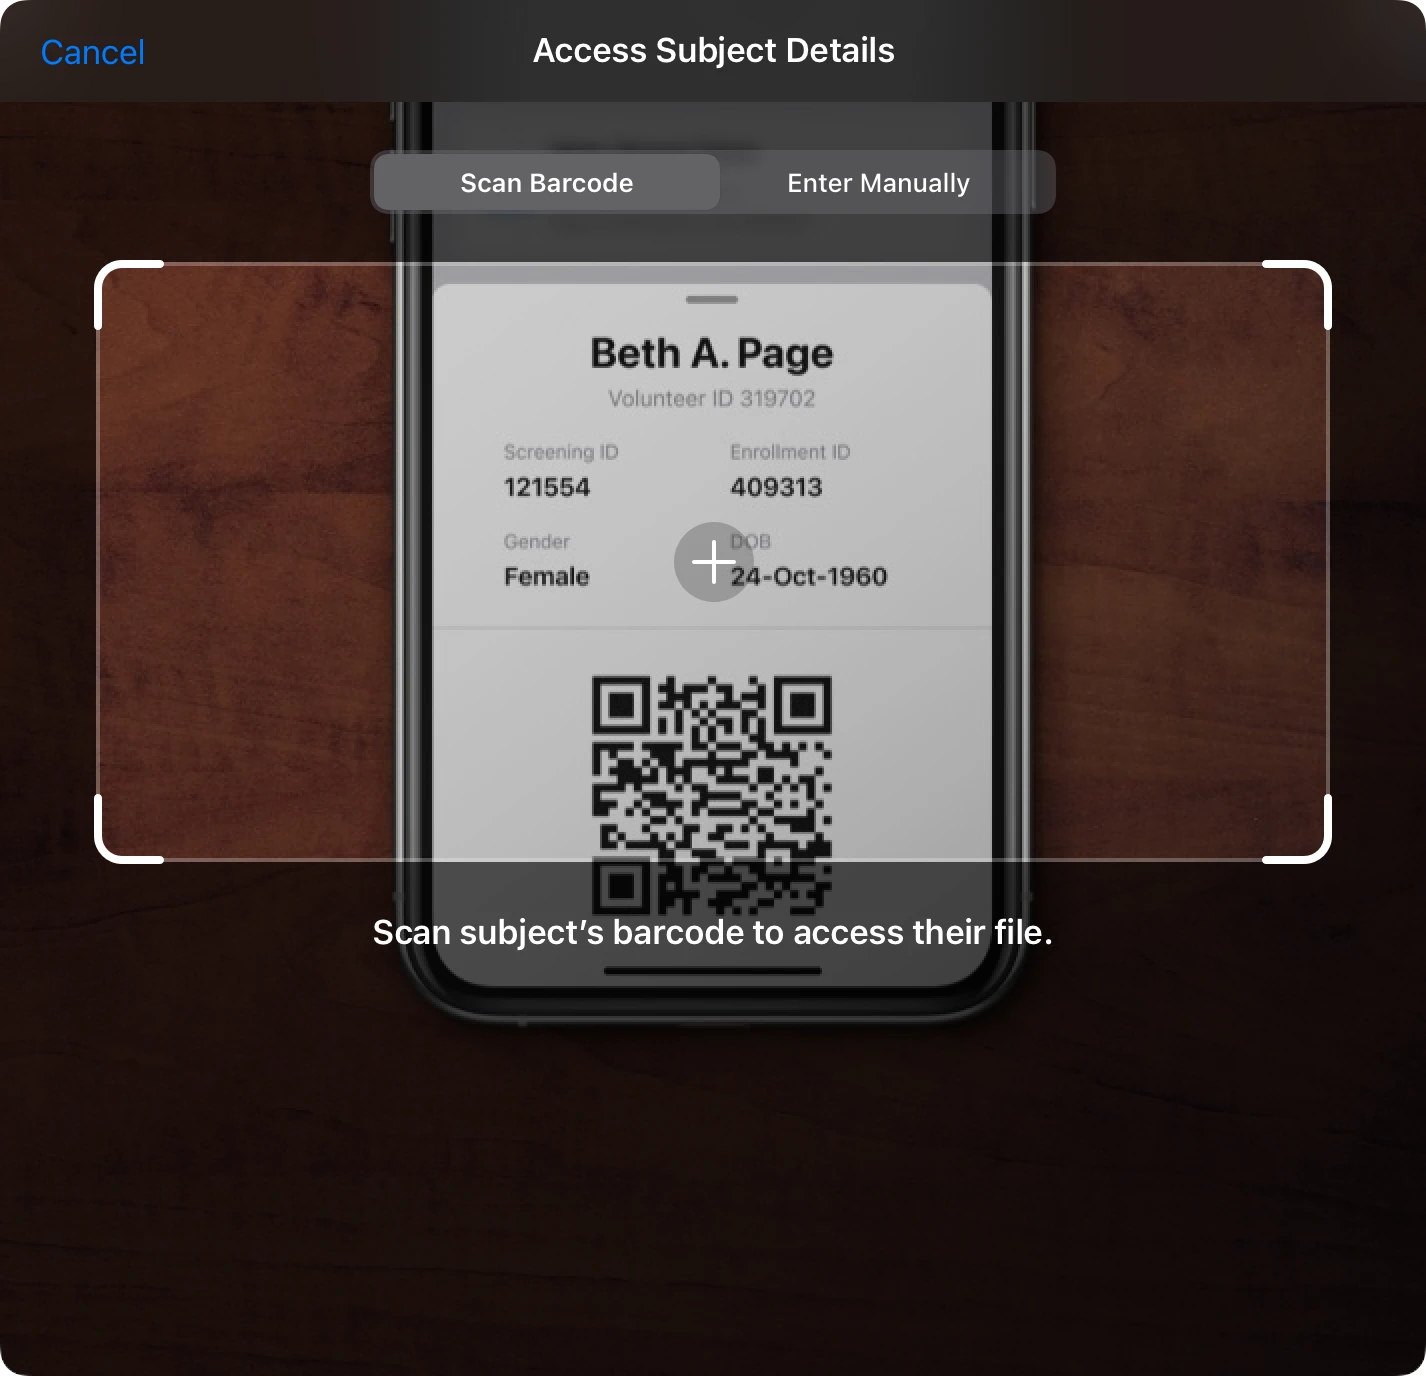
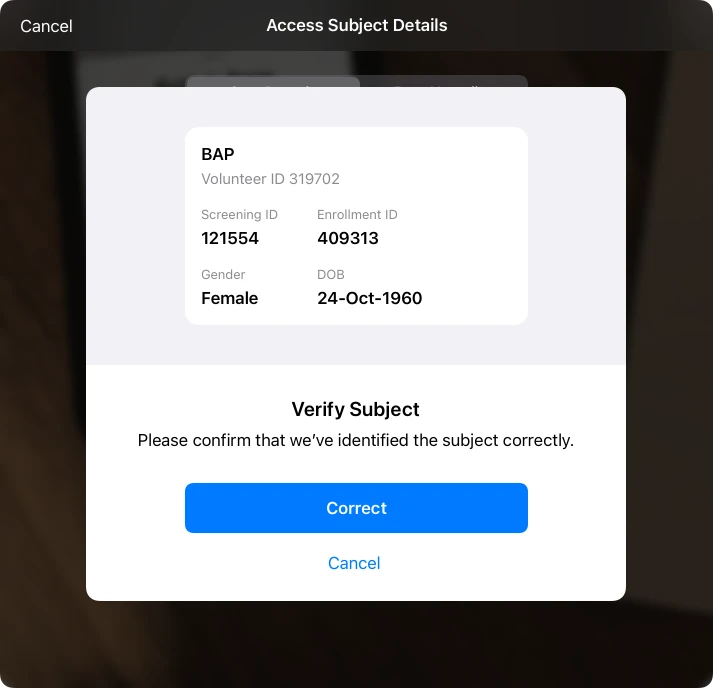
Participant Verification
Freezing the video feed, blurring the frame, and navigating to a separate screen would allow the CRT to focus more easily on the very important task of participant verification.
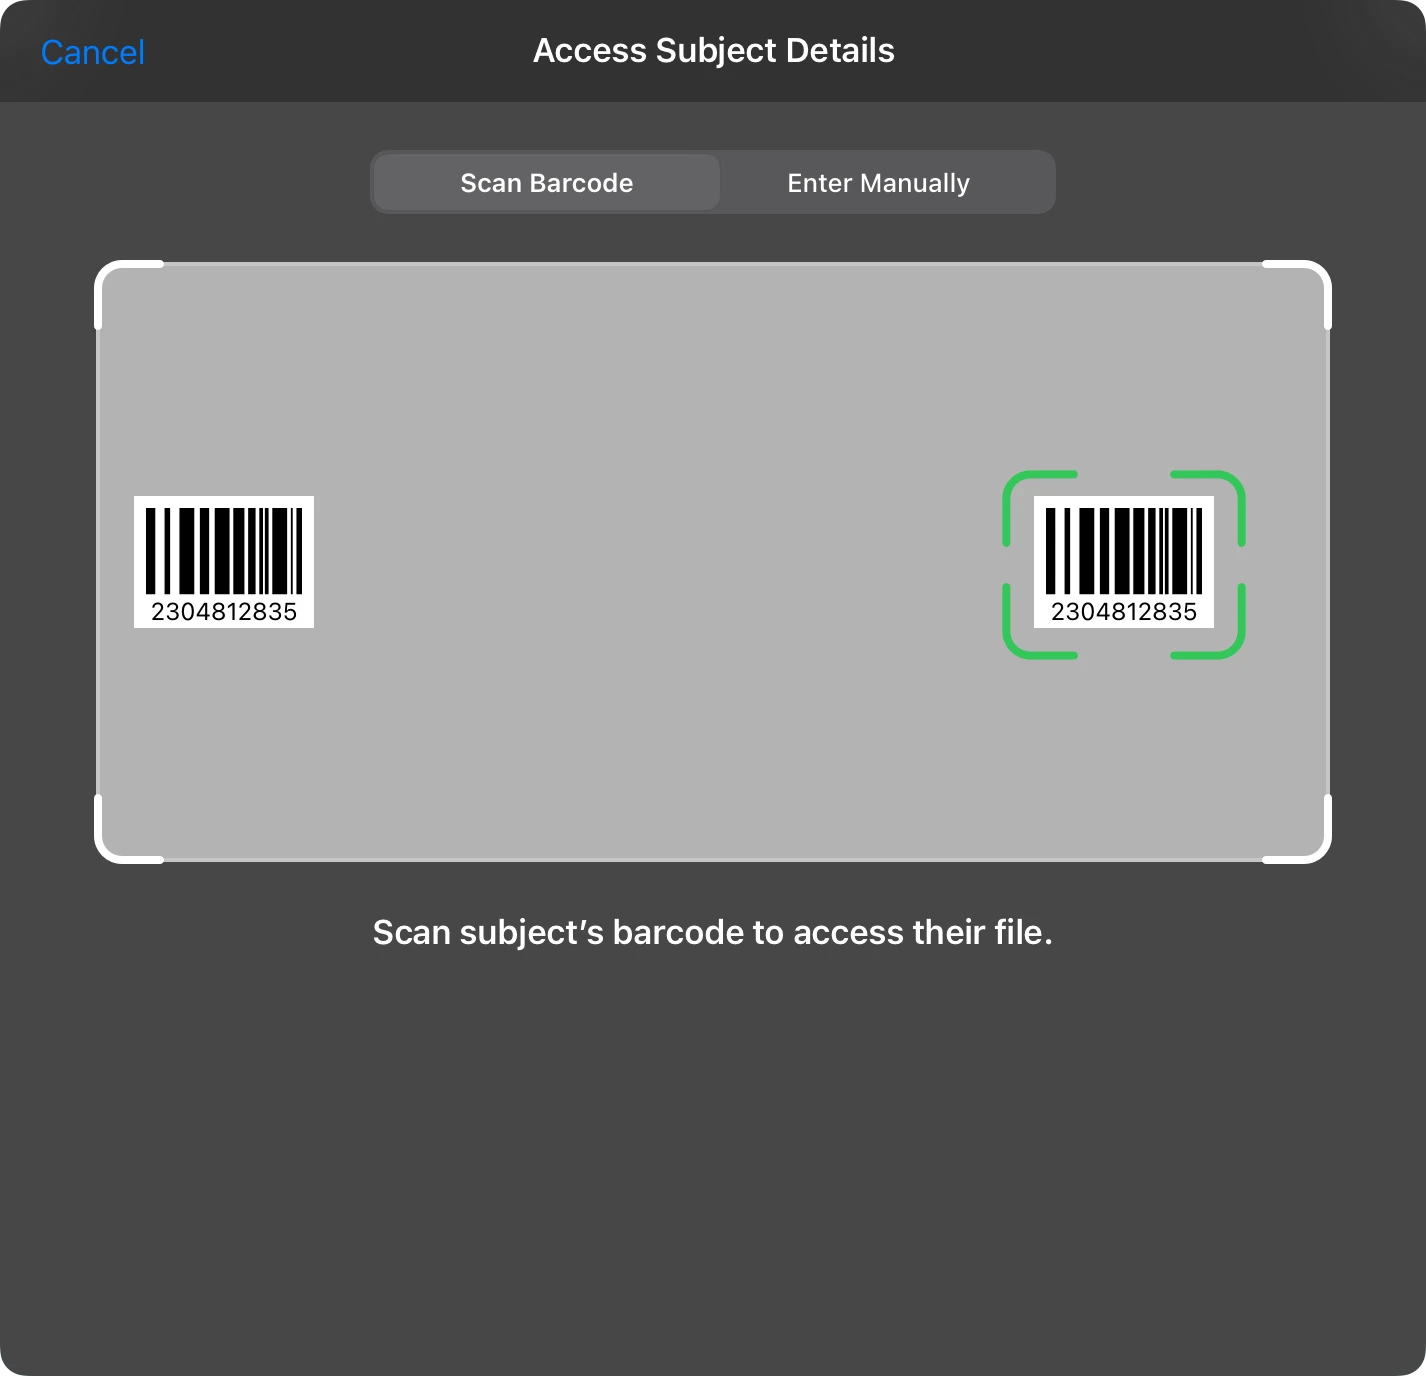
Barcode Scanning Prioritization Rules
During the ideation stage, I decided against adding a crosshair to the middle of the viewfinder window. I consulted our engineers and we decided to implement a set of rules that would determine which barcode in the frame was the intended barcode for scanning. At the time, I believed this would be a more delightful solution, as we felt confident enough that we could pinpoint the correct barcode based on the user's positioning of the device. These are the rules I defined:


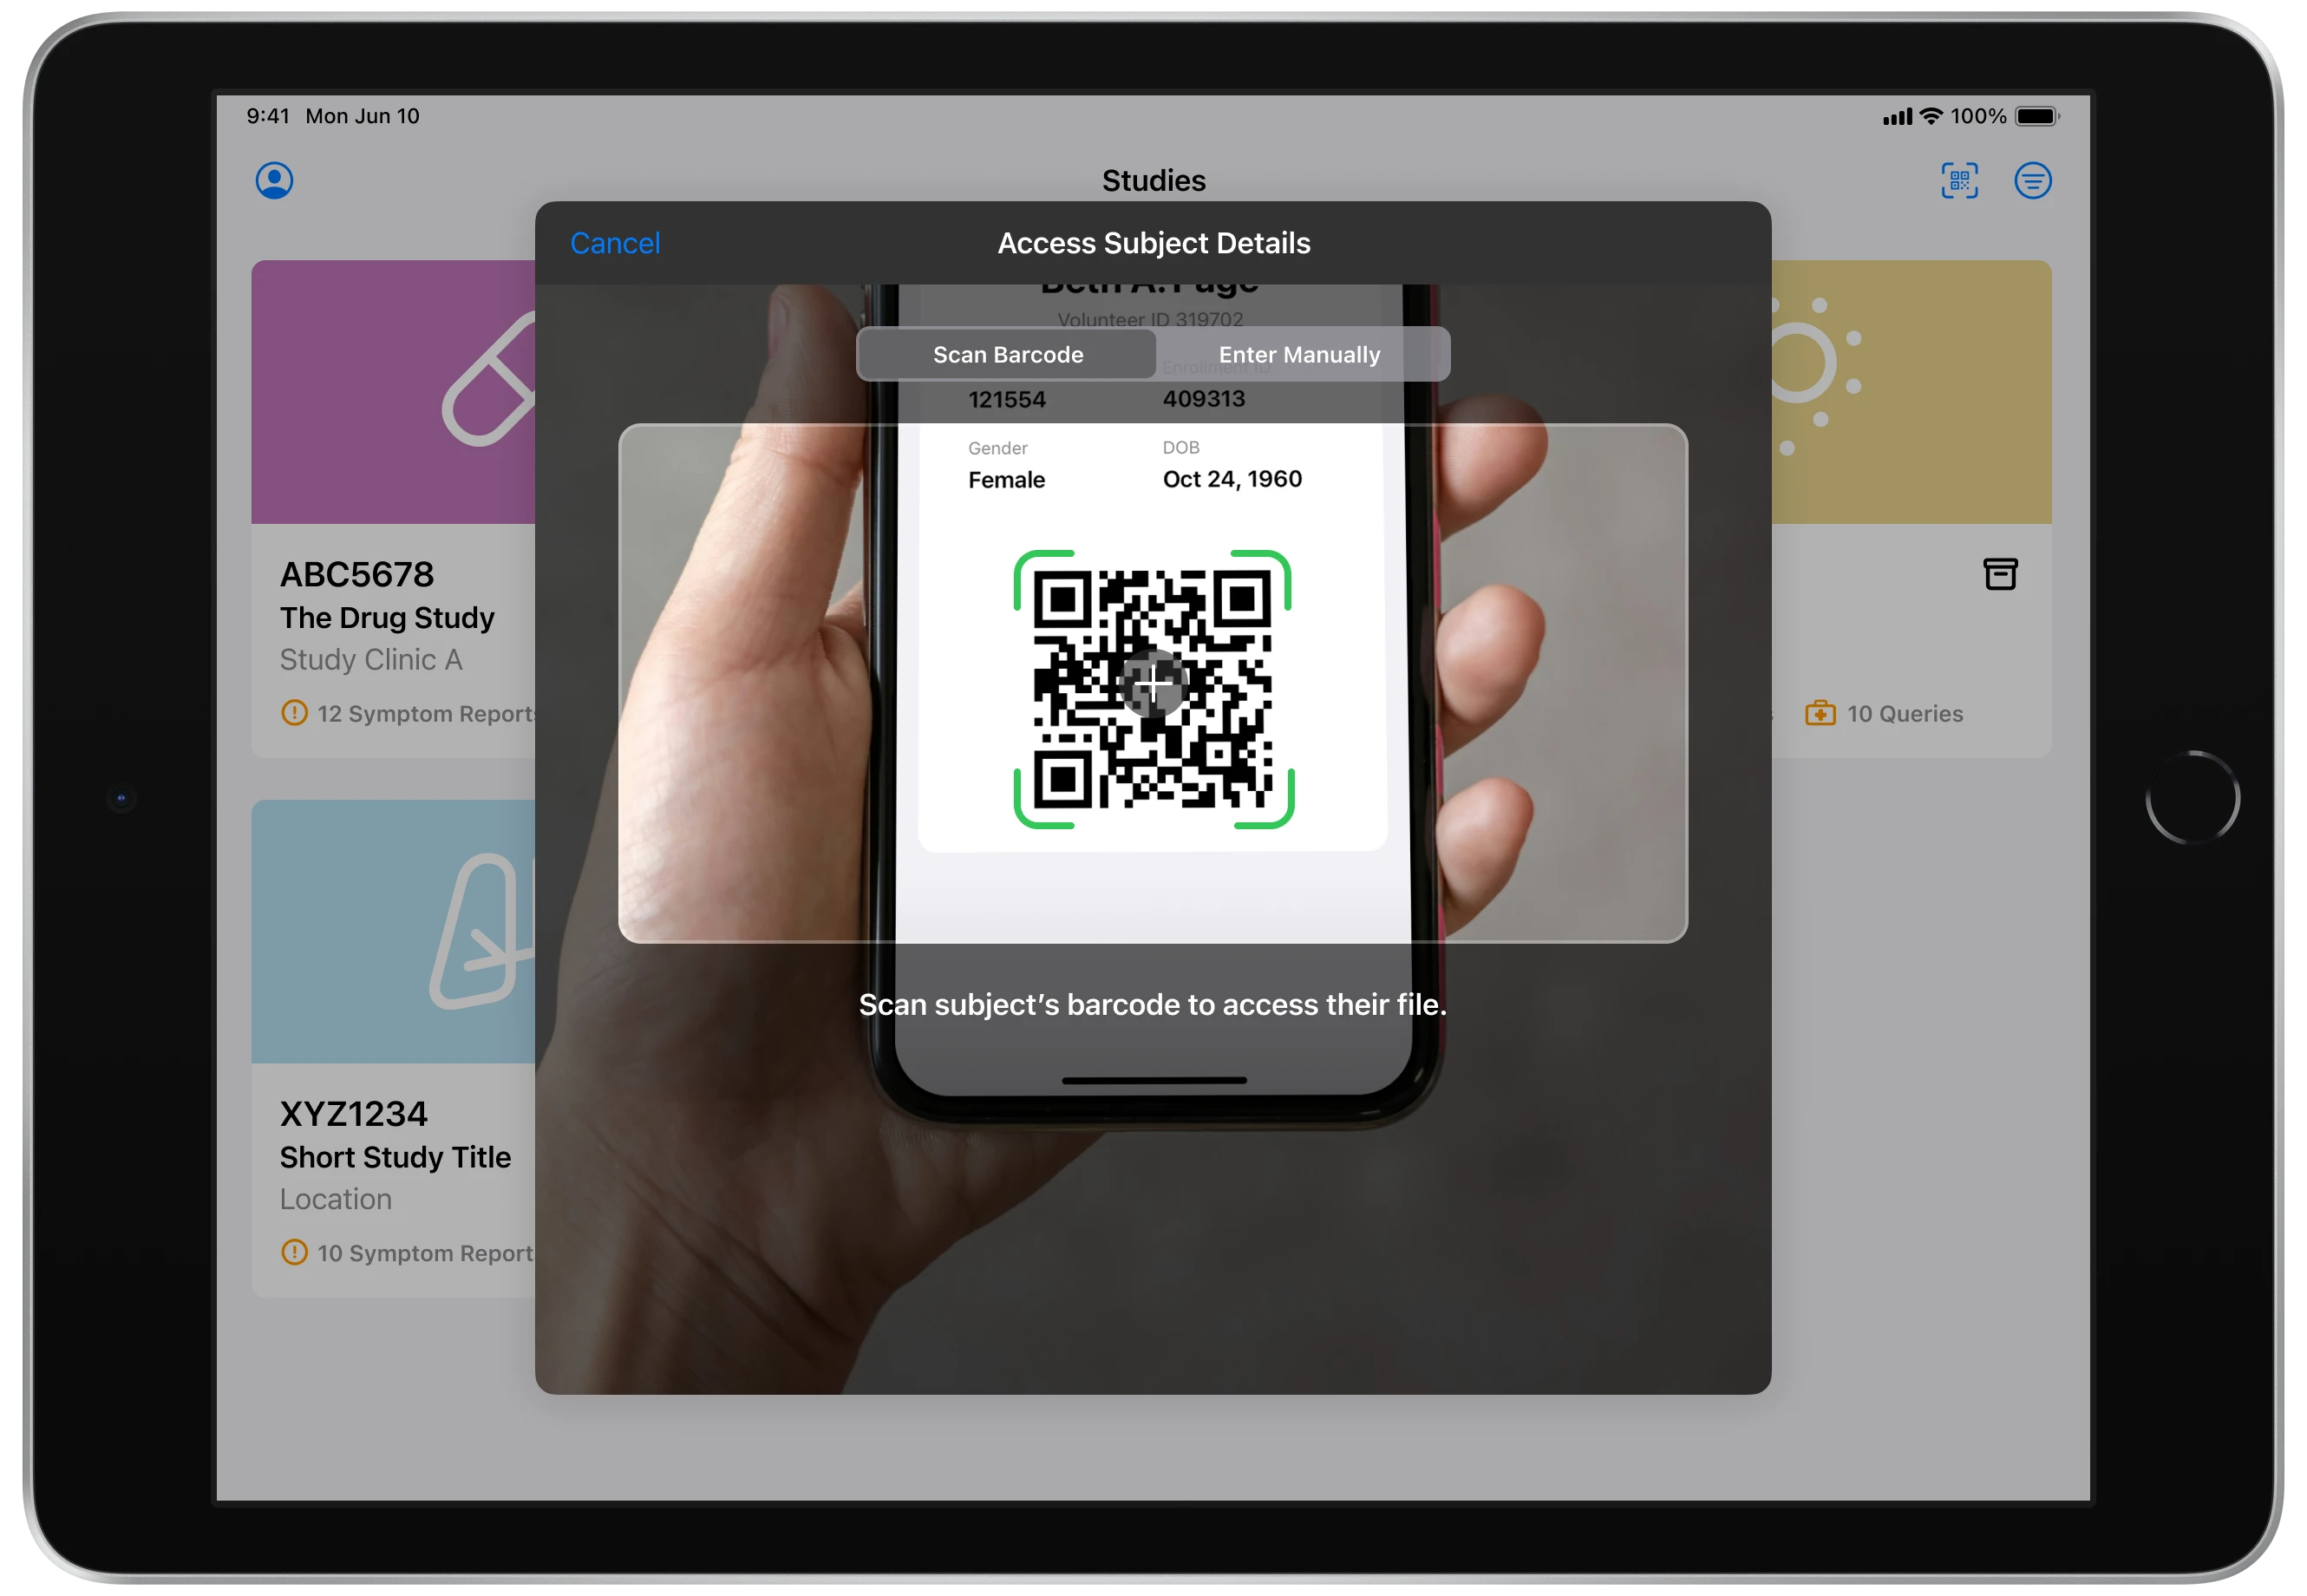
Participant App Barcodes
We were also designing a participant-facing app that would enable people to quickly pull up their barcodes for verification upon arriving at the study site. Capture's new scanning feature would work seamlessly with this new capability.
Post-Launch Refinement
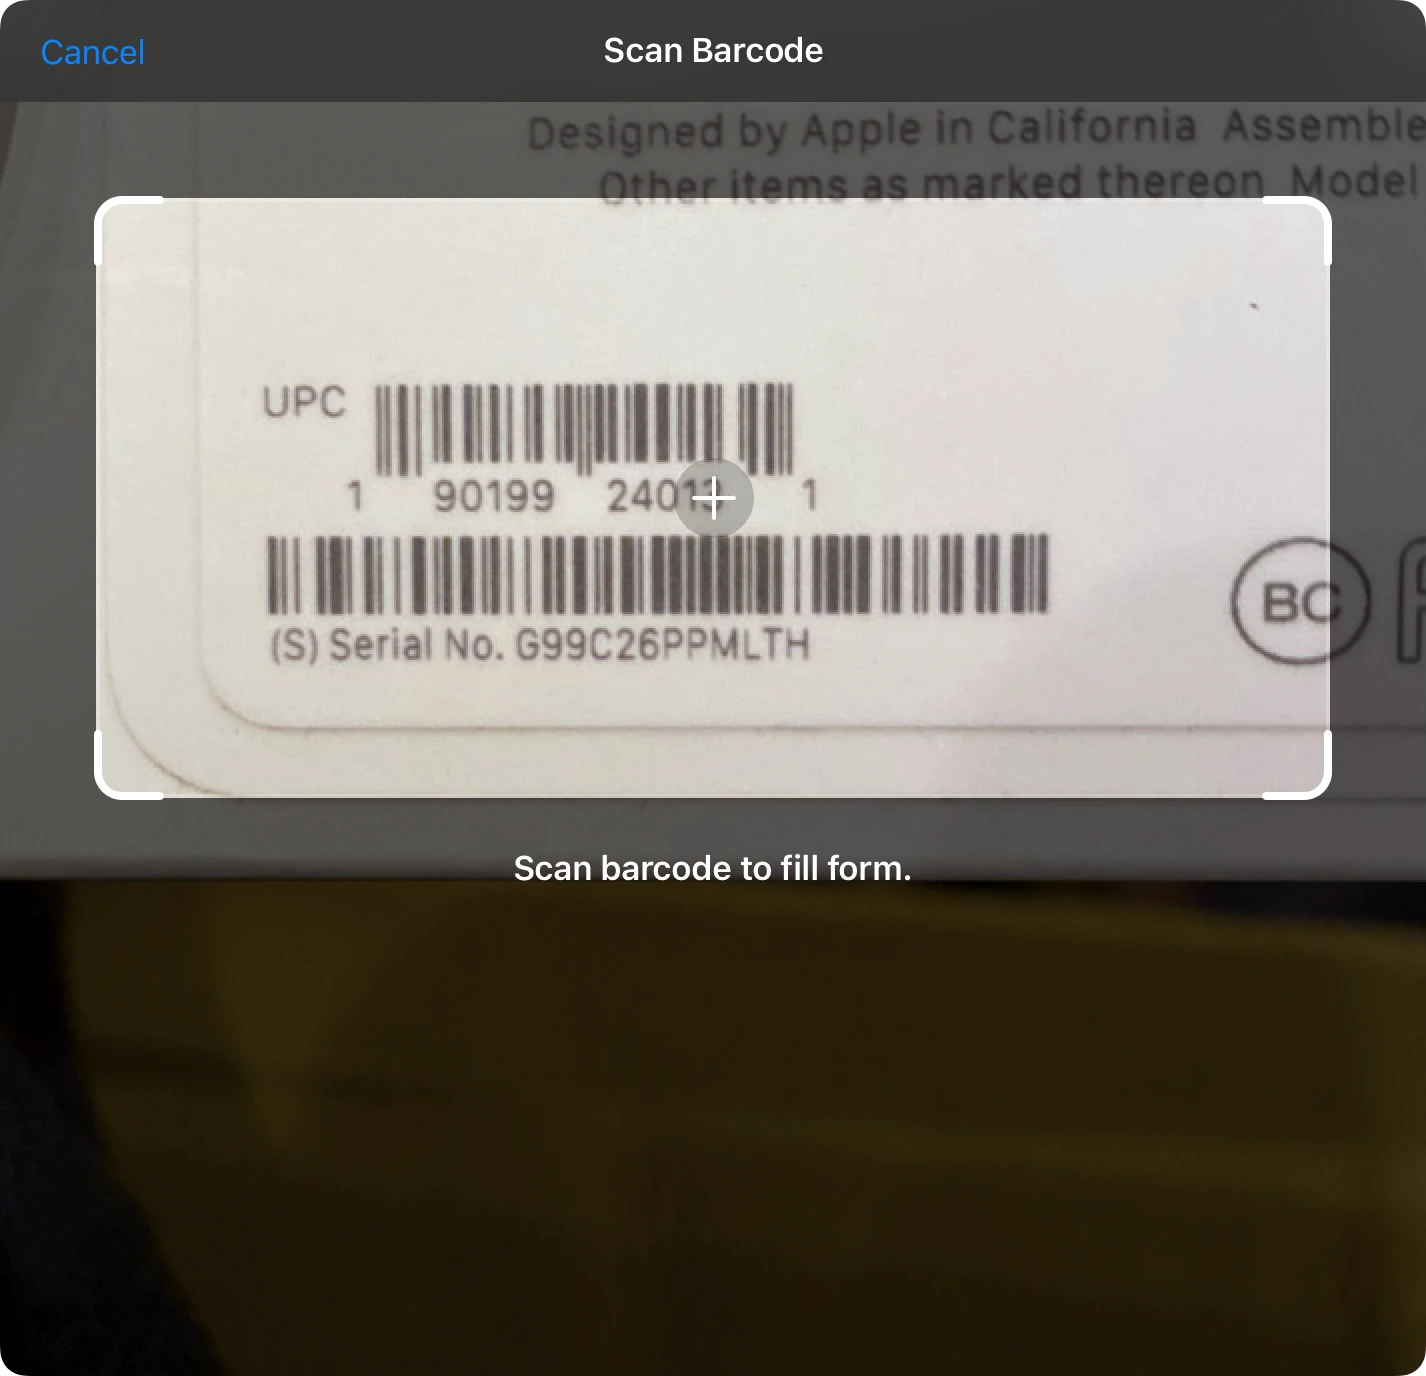
Shortly after this feature went live, we added the barcode scanning capability to "device provisioning" forms. These were electronic forms that had to be completed for every medical device that was given to a participant in a medical device study. Adding this feature was meant to enable users to log device serial numbers more quickly and efficiently. However, this use case highlighted an area of opportunity in the barcode scanner design.
Adding a Crosshair
When the use case for the barcode scanner expanded to include device provisioning, our users reported that the lack of a crosshair in the viewfinder window resulted in decreased efficiency. If the device packaging had two or more barcodes right next to each other, it was not as easy to scan the correct barcode. The extra few seconds per barcode added too much friction when the users needed to get through logging hundreds of devices.
With this feedback, we simply added a crosshair to the viewfinder window and enforced one primary rule: only scan the barcode in contact with the crosshair. This change went live and we confirmed it was an improvement over the original design.